Price: ES-1 single-track shed ($245), ES-1E extension shed ($110), or both for $325; ES-2 double-track engine shed ($295) ES-2E shed extension ($145), or both for $395. Shipping additional. Order online at www.darstaed.com
Features: First-class lithographed exterior, interior detailing, two lights in each section (mated with a connector), doors open and close
Order online from www.darstaed.co.uk
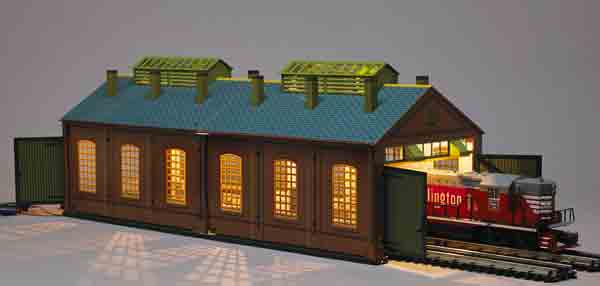
Darstaed Trains is dedicated to producing superb models evoking the best British outline tinplate trains from the pre-World War II era. But you don’t need to be an Anglophile to appreciate this re-creation of a vintage locomotive service shed. The O gauge building will look at home on a Mississippi branch line, in an upstate New York railroad car shop, or someplace along the old London, Midland & Scottish right-of-way.
We received two sheds and two extension kits: A single-track shed (no. ES-1) and extension (no. ES-1E) and a double-track shed (no. ES-2) and extension (no. ES-2E). Each illuminated shed comes complete and assembled, with doors in place on both ends. In other words, it is ready to place on your benchwork and hook up to your power supply.
If you’re happy with the basic shed, you need do nothing else. If you want a longer building, you’ll have an hour or so of work ahead of you.
The process for mating the single- and double-track sheds is virtually identical, and I assembled both. This review focuses on the double-track shed.
Opening the boxes
If you consider the pre- or postwar eras to be the high-water mark of lithography, think again. The representation of the buildings was spot-on. You have illustrated water spouts, you have intricate brickwork, especially above the shop doors (where you’ll find a brick oval with slats for a vent. The two sheds are virtually identical in detailing, except that the double-track one has a slew of chimneys to vent smoke. One neat thing about these little smokestacks is that they all have a small hole in the base of the chimney. Why? You can install a small smoke unit in the chimney and use the holes in the bottom for the wires to feed out. So, you now have it within your power to create your own “London pea souper” fog!
The shed doors come attached and are detailed on both sides. They swing freely and have a latch so you can lock/unlock the door with your fingertip. On the double-track version there is a clear plastic window frame over the entries. Affixed to this are what looks like two intakes to collect smoke from engines paused at the entrance.
The structure is brick red, and there is some interesting shading in the lithography on the sides of the buttresses where the waterspouts are “affixed” to suggest they’re mounted on three-dimensional buttresses. This provides excellent camouflage for the actual add-on buttress used to cover the merge point of the two shed components.
The side windows have plastic “glass” decorated with individual “panes.” These panes use two colors to suggest a three-dimensional element to them. The roof shingles are blue, and you will find rain gutters crimped in the ends of the roof. The two cupolas on the roofline are green with yellow side slats. There is clear plastic in the top, allowing you to peer inside.
The interior has lithography as well. The brick is “painted” a crème tone. The backside of the windows has dark brick around the top and traditional brown for the window frame and panes. Some of the clever details include a fire hose, a desk, a workbench and a callboard with the names of employees working the shift!
The buildings have cross-braces at both ground and roof level to keep everything in alignment. There are screws at the base level holding the two structures together, and the add-on buttress connects with a short cross beam you insert to mask the gap where two structures have been mated. In the end, it is a fairly strong single unit, considering most people won’t be carrying it anywhere but to their benchwork to install.
This is a well-designed product, and the execution is the nicest lithographed structure I’ve seen since I first encountered the fabled Marx freight terminal many years ago. Here are some of my thoughts after putting together both single- and double-track versions.
Making an extended shed
The extensions are identical to the completed section, except they lack doors and come with a bag of parts you need to mate the two. These bits include screws, a few nuts, rubber spacers, four buttress holders to join the sheds together, and two buttresses to cover the gap between the walls.
I assembled the single-track version first and the double-track version about a month later. Both single- and double-track sheds come with a well-written instruction booklet. Here are a few tips about the process based on my experience:
You won’t need many tools: I used a very small (think electronics or eyeglass repair) Phillips-head screwdriver, a small flathead screwdriver (used more to bend than turn), a pair of needle nose pliers, and some blue tack to keep the tiny screws and the driver head together for the first few turns.
Polyfoam end caps: Each shed comes with two Polyfoam caps protecting the ends of the building. Don’t discard these out of hand – they will be handy for keeping the shed upright during the door removal and door installation phases.
A front and a rear: Though they look alike, there is a front and a rear to the ES-1 and ES-2 sheds. The front is where the wires for the lights exit the shed. The rear (where you will remove the door) has a plug in the rafters that connects to a similar plug in the shed extension. If you manage to get it wrong, the lights are easy to remove and install in the reverse order.
My single woe: The only problem (and even calling it a problem is a stretch) I encountered was removing some screws holding cross-braces on the base of the single-track shed. My screwdriver was just a bit too long to get in a good (straight-on) position for easy use – it was slightly awkward and added no more than a few minutes to the process.
Is it right for your layout?
If you operate an ultra-realistic, hi-rail layout with custom-built buildings, possibly not. If your layout features a mix of commercially available O scale structures, you probably have a location for it to shine (and from the photos, you can see it looks great in dim light).
Here in Waukesha there are a number of structures with similar architecture styles, dated from the 19th or 20th centuries that are still in use – often as part of an industrial plant.
I’m struck by the notion the shed will make a great addition to an industrial scene as extensions of a factory or even as part of a “locomotive works” – with its long assembly lines – for you to park your O gauge demonstrator diesels. Heck, even the single-track shed would be a neat rolling stock repair shop.
The Darstaed engine shed is a quality product in a manufacturing style you may have thought was consigned to the past. The complete single-track locomotive sheds are just fine out of the box and placed in a strategic spot; better yet, they also give you the option to enlarge your maintenance yard footprint.