


There is no single right way to build a garden railroad. There are, however, lots of wrong ways. The first step in heading down the wrong path starts with the tools you choose to do the work. In garden railroading, as in any other task, there are the “right tools” for the job. You will find your time spent in the garden much more productive when armed with the correct accessories.
Before we go into specifics, let me say a few words about quality and longevity of tools. In essence, you get what you pay for. I do not suggest that you fork over the money for the most expensive tool every time, but there are times when you will want to get the best tool you can. Oddly, though, this rule applies more often to the low-tech tools than the high-tech ones, as these are the ones you’re going to use day in and day out.
Basic tools form the backbone of your construction arsenal and should be up to the task. Most common garden tools are now available with fiberglass handles. Some even have padded handgrips. These are worth the added expense, as they are virtually indestructible and won’t rot if you leave them outside in the elements. They’re also a touch lighter. Make sure the business end of the tool matches the quality of the handle, though.
Secondly, don’t compromise on the number of tools you need. If the job calls for a left-handed monkey wrench, get one. Trying to “get by” with what is on hand often leads to disaster and a trip to the store anyway. Don’t think you have to purchase every tool though. Some specialized tools can be easily rented. Begging and borrowing also works well in garden-railroad circles. Some clubs have tool libraries for uncommon-but-necessary tools. We’ll start by taking a look at the tools you are likely to need during the construction of the railroad landscape.
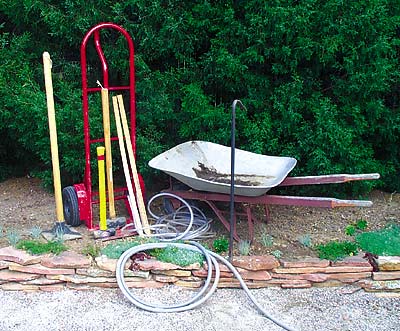
Shovel, either a spade or flat-bladed shovel will work well. Having both is better, as each has its own strengths. Flat shovels are good for edging and digging up sod. Spades are better for digging holes and moving larger quantities of dirt.
Hoe. A simple 6″ garden hoe will do wonders for making sub-roadbed trenches and similar features. The width of the blade is almost perfect for that purpose.
A mortar hoe has a much larger blade, usually 10″ to 12″. This comes in handy when you need to smooth and grade large areas of dirt. It’s usually used to mix concrete, so when you have occasion to do that, the tool will already be at hand.
A pick axe is necessary for breaking up compacted or rocky soil. It’s also useful in tilling an existing garden area.
Pruners can be used for removing small limbs from trees. They are also useful for cutting away small roots that get in the way of the sub-roadbed or other features of the railroad landscape.
Leaf and lawn rakes are used, for the most part, for the final dressing up of the landscaping. A lawn rake can be used in conjunction with the mortar hoe for forming the terrain.
The garden hose is most obviously used for watering the garden, but it also comes in handy for laying out where landscaping features are to go. Many trackplans and ponds began as lengths of garden hose lying on the ground.
Wheel barrow. Be careful here. You may be tempted to buy the largest one you can find. Instead, get the largest one you can lift! Rocks and dirt are heavy. Over-filling a wheel barrow can lead to injury, not to mention spilled loads.
Gardening hand tools, including trowels, hand rakes and tillers, weeders, a small scoop, and watering cans are all necessary when it come to planting flowers and shrubs around the garden landscape.
Plastic buckets, like five-gallon paint buckets, are great for just about anything. They hold stuff, or you can turn them upside down and sit on them. Best of all, they’re cheap. If you can’t find them lying around, go to a local construction site and ask for a few. They’re usually more than happy to accommodate.
Tape measure. Distances in the garden often exceed the 25′ of most metal tape measures, so you’ll want to invest in a 50′ or 100′ tape.
A water level is an inexpensive surveying device. These are available commercially, but can be built even more inexpensively with two yardsticks and a length of clear plastic hose (the hose should be at least v” in diameter). Using this tool is a good way to figure out height differences in the yard. Besides being cheap, a water level is easy to use.
Spray paint is great for marking where various features will go in the garden. You can buy cans designed to be sprayed upside down, in a variety of colors. A drawback to spray paint is that it is not very permanent. Once you mow the lawn, the marks are gone.
Garden stakes or flags is a more permanent way of marking where certain features will go. When bringing in dirt, these stakes will allow you to see where the dirt needs to go and how high it needs to be brought up.
A carpenter’s hammer is fine for regular construction tasks, such as building wood sub-roadbed or other structures.
A five-pound sledge hammer can be used for all the jobs that require “a bigger hammer.” This tool will drive stakes into the ground, move rocks into position, and a number of other tasks that require brute force.
A pry bar will be useful when you are trying to position large rocks.
A tamper is used to compact the roadbed once you’ve finished pouring the stone. It’s also good for compacting sand or fine stone as a base for flagstone or brick walkways. You can buy one or make one by screwing a thick piece of plywood to a large dowel.
A two-wheel dolly is a great way to move large rocks around the yard. The advantage of this over a wheel barrow is that you don’t have to lift the stone; instead, you just slide it on.
Artist’s sketch pad. I use a sketch pad for any construction notes, sketches, and ideas I have for the railroad. It’s nice to have everything in one book, so you don’t have to save the bar napkin you sketched your water feature on the night before.
A handsaw, for cutting landscaping timbers, boards, and other items that need to become shorter to be useful.
A power miter saw, or chop saw, is an alternative to a handsaw, and generally much more accurate. It’s also a lot easier on the arms. It may not have the capacity to cut thick timbers, though.
Tree saw. It’s always best to get rid of pesky branches before they have a chance to fall on the track. A tree saw allows you to remove many of these branches. Most have both a saw for larger branches and a pruner for the smaller branches.
Scissors, for cutting, of course. Find an old pair that can be kept with the rest of the gardening tools.
A steak knife comes in handy for cutting, but they’re also great for edging and weeding. Again, you’ll want to find an old one that you can designate as the gardening knife.
There will probably be other tools that you will find handy during construction, but those listed above are many of the most common ones you will likely need access to. You may already have most of these on hand. If you’re just starting out, though, don’t go out and buy all the tools at once. Get them as you need them and build up your collection slowly.
For more information on tools, download our eBook, Tools & Techniques for the Garden Railroader or Getting Started in Garden Railroading, both of which go into detail on the best tools for the hobby.


And wouldn’t the length of the hose for the water level have to be as the longest distance from the starting point to the end point?
What is v” in diameter for the water level hose?