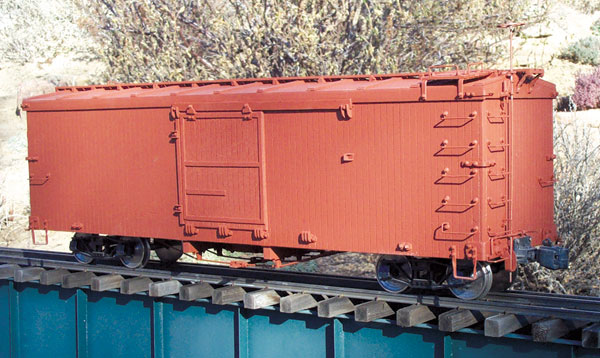
1:20.3-scale boxcar kit, less trucks & couplers
Phil’s Narrow Gauge
1008 Hampshire Lane
Windsor CA 95492-8535
Price: $75
Web site: www.philsnarrowgauge.com
Kit for a D&RGW 3000-series box car, less trucks and couplers; cast-metal parts; laser-cut or milled wood; preformed grab irons and steps; illustrated instructions. The finished car is 18″ long x 43/4″ wide x 5″ high. In 1:20.3, this is 30’5″ x 8′ 8’51/2″, respectively
Pros: Most parts are precut, predrilled, and notched as needed; easy assembly; high-quality materials; photos help with assembly; good kit for first-time builders; good level of detail; finished car is eye catching and adds interest to trains
Cons: Wire grab-iron diameter smaller than prototype
To start, I removed the minimal amount of flash from the castings with a hobby knife. The laser-cut wood parts include holes for the various detail parts and mounting hardware. There was a small amount of fuzz on some of the wood, which I removed with a few strokes of sandpaper. I used TiteBond glue for the wood-to-wood assemblies and CA cement for the metal-to-wood joints.
The instructions are divided into two sections: building the wood box and adding the wood and metal detail parts. The basic body builds up quickly, with the detail work and painting taking up most of the time required to finish the project.
The underframe comes pre-assembled, which provides a good foundation for building up the car body. A one-piece sheet of scribed wood is used for the flooring. There are a few holes that need to be drilled in the frame sills to mount the air-brake system, which consists of an air cylinder, reservoir, levers, rods, and supports.
The ends–which are notched to accept coupler pockets–and the sides are glued to the frame to form a basic box. Rafters and roof halves are then added to complete the structure. Small nails, supplied with the kit, are used for holding some parts together while the glue dries. This speeds up the assembly process.
Small brads are used to attach the cast-metal door hardware to the doors. These fit through holes in the the parts and match the cast-in bolt-head detail. Wood strips are used for the upper trim, roof slats, and catwalks. The pre-formed, brass-wire grab irons and strap steps were mounted in place with the nut-and-bolt details. The wire grab-iron diameter is slightly smaller the the prototype, but this is hardly noticeable when the car is painted. I glued the corner-brace castings, bolster tie plates, and the cut levers onto the body.
I painted the brake wheel, roof walks, doors, and coupler pockets before final assembly to assure total coverage. I used three coats of Krylon Crystal Clear to seal all of the wood parts. When the clear coat had dried, I sprayed on two coats of Krylon Ruddy Brown primer. Once dry, this particular primer resembles a faded red-oxide color, which will add variety to a string of cars painted in the more common Tuscan. Trucks and couplers were added and the car was ready to roll.
The finished car is not meant to be museum quality, but it is a well-detailed piece of rolling stock that will stand up to everyday usage. It was easy to build and, as with most kits, it would not take much longer to assemble several of these cars than just one. It also lends itself to freelancing or kitbashing and, with the doors open, it is possible to add a visible load for more interest.
For some of us there is something very rewarding about building up a kit, as opposed to operating something right out of the box. I recommend this kit to both beginners and experienced modelers as a good way to achieve that sense of accomplishment.


