


Wireless control system
Aristo-Craft Trains
698 S. 21st St.
Irvington NJ 07111
Web site: www.aristocraft.com
Price: $300; additional receivers, $105
2.4GHz wireless control system for use with track or battery power; receiver rated for 5 amps continuous, 8 amps peak power
Pros: Can be used with either track or battery power; simple installation (plug-and-play in some instances; solder pads or screw terminals for others); intuitive programming; easy to MU multiple locos to run under a single control; large display window allows for easy identification of which loco is being controlled, as well as other aspects, such as throttle setting, direction, battery, and signal strength
Cons: “All Stop” button instantly cuts voltage to the motor, which could potentially cause mechanical damage to locomotive’s gears; proprietary system, not compatible with other DCC-based control systems
The foundation upon which the Revolution is built is one of maximized functionality. It’s designed to compete with the multi-function, multi-train-control DCC controllers. However, while it is competitive with DCC in terms of functionality, this is a proprietary system and is not DCC compatible, meaning that you cannot hook up any generic DCC decoders or DCC sound systems to it. You’re limited to using Aristo-Craft’s receiver and third-party sound systems.
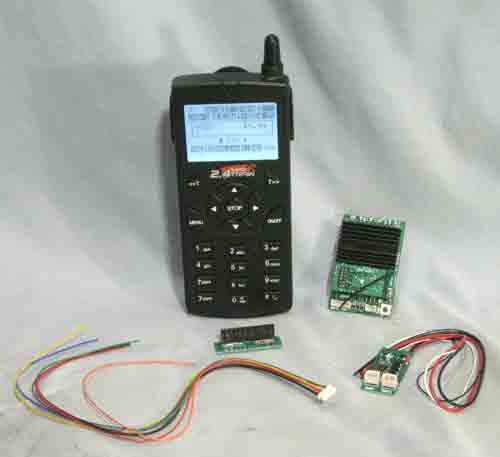
The Revolution system consists of a handheld transmitter and receiver. There are also separate circuits to handle turning on and off high-amperage accessories, such as lights and smoke units, should the user desire. A wiring harness designed to go between the receiver and a third-party sound system to trigger bells, whistles, and other features, also comes in the box. Currently the system can handle six such functions. There’s also a separate “bind” button to assist in programming locomotives to the transmitter (more on that later).
The transmitter operates in the 2.4GHz frequency range, which is used by modern cordless phones, wireless networks, and the like. It’s resistant to outside interference, so should provide good range in most environments. The handheld transmitter measures 6″ tall, 2.5″ wide, and 1″ thick, and resembles a cell phone. It’s comfortable to hold and your thumb can easily reach all the necessary buttons to control your train. It comes with a clip-on belt clip. Range on the system is good. I was able to move about 100′ away from the train, and still had a strong link between the transmitter and receiver.
The numeric keypad is used to program each locomotive with its name, road number, etc., and to control the various sound and accessory functions. Buttons above the keypad control speed, direction, which locomotive is being controlled, and allow access to the menu so you can program your trains. It also has an on/off button. (Trains continue to run if the transmitter is turned off.)
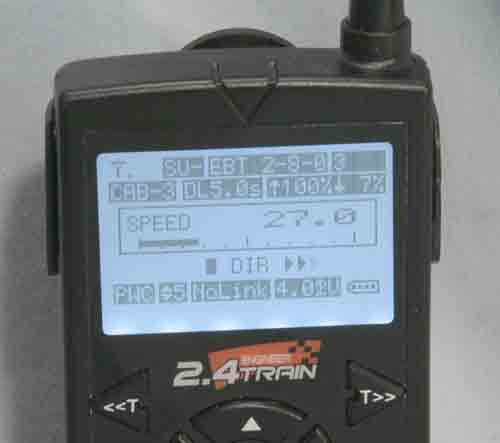
The large display window is divided into three “segments.” The top segment shows the signal strength between the transmitter and receiver. It also shows which “cab” is being controlled, (a cab can be either a single locomotive or a group of locomotives MU’d together), as well as the name and road number for the locomotive being controlled (or the lead locomotive in an MU consist). It also shows the speed-programming specifications for that particular locomotive (more on that later). The second part shows the throttle setting, both numerically as well as via a graphic bar, and the direction the locomotive is running. The bottom line shows speed increments (adjustable from 20 to 1,000 steps), whether there’s a link between the transmitter and receiver, and the strength of the battery in the transmitter. The transmitter runs on three AA cells and has a charging jack on the bottom for rechargeable batteries. (Neither batteries nor charger are included.)
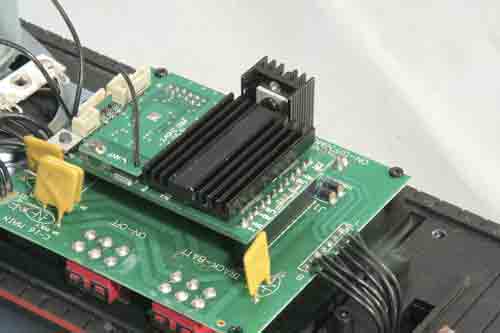
The receiver is small and plugs directly into the socket in both Aristo-Craft’s and Bachmann’s locomotives (if so equipped). For locomotives not equipped with a socket, Aristo-Craft supplies, with each receiver, a small board with solder pads on it to make wiring the locomotive simple. All that’s needed then is to plug the receiver into the socket on that smaller board and you’re ready to go. If you wish to wire in the smoke and sound controls, you’ll have to isolate which wires control those features and hook them up accordingly. The receiver is rated at 5 amps continuous draw, 8 amps peak, which should be ample for most large-scale locomotives.
With the receiver installed, you’ve got to program it with a unique address. This process is all done on the transmitter using the on-screen menu and is, for the most part, fairly intuitive.
Instructions are easy to follow (which is refreshing in a technical manual). The transmitter has 50 separate “link addresses,” numbered 0-49. It also has 50 “cabs,” also numbered 0-49. That is perhaps the most confusing aspect of this whole process. Logically, one would assign the cab number to the corresponding link-address number. I wish this was a default but, as long as you keep that in mind from square one, you’ll save some confusion. (I also wish it started at 1 and went to 50.) You give each of your locomotives its own unique link/cab number. You can then assign that link/cab number a road name and number to describe the locomotive assigned to it (i.e., “EBT 2-6-0” and its road number). There are nine spaces for the name and four for the road number. Once that basic information has been programmed in, it’s time to link that cab to the receiver in the locomotive. This is done via the “bind” button on the receiver or the external “bind” button that can be plugged into the receiver. Scroll down to “linking” on the menu, then press the “bind” button on the receiver to pair the two together and you can run the locomotive. That’s really all that’s required to get the train moving.
The rest of the programming controls have to do with how the locomotive re-sponds to the various commands given to it by the transmitter. For instance, if your train won’t start moving until a certain voltage, you can program the transmitter to jump to that voltage when the “up” button is pushed on the throttle for the first time. You can also set the top speed of the locomotive as a percentage of the full voltage. Other features include an adjustable momentum for slow starts and stops, and a programmable delay when the direction is changed while the train is in motion. (When the direction is changed while the train is moving, the train slows to a stop at a preprogrammed rate, ignoring the momentum setting.) This feature is nice when doing prototypical switching in the yard. You slow to a comfortable coupling speed, hit the direction button to go the other way, and the train slows to a stop, waits the programmed amount of time (0 to 5 seconds) for you to make the couple (or uncouple), then starts moving the other way. Other controls allow you to change the polarity of the power going to the motor (so that all your trains run the same direction), control the direction of the headlight, and also customize the function keys to best control their various functions, all of which can be changed without having to relink the transmitter to the receiver. This is a nice feature. For instance, you can quietly program the maximum speed for your locomotive to 50% before handing the transmitter to the speed-demon neighbor kid.
One of the primary functions of this control system is the ability to “MU” your locomotives so that they all run under one control, while still maintaining the ability to control each one individually when not running in groups. This is where the separation of the link and cab numbers comes into play. You assign a cab number to an MU grouping, but it does not have its own link address because it uses the link addresses of each individual locomotive in the consist to talk to that locomotive. For example, if you’ve got locomotive #1 and locomotive #2, each has its own link address and cab number. When you want to run them as a pair, you’d assign a new cab number, then designate that cab number, not as a single locomotive, but as an MU group. You can have as many as six locomotives in each group. If you wanted to run each locomotive separately, you’d merely scroll to each locomotive’s respective cab number. When you wanted to run them as a group, you’d scroll to the MU cab number, and both will respond to the same commands.
There are some caveats to this. First, make sure the locomotives are running the same way in the consist. This might require you to go into the menu settings for one locomotive to change the polarity of the motor. (I.e., if you have an A-A set of F-7 diesels, you’d want to reverse the polarity of the second unit so that its “forward” would be reversed when coupled to the other locomotive.) Second, you’ll need to try to match the speeds of the locomotives in the consist. This requires running both locomotives and using the start voltage and maximum-speed controls on one to match the second. Speeds don’t have to be perfectly matched but you’ll want to get it close, so not to overwork one motor vs. another. This is perhaps the trickiest aspect of MUing. On my two test locomotives, I was able to get speeds to match going forward fairly well, but when I put the engines in reverse, they ran at very different speeds. I don’t know if that’s a locomotive or control issue.
If you want to MU your locomotive with a friend’s locomotive running on the Revolution system, you will have to bind your receiver to your friend’s transmitter, done simply by creating a guest locomotive on your friend’s transmitter and binding it. You can then rebind the locomotive to your transmitter when you’re finished with the MU.
I mentioned earlier that, for sounds, you’ll have to install a third-party sound system. I chose Phoenix’s latest PB9 sound system, since it works with non-DCC control systems. I attached the wires from the wiring harness supplied with the Revolution to the appropriate spots on the sound board, then turned everything on. The sounds responded exactly as expected, with the function keys (1 through 6 on the keypad) triggering the bell, whistle, and brake squeal when pressed. I could easily do long and short whistles.
There is undoubtedly going to be comparison between the Revolution and DCC control. For the average user, the two systems are comparable. Each does basically the same thing. The Revolution system isn’t quite as full-featured as DCC, so the “power user” who wants to control every last light and sound on the locomotive may find it lacking in that capacity. On the other hand, the Revolution is far more intuitive and easy to program. There are no special codes to look up or remember. Everything is in plain English.
If you’re looking for a control system that will reliably allow you to run more than one locomotive at a time, and control basic sounds and lights, then Aristo-Craft’s new Revolution is a worthy choice.


I am interested in placing this into all my locos, other than the cost is their any other downsides to using the new Revolution TE?