(all scales)
DCC BitSwitch
31190 Eagle Crest Lane
Evergreen CO 80439
Prices: Timed-stop station control, $89.95; DC brake generator (needed in conjunction), $25
Website: www.dccbitswitch.com
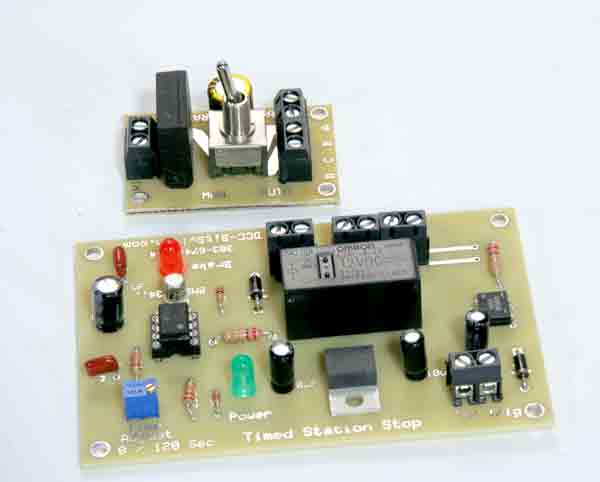
Circuit boards to provide automatic station stops for DCC-powered railroads
Pros: Wiring diagrams clear and easy to follow; simple installation
Cons: Only works on track powered, DCC-controlled railroads (DCC BitSwitch does make a “traditional” track-power version of this control); DC brake generator control not universally compatible with all DCC decoders, requiring purchase of more expensive (but more universal) “Set Speed Zero” control
DCC BitSwitch makes a wide range of automated controls for DCC-controlled railroads. These can automatically throw switches, stop and start trains, control crossing signals, control traffic through single tracks, and more. I wouldn’t say the list is endless but a survey of the company’s web site certainly gives some insight as to what the products can do. Indeed, I had the pleasure of spending an afternoon at the home of the company’s owner, where he demonstrated what these products can do for automated train control. (And yes, it is cool sitting in the living room watching N-scale trains run by themselves in the coffee table.)
The systems work on the premise that many DCC decoders, when they stop receiving DCC instructions (i.e., are running on “straight” DC), will automatically slow down and stop. So, if you have a way of “turning off” the DCC instructions going to a section of track, you can automatically stop whatever train is on that track. The speed at which the locomotive slows to a stop is dictated by the settings on the decoder in the locomotive.
The wrinkle in the equation is that not all decoders are programmed (or can be programmed) to slow and stop when they lose a valid DCC signal. That’s why there are two separate components to the system being reviewed—the electronic circuit that does all the fancy automation, and a second board, called a “brake generator,” that generates the “stop” command that tells the decoder to slow down. It’s this latter board that is really the key to success. Two of the three available boards sell for $25 each, and are relatively simple in terms of how they operate. Alas, they are not universally recognized by all DCC decoders. (Only two of the three brands of decoders I tested worked with the “Brake on DC” brake generator supplied for review.) The “universal” solution is more expensive ($85) but, instead of relying on the decoder’s ability to shut down in the absence of a valid DCC signal, it sends a specific DCC “stop” signal to the track. (This is similar to hitting “all stop” on your DCC throttle—it will stop any locomotive, not just one specific address.) Note that all of the “brake generators” have the ability to easily bypass the stop commands, so you can run your railroad without any automation, should you desire.
The good news is that you only need one “brake generator.” It feeds as many automated controls as you have on your railroad. The output of the brake generator is fed into the automation control. Each automation-control board feeds one section of track. This is the other key. If two locomotives are on the same section of track when one of them triggers the “stop” command, then both locomotives will stop.
If you want multiple locomotives to be controlled automatically but independently, you must divide your railroad into separate blocks—at least one for each locomotive. Wiring diagrams with examples are shown on the company’s website.
Back to the specific example provided for review—the timed-station-stop board. This board will automatically stop a train in front of a station when a switch is triggered. DCC BitSwitch provides inconspicuous magnetic reed switches that work well. The locomotive runs around the railroad until it passes over a switch. This triggers the automation-control board to switch to regular DC (or send the “stop” command), and the train slows to a stop in front of the station, where it will remain for up to two minutes. At that point, the board switches back to “regular” DCC, and the train accelerates again. There’s an adjustment on the board that allows you to set the duration of the station stop. You can have as many triggers wired to the board as you have stations.
Wiring these boards is simple. Screw terminals on the boards are clearly marked, and the accompanying wiring diagrams and instructions are clear and easy to follow. I set up a small loop of track and quickly hooked things up. I used some double-sided tape to stick a small (18″ diameter) rare-earth magnet to the underside of my locomotive, which proved adequate to trigger the switches.
When the engine triggered the magnetic switch, it slowed as expected. A minute or so later, it came back to life, accelerating per the decoder’s setting. It’s important to note that the “brake on DC” aspect of a decoder is dependent on the polarity of the track. In other words, while the train will slow and stop when going one direction, it will not, when going in the other. This is by design. A train headed east approaching a station on a stretch of track would hit the trigger, then slow down and stop in front of the station. A train headed west on that same track would pass the station, then pass over the trigger. You wouldn’t want the westbound train to then slow and stop in the middle of nowhere, so the directionality of the “brake on DC” command keeps that from happening. The train will continue at its preset speed, though the track itself is not carrying DCC signals and you cannot change the speed or trigger other functions for whatever time you have dialed in. For a railroad running in “automatic” mode, this momentary deafness isn’t an issue, as you’re not typically actively running your trains anyway. The train can cruise on autopilot for a few minutes and not cause too much trouble.
DCC BitSwitch offers a few of their more common-function boards in “analog DC” versions, such as the timed station stop and siding controls for running multiple trains into and out of passing sidings and around the railroad, and running multiple trains on one track. Installation is a little more complicated, since you’ve got to wire more isolation blocks and things of that nature, which you don’t have to do with DCC, but they’re available and, ultimately produce the same end results.
Automation can add a lot to a garden railroad, especially one that’s designed to be more ornamental than interactive. These automation circuits can give you the flexibility to do some really cool things that will have your guests wondering “how’d you do that?”


