Empire Rail Works
1532 E. St. Mark’s Ct.
Salt Lake City UT 84124
See website for pricing
Website: www.empirerailworks.com
Laser-cut steel and mahogany Chicago “L”-style elevated railway platform; suitable for suspending from ceiling
Pros: Clean, sturdy construction, simple assembly, neat overall appearance
Cons: None
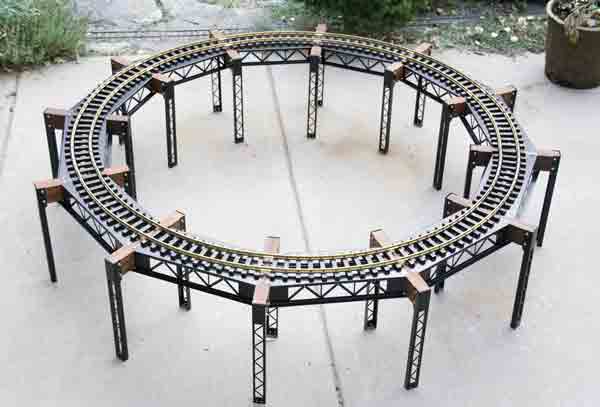
The system is designed as a dual-purpose “elevated” railway; if you invert the risers that would normally raise the track off the ground or table, they serve to suspend the track from the ceiling, making a sturdy and decorative way to run your trains overhead.
The modular design allows for single- and double-track mainlines, and is available in 4′-, 5′-, 8′-, 9′-, and 10′-diameter circles. The double track girders are available in 4’+5′-, 8’+9′-, and 9’+10′-diameter combinations. Straight sections run 12″, 15″, 18″, 21″, and 24″. The girders are laser cut from 18-gauge steel, and the cross beams CNC milled from mahogany. The cross beams can be ordered for 1-, 2-, 3-, and 4-track widths, along with extra lengths for station platforms.
When I opened the box, I found everything for the sample (a single track, 4′-diameter circle) neatly wrapped and packaged. The instructions are on one sheet, and are fairly self-explanatory. All the metal parts were clean and painted satin black. The laser cuts were clean and there were no really sharp edges that I would consider worrisome. The mahogany posts were likewise clean and smooth, with a rich, dark mahogany finish. If you were modeling an actual elevated railway, you might repaint the structure olive drab for a more prototypical look but, as it comes, it’s a nice-looking presentation and, given its dual purpose as a ceiling railway, the black and mahogany would complement most interiors very well.
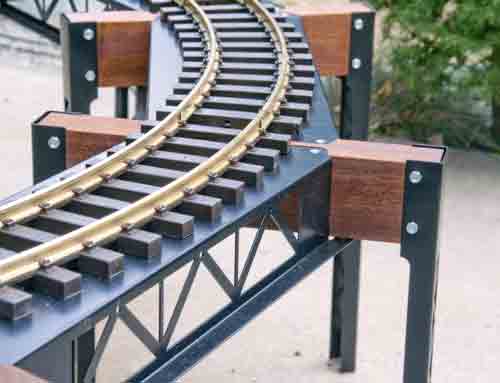
I started by laying out the mahogany cross beams and girders. Cross beams have notches milled into them into which the girders rest, so it’s pretty simple to dry-fit the pieces before screwing everything together. The manufacturer includes 12″ wood screws for attaching the girders to the cross members, with countersunk holes in the girders so the screws lie flush with the surface. The pre-drilled holes in the cross members make it easy to use a regular Phillips-head screwdriver but, with eight screws on each beam, your wrist is going to get tired fast. I used a cordless drill with the clutch set at its lowest setting, and breezed through assembling the small circle in a fairly short time.
The girders also have holes on their undersides so you can attach them to the cross beam from the bottom, though there are no pilot holes drilled for that purpose. With the risers in the inverted position, and taking into account the height of the track, there is nearly 10″ of clearance to the ceiling. With the risers in the “elevated” position, there’s about 10″ underneath the girder—ample for running another track under the elevated section.
Once the main ring was assembled, I added the risers. As I mentioned, you can either mount them so they raise the track off the ground or invert them to create a “U” shape, with the cross beams and girders at the bottom. You can then use the manufacturer’s mounting brackets (sold separately) to hang the assembly from the ceiling. These vertical supports are attached to the cross beams by 2″-long 6-32 screws and nuts. (Hint: get yourself two 14″ nut drivers, or at least a nut driver and box-end wrench, to simplify tightening these.) Most bolts went through very easily, though one or two did need a little friendly persuasion to run through both sides of the brackets. At that point the structure is ready for the track. There’s no provision for physically attaching the track to the girders. That’s up to you.
Once assembled, the structure is very sturdy. I didn’t try walking on it, but my three-year-old son had a good time pushing his New Bright train around the circle of track. He’s not exactly the pinnacle of grace and dexterity, and the girders withstood that onslaught without issue.
Overall, this is a pretty cool thing. It’s not a scale model of an elevated railroad girder but it has enough detail to evoke the structure. I can definitely see this in an urban scene, with a trolley, doodlebug, or similar commuter-type passenger train running over it. It’s also good-looking enough to be a stand-alone support for a Christmas layout or other temporary display. And there’s lots of room under the “L” for presents!