


CVP Products (Airwire)
PO Box 835772
Richardson TX 75083
Price: $132 (internal antenna); $138 (external antenna)
Website: www.cvpusa.com
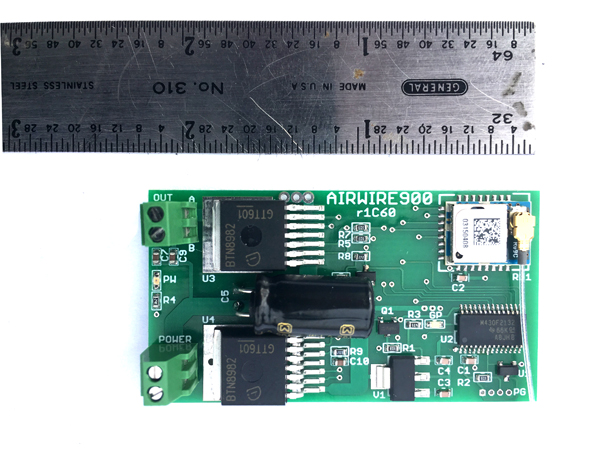
Convertr-60; 6-amp wireless DCC receiver for battery R/C. Dimensions: 2.4″ x 1.2″
Pros: Easy installation; good range; high current capacity; able to use all 17 available Airwire frequencies
Cons: No polarity protection on battery input
The Convertr-60 receiver is at the high end of what is now a line of three receivers. The original Convertr has been renamed Convertr-25 and a smaller version is called Convertr-15. The Convertr-60 has a continuous-current capacity of 6 amps, the Convertr-25 is rated at 2.5 amps, and the Convertr-15 comes in at 1.5 amps. The Convertr-60 can handle momentary current spikes as great as 55 amps, according to the company’s literature. I don’t have any locos that draw 6 amps, nor did I want to spike the current to test these capacities.
I’m always pleased to see new ways of being able to use the latest generation of DCC decoders in a wireless battery R/C (increasingly referred to as “deadrail”) environment. The notion that I can get a receiver and hook it up to any generic DCC decoder and be off and running is pretty remarkable. At a time when we’re seeing an increasing number of locos available factory-equipped with DCC decoders pre-installed, this makes converting them to battery power an absolute breeze. (I’ll get to that in a bit.)
At 2.4″ long x 1.2″ wide, the Convertr-60 is fairly small for its capacity. That’s about the same size as many large-scale DCC decoders so, in terms of the space required, you could easily piggyback one on top of the other in cramped spaces if need be. The unit comes in two varieties: one with an internal antenna, and one with a roughly 3″-long external antenna. The latter is good for installations in brass locomotives, where the metal construction may otherwise shield the radiosignals from getting to the decoder. You can drill a hole and extend the antenna outside the brass shell. For plastic-shell locomotives, the internal antenna will work well. I’m reviewing the external-antenna version here.
The board comes with two sets of screw terminals. One side is for battery power in, the other side is for DCC out. The board can accept battery voltage from 8V to 24V maximum. Airwire says the board is “optimized” for 14.8V, though that’s likely more just a reflection that many folks who run battery R/C use 14.8V Li-Ion battery packs. It’s important to note that the battery input is polarity sensitive. According to the literature, if you hook the battery up backward, you will kill the unit and such damage is not covered under their warranty. The polarity is clearly marked on the board. The other set of screw terminals is the DCC output that goes to the decoder. This side is not polarity sensitive, as the DCC signal is an AC (bi-polar square wave) signal.
When power is applied to the board, a green LED illuminates to indicate it’s receiving power. If the receiver is receiving a valid signal from an Airwire transmitter, a red LED will illuminate. If there is no valid signal from the transmitter, the Convertr will not send any signal to the DCC decoder.
The Convertr must be set to a frequency that matches that of the transmitter, and also a DCC address that matches the decoder it’s running. By default, the Convertr comes set to frequency 0 and DCC address #3. It’s not imperative to reset either of these to another value, though most people program the decoder in a locomotive to the road number on that locomotive. The instructions walk you through the frequency- and address-setting process.
Operationally, the Convertr is invisible to the user. In a track-powered DCC environment, you use the handheld controller to communicate with the central command station, which then sends the commands through the rails to the onboard decoder. With the Convertr installed, the handheld transmitter communicates wirelessly to the onboard receiver in the locomotive, which then sends the commands directly to the DCC decoder that is paired with the receiver. The only difference is that the wireless communication is unidirectional, so if you’re programming CVs on the decoder, you cannot have the decoder read back the values to the transmitter. You would need to hook the decoder up to a traditional command station or PC to do that.
When programming the Convertr, know that you will program the same values to CVs on both the Convertr and the decoder attached to it. This shouldn’t be an issue, as the Convertr has mostly the standard DCC CVs, which you’d need to program on both anyway. The exception may be CV 200, which sets the frequency. When programming the frequency of the Convertr, check the documentation that comes with your decoder to make sure there’s no CV 200 that you may inadvertently reprogram. (You can disconnect the decoder from the Convertr when programming CV 200 if there is a conflict.)
The subject for this installation was an LGB track-cleaning locomotive that had a factory-installed DCC decoder onboard. There was ample space under the hood of the locomotive for the Convertr, and the battery fit nicely in the cab. Converting this loco to wireless control was a simple matter of connecting the Convertr to the battery (via a power toggle switch), then finding the two wires providing track power to the existing DCC decoder, removing them, and replacing them with wires from the DCC output of the Convertr instead. You could easily wire in a switch to toggle between the two if you wanted. Instead, I just taped the ends of the old wires and left them in place, should someone down the road wish to convert the loco back to track power.
I found the range to be sufficient for reliable operation in my backyard. One feature Airwire advertises is that if/when the receiver does go out of range (in a tunnel, around a corner, etc.), certain functions, like whistles, will automatically shut off, so those sounds don’t get stuck on until the receiver regains contact with the transmitter. I’ve not found that to be an issue with any of the wireless DCC systems I use so it’s hard to say how effective that feature is.
Overall, I’m pleased with this board. It’s great to see more options become available for wireless, battery radio-control systems and this board performs as well as any other I’ve used.


Kevin: I saw the review for the diesel board in this months GR and found this as recommended. Have you added sound to the AirWire receiver? If so, what do you like?
Can this be used with track powered trains?