News & Reviews Product Reviews Thorely Miniatures signal-box kit

Thorely Miniatures signal-box kit

By Marc Horovitz | April 21, 2017

| Last updated on November 3, 2020


Large-scale resin kit

Email Newsletter

Get the newest photos, videos, stories, and more from Trains.com brands. Sign-up for email today!

resin_kit1
Marc Horovitz
Large scale signal-box kit
Thorley Miniatures
Penllain, Rhydcymerau
Llandeilo, Carmarthenshire SA19 7RP
United Kingdom
Price: £39.99 + s&h
Website: www.thorleyminiatures.com

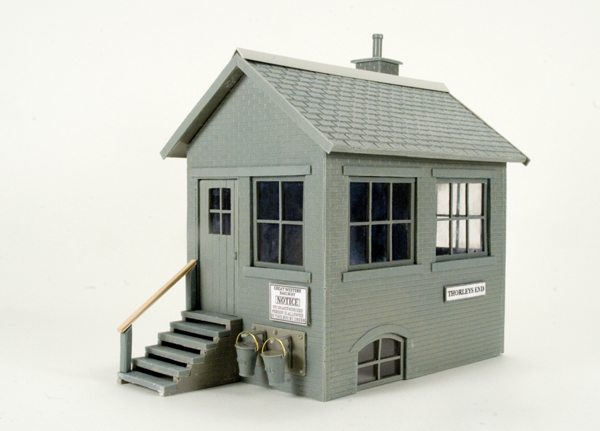
Thorleys End Signal Box; suitable for 16mm, 1:20.3, 1:22.5, and 1:24 scales; all-resin kit; instructions and window glazing included; extra details and color guide included. Dimensions of finished model (not including steps): 8 1/4″ x 6″ x 7 1/2″

Pros: Highly detailed kit; well thought out; good-quality resin castings; goes together well; attractive finished model

Cons: Assembly instructions are text only—no drawings or in-progress photos

resin_kit3
Marc Horovitz
resin_kit2
Marc Horovitz
Thorley Miniatures is a British company that offers a wide and growing range of structure and accessory kits. The company specializes in cast-resin kits that are complete—no additional parts or details are necessary. Kits are supplied unpainted.

Sent for review was a generic model of a small British signal box, or what we would call a switchman’s tower, although this model is not a tower. It portrays a basic brick structure with steps leading up to the door, windows, a chimney, and a shingle roof. It might be adapted to any number of different uses—a yard office, for instance. Also included are various detail parts, like fire buckets and signage, and some short sections of 1/32″ brass rod.

The instructions are text only—no photos or drawings of various steps. They begin with a short list of required tools and end with a color guide that included no less than 13 suggested colors for the various pieces. American modelers may have a little difficulty with some of the British terminology. For instance, “sugar soap” (TSP) and “barge boards” (the cosmetic trim pieces applied to the ends of the roof gables).

Construction begins with washing all of the parts in TSP. I suppose any good degreaser would suffice to remove any remaining mold-release residue. This was followed by going through each part and removing any flash. There are a surprising number of parts for this relatively simple structure. Although the castings were pretty clean, there was a little flash on each part that required removal and/or smoothing. Once that was done, assembly could begin. Super glue (CA cement) is recommended. I used both a semi-thick glue and the water-thin variety.

Construction commenced with the walls. A little additional smoothing of the inside surfaces was necessary for a good fit. Masking tape was helpful in temporarily holding the wall sections together. The roof was then glued into place. I added the barge boards next. In this case, a diagram showing exact placement would have been helpful but I figured it out. The roof ridge was next, a piece of 3/8″-styrene 90° angle. The roof sections come together at around 70°, so the fit of the ridge angle is not all that might be desired. However, when the building was finished, the discrepancy was not that noticeable. The chimney, which is composed of three parts, came next.

In the interest of saving time I did not paint the review structure. This would have been the time to paint it. Acrylic paint is recommended. You can follow the color guide or do what you please. Windows are glazed by gluing their backsides to a provided sheet of acetate, then cutting them apart. The instructions say to paint the windows after they are glazed but I think it would make more sense to do it beforehand. Cleaning up the windows with sandpaper and a file took a little time. They then had to be fitted to their proper holes. Some fit right in while others took a good bit of sanding, as per the instructions—especially the lower, round-top windows.

The stair assembly is composed of the brick side pieces and six treads to be glued on top. This was the only significant problem in this kit’s assembly. When finished, I found the stairs to be too tall for the doorway by about a brick and a half. I reduced the height on my belt sander and all was well. The stair rail is composed of two uprights and the railing itself, all resin castings that required cleanup. The railing came out of the mold with the bottom surface quite convex. To flatten it properly so that it would sit on the uprights correctly looked like a real pain, so I substituted a piece of wood instead, which I think is less prone to breakage anyway.

On the face of the building is a plate with brackets that hold a pair of fire buckets. I discovered that the 1/32″ wire was intended to be formed into bails for the buckets, so this I did. The buckets had to be drilled to receive the bails.

The provided signage was glued to its resin backing plates, which were then glued to the building, and the project was finished. The resulting structure looks quite good. It is robust and will stand up well to the elements. No interior detail is provided and the insides of the walls are rough, but an enterprising modeler could provide an interior, which would be visible through the large windows. With a nice interior, the building would be a good candidate for lighting, as well. 

I’m not sure I’d recommend this as a first-time kit for those who have never built a cast-resin model, especially given the rudimentary instructions. However, for those with a little experience, the model goes together well and the end result looks great and would be an interesting addition to any garden railway.

You must login to submit a comment