Brandbright Ltd.
Unit 3
Holland Business Park
Holland Way
Blandford Forum, Dorset
DT11 7TA
United Kingdom
Price: £57.50 + s&h
Website: http://brandbright.co.uk
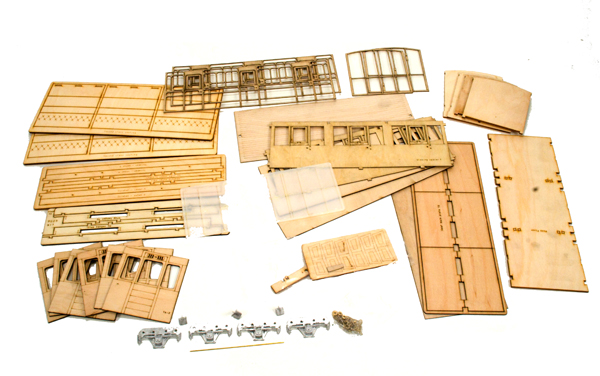
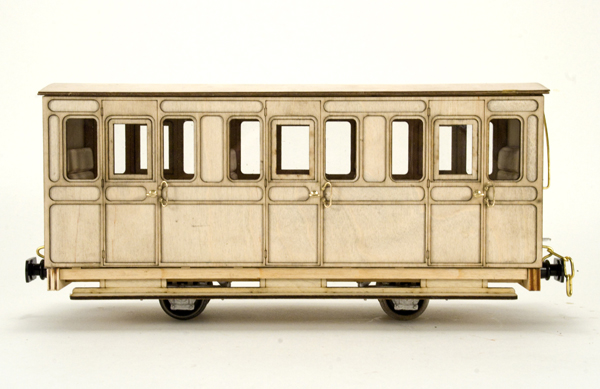
16mm scale, all-wood coach kit (#PS23); white-metal and brass detail parts; supplied without wheels and couplers; laser-cut wooden parts; tab-and-slot construction; window glazing; full interior; painting guide; waterslide transfers included; written instructions with drawings
Pros: Well designed and produced kit; adequate, well-illustrated instructions; color guide; precision laser-cut parts; parts fit together well; logical construction sequence; extra decals included; nice-looking finished model with good weight
Cons: None
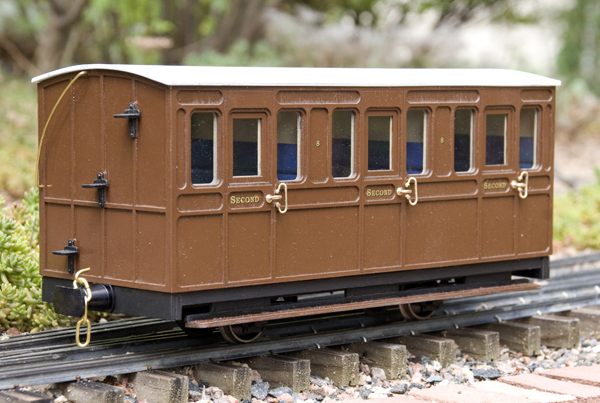
This is a freelance model, though typical of British narrow-gauge practice. The coach is a four wheel, three-compartment vehicle that can be built for gauge-0 or gauge-1 track. Wheels and couplers are not supplied, so the builder can use whichever ones are preferred. In order that I be able to complete the kit, Brandbright kindly sent along a set of gauge-1 steel wheelsets (#RSA139/1, £8.00) and a pair of nicely rendered, blackened aluminum, center-buffer couplers (#RSA45, £5.80). These are “dumb” (unsprung) buffers.
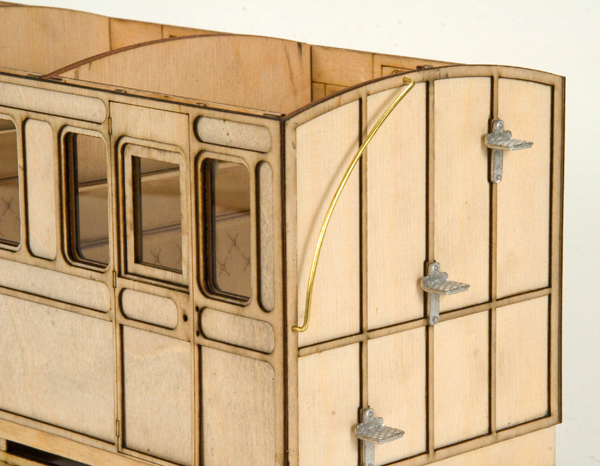
The kit is mostly of laser-cut plywood in three different thicknesses. The laser cutting is clean and crisp and major parts have their part numbers etched in to aid in assembly (these are concealed later). Also included are white-metal axleguard (journal box) and step castings, brass bearings for the wheelsets, and lost-wax-brass door handles and grabs. The brass castings were quite clean; the white-metal ones required some flash cleanup.
Supplied with the kit are six pages of instructions that include both text and nicely done drawings. These include a description of the coach, general discussion of
building techniques, glues, and suggestions, followed by a detailed painting guide and instructions for applying the included waterslide decals. Extra decals are included in case of accident. A complete parts list precedes the actual assembly instructions.
Construction of this coach is interesting—it’s done in layers. The end panels are comprised of two layers each, while the side walls are formed of four layers. Even the roof is made up of two layers. The result is a car that has the depth of paneling as well as the wall thickness and interior detail of a full-size coach. It also has heft when complete and it tracks well.
Assembly is straightforward. In the interest of time and clarity of photos, I chose not to paint the coach for the review. However, if you are building it to become part of your roster, this approach is not recommended. The instructions are clear on this point and, in various places, they tell you when to paint the parts. If you are unsure about the colors, a color guide is provided. A full-size coach, even one that is simply painted, still comprises many colors. Using the full recommended color scheme will give you a finished product with depth, character, and authenticity. (I did paint mine afterward.)
The instructions are clearly written and are supplemented with excellent drawings, including an exploded drawing of the entire vehicle. Each part is numbered, which can be checked against the parts list.
Construction begins with the floor and frame, followed by the end walls and partial side walls. With the exception of the metal bits, all of the parts are precision laser-cut plywood. A modicum of sanding is necessary on most parts just to clean them up a little. The parts are cut in sets, held onto the sheet by an outer framework, or fret, from which the parts must be separated. They are held in place by tiny tabs of uncut wood. These can sometimes be broken but, more often, should be cut apart with a hobby knife. All parts fit together well—I had no trouble at all with assembly, although there is a certain amount of sanding and fitting required for perfection.
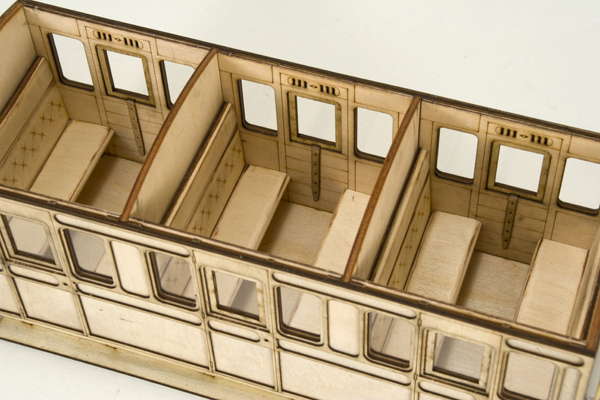
The kit features a full interior. It has three compartments and each compartment has two facing bench seats. Interior compartment walls have detail cut into them. The most work in the kit, I found, was rounding off the seat cushions, which are supplied basically as wooden blocks. Each of the six seats has three cushions (one seat, one back, and one headrest), each of which has two edges that must be sanded round to to make them more cushion-like. This means a total of 36 edges that must be rounded. The instructions suggest doing this by hand using a sanding block, which would produce very good results. I got reasonable results using a belt sander. Even the seat backs have laser etched pleats and buttons, which, when painted, aid in the realism of the cushions.
Painting the coach really enhances its looks, especially if you follow the color guide in the instructions. I was pleased with the way our review sample turned out. The windows are large enough that the interior can be easily seen, so the time spent on a good paint job is well worth it.
I liked this kit. It is not difficult but is not a snap-together kit either. It takes time, diligence, careful adherence to the instructions, and patience. If you have those things, you’ll end up with an excellent generic model of a British narrow-gauge coach, with full interior detail. It rolls well, has a solid feel, and looks right. Recommended.


