Q: What are the drawbacks of extruded-foam insulation board benchwork? Much has changed with model railroading since my childhood. As a retiree, I’m re-entering the hobby with a modest HO scale layout in a 10 x 15-foot room in my garage. I’ve consulted several articles, books, and videos on benchwork, but I’m still uneasy about my plans. I just completed basic benchwork using a modified L-girder framework with 1/2″ plywood tabletop. I was initially going to just lay cork roadbed and track on top of the plywood. But now I’m considering adding 1″ or 1-1/2″ extruded-foam insulation board on top of the plywood to let me create ditches, small streams, or other terrain features without having to lower the plywood. This will probably add some additional difficulty with laying roadbed, track, and under-track switch machines. Is this a reasonable approach? Do you foresee any other issues or problems? – Barry Kenyon
A: Extruded-foam insulation board benchwork is no longer considered an experimental or innovative model railroad scenery material; it’s been around long enough to be considered mainstream. Model Railroader staffers use it on most of their project layouts. The reason is that it’s light, rigid, conveniently sized (in 4×8 sheets and 2×4 “handy panels”), and easy to cut, shape, and glue.
As you mentioned, foam makes it easy to carve out below-grade scenic features like drainage ditches, culverts, waterways, and underpasses. The biggest drawback to extruded-foam insulation board benchwork is availability. Since it’s sold primarily as a construction material to insulate buildings against the cold, it can be hard to find in hotter climates.
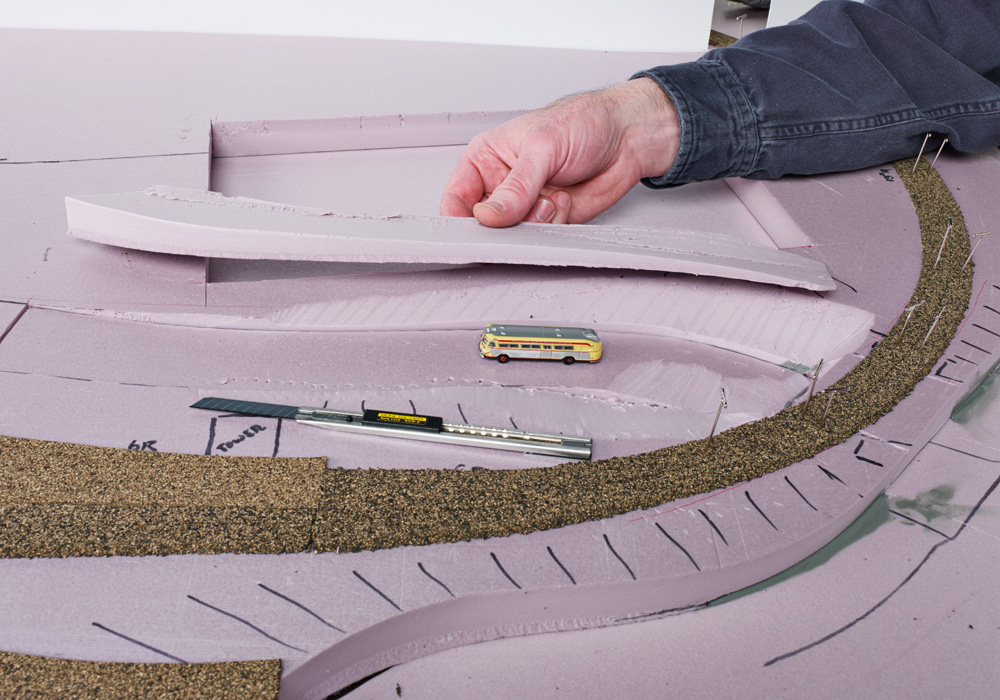
Just because you can’t use nails to hold down your track on extruded-foam insulation board benchwork doesn’t mean track laying is harder on foam. We usually fix cork roadbed to the foam using a foam-safe construction adhesive caulk like Liquid Nails for Projects or Loctite PL 300. Simply run a bead of adhesive caulk down the future track centerline, spread it thin with a putty knife, press the roadbed into the adhesive, and use foam nails (T-shaped pins; see the photo above) to hold it in place while the adhesive cures. Once it’s cured, use the same technique to glue your turnouts and flextrack to the roadbed. Just make sure to drill holes for your switch machine actuator wires before gluing down the turnouts, and don’t get the adhesive under the switch rods.
If you add foam to the top of a plywood table, you can still use under-table switch machines. Most switch machines come with an adjustable fulcrum you can slide up or down to adjust the distance the end of the wire moves when the machine activates. Adjust this so the end of the actuator wire’s travel isn’t excessive. Test your switch motor before attaching it permanently; if your machine is mounted more than a couple inches below the turnout, you might have to replace the actuator wire that came with the machine with a length of stiffer piano wire. Also called music wire, this is available in 12” lengths from the manufacturer and through hobby vendors like Walthers.com. Use a hardened-metal cutting plier and wear eye protection when you snip it to length. Music wire will ruin rail nippers and sprue cutters, and the cut ends can go flying.
But all-extruded-foam insulation board benchwork isn’t your only option. For better control of your track elevations and easier mounting of switch motors, you could use the traditional open-grid benchwork with plywood subroadbed on risers. Then, fill in the empty spaces between the subroadbed with foam terrain. This hybrid approach gives you the best of both worlds.
For more about using foam benchwork, check out Lance Mindheim’s article “Bench tops made easy with foam” in our July 2012 issue.
Send us your questions
Have a question about modeling, operation, or prototype railroads? Send it to us at AskTrains@Trains.com. Be sure to put “Ask MR” in the subject.


For adhesive you can buy the correct foam adhesive wherever you get your foam board, it is very cheap and has a long working time. Just run a bead then flatten & spread it with a 1″- 2″ putty knife. Weight whatever you are gluing down for 24 hours. Laying track is a dream. Do NOT glue the track down! If using Woodlands Scenic foam roadbed use dress makers pins to hold the track in place (I didn’t use cork anywhere on this layout but pins will work with that too) until you are sure everything runs smoothly for a couple of months, then apply ballast in the normal manner. After all is dry remove your pins instead of leaving spikes etc. stuck in the middle of ties.
I recently built an 11’x13′ (+ 2’x4′ closet yard) bedroom layout using 2″ pink insulating foam because I plan to move in the future and wanted something lightweight when the time comes for the move. Noise is the only drawback, use a good roadbed material to damp sound. I experimented with laying track directly on the foam and cutt edge ditches to give the appearance of raised roadbed. It looks great and works fine, but the faster the trains run on it the louder they get. It is always available though Lowes or Home Depot no matter where you live, and I recommend the 2″ x 4′ x 8′ which is dirt cheap compared to plywood these days. A basic open frame approach is the way to go, which is nice because it is much lighter to move and much cheaper to build than L girder. I used 1×3 cross members and 1×4 facia on 24″ centers. I anchored the rear to the studs in the wall using kitchen cabinet screws, and supported the front with 2×2 legs every 4-6 ft. Foam sheet comes scored for easy snap breaking down the middle and along the length at several useful intervals. The best way to cut incline track sub-bed wedges, and very nicely curved inside/outside corners is with a bandsaw (or substitute a Sabre saw with a long blade). A razor knife works well for long, straight cuts, and you can score both sides 1/2″ deep or so and then snap it to break it. Shaping certain depressions and ditches can be done with a torch for interesting effects before paint is applied.
For the adhesive to attach cork roadbed to the foam, I’ve been using a product called Styrogoo made by HotwireFoamFactory. Seems to work pretty good & you have adjustability of the roadbed for a decent time. Seems easy to remove the roadbed if need be by using a putty knife. You don’t have to go nuts with it either – a little works good. I use foam push pins (t – shape – Woodland Scenics I think) to hold it down.
“Since it’s sold primarily as a construction material to insulate buildings against the cold, it can be hard to find in hotter climates.”
Not necessarily so. I live in the Los Angeles area (Burbank, to be specific), and there are a multitude of sources for extruded foam insulation board here. Remember – just as it can insulate against the cold, it can also insulate against the heat. And in a area which routinely sees 100F+ temps in July, August & September – that’s important.
Foam is not flat !
I like extruded foam, but note that it often is not as flat as it seems. The extruding process or the slicing of the foam into thinner slabs can produce a subtle wave especially into one side.
We built portable HO Free-mo modules using foam and it provides extremely light-weight modules. One module had the wavy side up, and the mainline track undulated up and down unnoticed. A pair of 60′ cushioned auto-parts box cars (Walthers or Intermountain) would occasionally uncouple just before or after the peak of the wave. Trouble-shooting the uncoupling problem finally uncovered this flaw. Some long locomotives and passenger cars also did this trick. Yes, the couplers were at the same proper height. Equipment with high or low couplers also commonly uncoupled at this wave.
I have noticed most foam pieces have 2-3 waves per 8′ slab sheet.
I’ve also noticed that some modelers lay their track on a narrow plywood inserted into a slot cut into the foam surface. This helps with several problems – spiking/nailing, noise, and flatness.
Reynold
– Puyallup
I personally don’t use it because it radiates sound. It’s pricey and doesn’t hold spikes. Yes it is easy to cut for scenery and that is the only thing I use it for.