Q: I have some HO scale passenger cars that I would like to install LED lights into. I’m new to model railroading. I understand that I need decoders in each car, but after that, I’m lost. – Alex Laserson
A: If you want to install passenger car interior lighting, you don’t absolutely have to use a Digital Command Control (DCC) decoder. A bridge rectifier can convert the rails’ alternating current (AC) to direct current (DC), and a resistor can lower the voltage to a level safe for whatever bulbs or light-emitting diodes (LEDs) you plan to use. You could even power the lights with button batteries, like those used in wristwatches. But if you want to be able to control the lights in your passenger cars – turn them on and off with a DCC throttle command – you’re right, you will need a decoder.
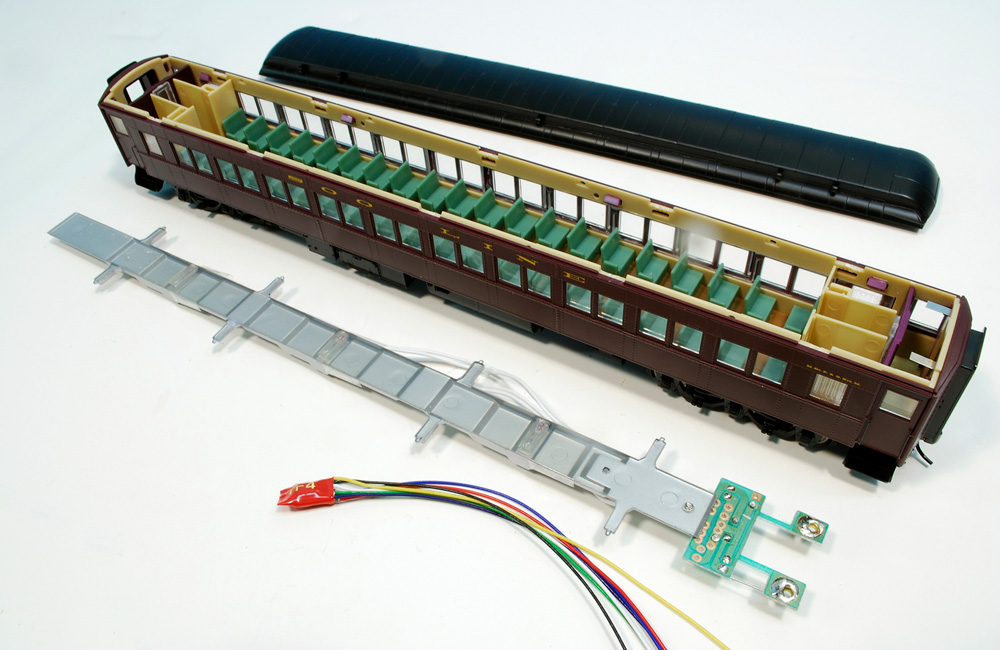
A decoder is a computer on a chip that converts the square-wave AC of Digital Command Control to power for a locomotive’s motor, light(s), and speaker(s) in accordance with commands carried on the rail voltage. While the decoders most often used in locomotives are multifunction, you can also get smaller, specialized decoders that handle fewer functions. What you’re looking for is a lighting-only decoder, which usually has two to four outputs.
Installing passenger car interior lighting with a lighting-only decoder isn’t complicated. Starting at the bottom, you’ll need to pick up the DCC power from the rails. Many passenger cars these days come with metal wheelsets and electrical pickups installed. If yours don’t have these, you can upgrade your car with trucks that have pickups (such as these from Rapido Trains). Alternately, you can replace your wheelsets with metal ones and craft pickups from phosphor-bronze wire. This is the best option if your car has trucks for which pre-wired replacements are not commercially offered. (To see how, read “Decoder-controlled caboose lighting” in the March 2006 Model Railroader.)
Once you get current into the car, read the documentation that came with your decoder and figure out which wire does what. If your decoder follows National Model Railroad Association (NMRA) Standard 9.1.1, the wires for rail power will be red and black. Connect those to the truck pickups. The common wire for lighting functions will be blue, and the white wire is used for the front headlights in a locomotive. Since a passenger car doesn’t have headlights, use this wire for the interior lights, so you can turn them on and off with a simple press of F0 on your DCC throttle.
Use a digital multimeter to test the output voltage between the blue and white wires, then calculate the size of resistor you need to drop that voltage to the level needed by your lighting kit. The formula for this is Ohm’s Law: V = I x R, where V is how much of a voltage drop you need, I is current in amps, and R is the resistance in ohms. You might want to use a slightly larger resistor than the formula calls for to keep your lighting from being unrealistically bright. (This will also make your bulbs or LEDs last longer.) Connect this resistor to the white wire between the decoder and the lighting unit.
For a more detailed walkthrough of how to install passenger car interior lighting with a DCC decoder, check out Mike Polsgrove’s “DCC Corner” columns in our April 2011 and November 2013 issues.
Send us your questions
Have a question about modeling, operation, or prototype railroads? Send it to us at AskTrains@Trains.com. Be sure to put “Ask MR” in the subject.