How To Build a Model or Structure Scratchbuild cars for the American Freedom Train

Scratchbuild cars for the American Freedom Train

By Rene Schweitzer | July 1, 2024

Email Newsletter

Get the newest photos, videos, stories, and more from Trains.com brands. Sign-up for email today!

The most recent version of the American Freedom Train (AFT) was assembled to help celebrate the United States’ 1976 Bicentennial. The complete train, which visited all 48 contiguous states over a two year period, had a total of 23 pieces of rolling stock, including passenger cars, showcase cars (with full-scale historical artifacts, like the Lunar Rover on loan from the Smithsonian), display cars with smaller artifacts, and flatcars to carry the concession carts and vehicles. The AFT was pulled by different locomotives, depending on what part of the country was being visited. Historical pictures of the entire roster is viewable on this website: freedomtrain.org

Commercial large-scale equipment

red white and blue model train on garden railway
1. No. 4449 hauling American Freedom Train passenger, showcase, and display cars on the author’s railroad. This story describes the construction of special cars to match commercial coaches. Raymond Parent photo

The only manufacturer to offer somewhat prototypical equipment of the 1976 AFT for gauge-1 track was MTH, with their Railking line in 1:32 scale. Their offerings included the 4-8-4 Gs-4 Southern Pacific Daylight Nº 4449, several identical passenger cars (with different car numbers), and an observation car—all in the AFT’s red, white, and blue livery. Photo 1 shows my Nº 4449 steamer pulling a several commercial MTH AFT passenger cars as well as the showcase and display cars described in this article.

drawing of model car side
Marc Horovitz illustration

After purchasing the commercially available passenger cars, I wanted to add to my AFT fleet by scratchbuilding a few of the display cars and the two showcase cars used in the original 1975-1976 Bicentennial excursion. What follows are the details of how these cars were designed and built.

Preliminary construction of car components

I used basswood for all framing as well as for the solid roofs, since it is readily available and relatively easy to work with. Floors, sides, and end walls were made from 1/8″ Lite Plywood from Balsa Wood Inc.

od piece
2. A blank plywood side wall. Raymond Parent photo


jig saw cutting square shape in wood
3. Window openings were marked in pencil, then holes drilled for inserting the scrollsaw blade. Here, two sides have been cut by the scrollsaw. Raymond Parent photo


cut out opening in piece of wood
4. The finished rough-cut opening. Raymond Parent photo

I began by making a drawing of the important dimensions of my existing MTH passenger cars, as seen in figure 1. The overall height and length of the plywood sides were then cut on a table saw, while the wheel wells were cut using a Dremel scrollsaw. The first side-wall piece can be seen in photo 2.
Next, the side-window holes for each of the cars were cut out. I based their respective sizes on measurements from prototype photos found online, adjusted to 1:32 scale. Rough openings were cut out with the scrollsaw as shown in photos 3-4, then framed with 1/8″” x 1/8″” strips of basswood (photos 5-6), which were glued in place with Titebond III glue. Note that the showcase car differs from the prototype, since it has three, three-bay windows rather than the three, four-bay windows of the original. I made that choice for ease of construction.

partially finished model car side
5. Preliminary window framing on a display-car side has been installed. Raymond Parent photo


partially finished model car side
6. Similar preliminary window framing on a showcase-car side. Raymond Parent photo

Next came the final window framing. I cut and glued, with Titebond III, 1/4″ x 1/8″8″ basswood for the external window framing of the showcase car. The framing left about 1/16″ of the preliminary framing exposed, as shown in photo 6, completely hiding the scrollsaw cut. This can be clearly seen in progress in photo 7. The rest of the framing pieces were cut and glued after the decals were applied.
This process was repeated for the display cars, utilizing 1/2″ x 1/8″” basswood, reflecting the larger window frames used on the original converted baggage cars.

partially finished model car side
7. Partial external window framing on a showcase car. Raymond Parent photo


illustration of floor of model car
Marc Horovitz illustration

While the window frames were in various stages of construction, I was able to assemble the floor framing, using the same 1/8″” plywood and 1/4″ x 3/8″ basswood. All pieces were pinned and glued as above. Figure 2 and photo 8 show the completed floor-framing details.

underside of model floor frame
8. Underside of the floor, showing the floor framing. Raymond Parent photo

The floors’ topsides were left blank in the display cars, since they are not visible from the outside, while the floors of the showcase cars were covered with 3 1/2″-wide pieces of 1/4″ sheathing to simulate 8″-wide floorboards (photo 9). After staining with Minwax “Golden Oak,” the 3 1/2″ bands were not noticeable, especially when viewed from outside the cars.

underside of model floor frame
9. Showcase-car floorboards prior to staining. Raymond Parent photo

The roof

drawing of roof of model train car
Marc Horovitz illustration


piece of wood with markings on it
10. Roof cuts marked on the blank end. Raymond Parent photo


table saw cutting a piece of wood
11. Making the 17° cut on the table saw. Raymond Parent photo


table saw cutting a piece of wood
12. Making the 31° cut on table saw. Raymond Parent photo

The last major components were the roofs. Since I wanted to match the rounded roof of an MTH AFT passenger car, I drew its profile and determined the required straight cuts that would closely approximate the profile. Figure 3 shows the end result. The inner shape depicts the original AFT car roof profile, while the middle shape shows the required straight cuts to approximate the curvature. I used a 1″ x 3 3/4″ piece of solid basswood and made the 17° and the 31° cuts the entire length of the roof with a table saw, which can be seen in photos 10-14.

wood piece next to yellow sander
13. A roof (left), cut to shape, prior to sanding. The sander is on the right. Raymond Parent photo

Photo 13 shows the roof profile (left) after all four cuts from the table saw and prior to sanding, along with the power sander that was used to smooth the curvature, while photo 14 shows the curved roof after sanding.

piece of wood
14. The sanded basswood roof, prior to painting. Raymond Parent photo

Finally, all painted/stained components are shown in photo 15 prior to assembly. All painted surfaces were sprayed with Rust-Oleum “Painter’s Touch” primer prior to the following applications: White side walls and window trim were spray-painted with Rust-Oleum “Painter’s Touch” Semi-Gloss White; end walls and floor undersides were spray-painted with Rust-Oleum “Painter’s Touch” Flat Black; roofs were brush-painted with Martha Stewart Living Polished Silver Metallic Paint (#343-560); the two showcase-car floors were brush-stained with Minwax “Golden Oak” (#210B).

pieces of model cars on white background
15. Wooden car components for the four cars prior to assembly. Raymond Parent photo

The black end walls, with cutouts to accept the diaphragms from MTH, are at the bottom of the photo, while the rest of the window-framing basswood is shown uncut. The black floor in the left set shows the car underside, while the light, unpainted floor in the second set from the left shows the top of the floor of the display car. The two stained floors in the right-hand sets are for the showcase cars.

Preliminary car assembly

four assembled model cars
16. The four cars, assembled. Raymond Parent photo

The four respective cars were glued with Titebond III and pinned together with Grex 23-gauge pins. The assembled cars are shown in photo 16. I added 2 1/4″-long pieces of 1/2″ x 1/2″ basswood in each of the inside corners to strengthen the overall assembly. The solid roofs are held in place by a friction fit, with the recesses seen in photo 14. Note that I brush-painted the bottom of each side wall with Apple Barrel “Too Blue” acrylic paint (#20771) to match the decals that were applied next. I used FrogTape-brand masking tape to ensure a clean break with the white paint.
Decals

All decals were made using commercially available clear, waterslide, ink-jet decal paper and a conventional HP printer. The decal design was accomplished with the “Shapes” option within Microsoft Word. Following is a brief step-by-step description of how the car bottom decal was designed using this option:

1. I first created the red stripe at the proper height.
2. Then I added the blue stripe, correctly spaced below the red stripe.
3. Finally, I added the three white stars. This was the finished product prior to printing on clear inkjet decal film.
I sprayed the printed decals with Krylon Clear Acrylic Coating to protect them from water absorption during application. After all decals had been applied and set,
I sprayed the entire car with the same acrylic coating to help mask the decal edges. Then the .005″ PVC-film window glazing was cut and glued to the interior with five-minute epoxy. MTH trucks, with their truck-mounted couplers, were screwed into the floor bottoms to match their commercial passenger cars.

Finished car details

red, white, and blue car on trestle
17. Completed showcase car Nº 40. Raymond Parent photo


red, white, and blue car on trestle
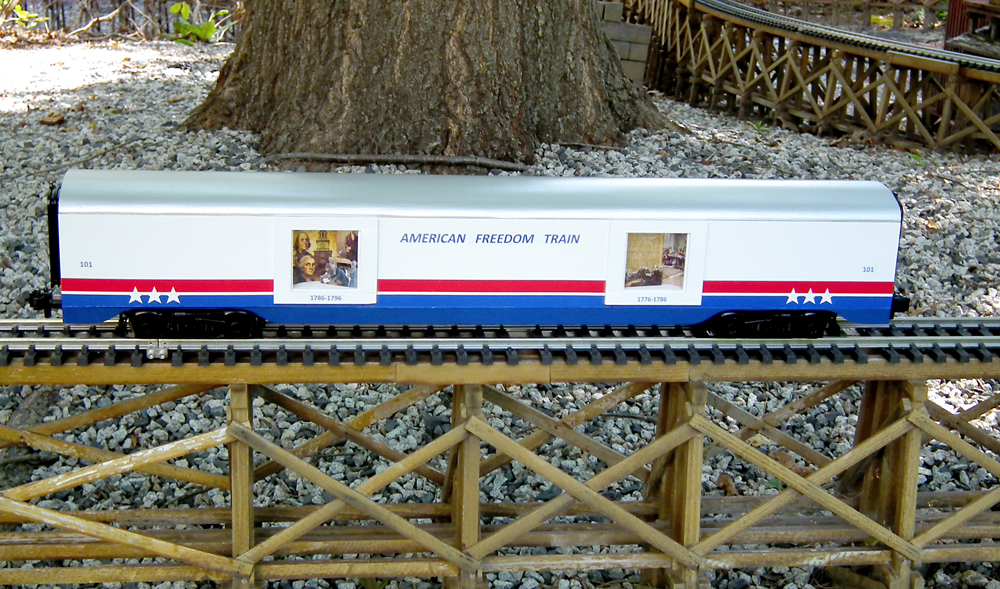
18. Completed display car Nº 101. Raymond Parent photo


inside of model car
19. Showcase car Nº 40 interior, with a 1904 Oldsmobile runabout, Friendship Fire Engine, and a B&O locomotive. Raymond Parent photo

Photo 17 shows a completed showcase car, while photo 18 shows a completed display car, each with its MTH trucks. Each side of the display car has two, removable, 2 1/4″ x 2 1/4″ x 3/4″-deep shadow boxes that display small dioramas showing historical events from various decades of US History. Showcase car Nº 40 (photo 19) carries diecast models of the 1904 Oldsmobile Runabout The Old Scout, Friendship Fire Engine from George Washington’s fire company, and the B&O Arabian steam locomotive—or at least the closest facsimile I could find in diecast pencil sharpeners! They were attached to the floor with five-minute epoxy.

inside of model car
20. Showcase car Nº 41 interior, with the Liberty Bell, AFT route map, and Lunar Lander. Note the corner braces. Raymond Parent photo

Showcase car Nº 41 (photo 20) houses the Liberty Bell, the 1975-1976 American Freedom Train Route Map, and the Lunar Lander (which I substituted for the Lunar Rover used in the original Showcase car). In the display cars, which have no interiors, the removable shadow boxes are held in place by strips of 1/4″ x 3/8″ basswood, pinned and glued to the floor.

end of model car
21. A typical car end, with the black-plastic diaphragm and truck-mounted knuckle coupler. Raymond Parent photo

Finally, photo 21 shows a typical car end, with the black-plastic diaphragm and truck-mounted knuckle coupler clearly visible.

This was a fun winter project that allowed me to expand my American Freedom Train by four cars that contained simulated historical artifacts, comparable to the original. Now I’m thinking about scratchbuilding the three flatcars, with appropriate loads of vendor wagons and vehicles that were used at the various stops along the 1975-1976 route.

Bill of materials

Walls and floors, 1/8″ Lite Plywood Balsa Wood Inc., www.balsawoodinc.com
Trucks & couplers, # DA-7500000, MTH
Diaphragms, # FI-7540000, MTH
Titebond III
five minute epoxy
paints
decal fixative
masking tape
Grex 23 gauge pins, Fastener Company, thefastenercompany.com
.005″ PVC film (windows), Midwest Products Co., froml ocal hobby shop
Diecast pencil sharpeners, eBay
Inkjet decal paper, Micro-Mark, www.micromark.com

Want more patriotic content?

American Freedom Train steam locomotives

Patriotic evening on the Smoke & Oak Railroad

Railroad memories on vinyl records

Routes of the Freedom Trains

You must login to submit a comment