There are many reasons you might need to bring a locomotive back to life. Here are some tips for resurrecting unused locomotives.
Disassembly
The first thing you’ll need to do is to get inside the locomotive shell. Maybe you’re lucky enough to have an exploded-view diagram of your model. If not, you can check the manufacturer’s website. Many offer diagrams as PDFs you can view or download.
If your model is older, you might need to do some research. Here are a couple of sites to try: for HO scale, check out HO Seeker. For N scale, try spookshow.net. For some general tips on disassembling locomotives, see this story on Trains.com.
Clean the gearbox
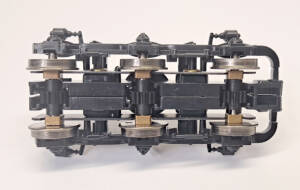
Once you’ve removed the shell, clean the old grease out of the gearbox. On a diesel, the power trucks usually clip or snap into the frame.
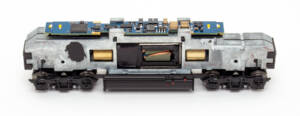
On split-frame N scale models, the trucks will fall free after the frame halves are split.
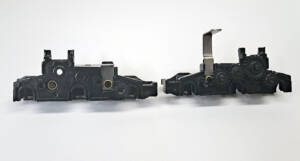
Oftentimes, a clip on the top or bottom of the power truck will hold the halves together. Once you remove the clips, you can take out the wheels. They may have bronze bearing blocks on the axles.
With the wheels out of the way, lay the truck on its side, then take the halves apart. Placing the truck on its side prevents the gears from falling out. If they stay stuck into one side of the truck, that’s a good indication the grease or oil has started to solidify. That’s what you want to get rid of. Be sure to note where the various gears go so you can put them back together correctly.
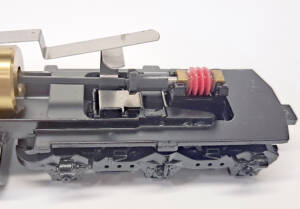
Clean everything with paper towels. You don’t need to use solvent, but you might want to use toothpicks or cotton swabs to get in the corners, crevices, and between the teeth of the gears. Don’t use metal tools that could scratch the gears.
Once everything is clean, begin the reassembly process. Everything should slide together easily. Make sure there’s no binding by rolling the gears back and forth. If there’s a worm gear involved, turn that to get the gears to rotate. Look and feel for binding. If you notice any, take things apart until the binding is gone.
With everything working smoothly, sparingly add lubrication. If the manufacturer includes instructions for lubricating the model, follow those. But generally, you want to be sparing with new lubricant. A single drop of plastic-compatible oil where the gears spin on an axle, and maybe a dab of grease on one gear is
sufficient. One of the primary suppliers is Labelle Industries, and we offer kits for HO and N scale locomotive work.
If you’re working on a steam locomotive, avoid disassembling the running gear as much as possible, especially on plastic models. The side rods and valve gear are often riveted together, and aren’t intended to come apart. If there’s a cover plate below the drivers, you can often remove it without causing complications. Use toothpicks to clear out as much hardened lubrication as you can, and add a few drops of oil to the driver axles on the inside of the frame. Most steam locomotives have one driver connected to the motor with a gearbox, then the motion of the side rods transfers power to the rest of the wheels. Some older N scale steam locomotives will have a gear train similar to what’s used on diesels. Clean the gears up as best you can, then add just a tiny amount of oil to keep things running smoothly.
Check the motor
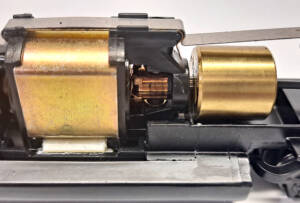
While the trucks are out of the model, spin the motor to make sure it isn’t binding. If there’s significant resistance to turning the motor shaft, you may have to replace it. Check the manufacturer’s website to see if you can purchase a replacement. If the manufacturer doesn’t offer replacement motors, or if it’s an older model from a defunct manufacturer, check out NorthWest Short Line. The company offers wheels, gears, nuts, bolts, washers, screws and all sorts of repair and replacement parts for model locomotives.
Clean the wheels
Next, take a look at the locomotive’s drive wheels. If they’re dirty, you can use various cleaners to get them shiny again. Though some people use alcohol on a cotton swab, there’s evidence this can leave residue that will increase the amount of micro-arcing that goes on between the wheels and rails as the wheels roll along
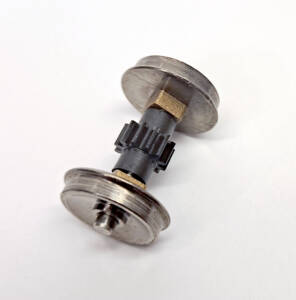
with power traveling across the connection. Other solvents, such as mineral spirits, seem to do as good a job cleaning and leave less residue. You can also use electronic contact cleaner.
While you’re working on the wheels, make sure the power path from the wheels back to the rest of the locomotive is in order. Some models direct power through the frame. Ensure the contact points are clean and polished. Check that any wheel or axle wipers are properly positioned to make contact, and that any wiring connections are solid. You may need to do some gentle bending of contacts or repair some wiring connections with solder.
Reinstall the trucks
With the trucks reassembled, you can reinstall them on the locomotive. Again, make sure the wiring path is complete, and that there’s no binding as you reassemble the model. Most diesel models have a centrally mounted motor with drive shafts going to each truck. These parts are usually made from slippery engineering plastic that doesn’t require lubrication. All that adding lubricants will accomplish is coating the inside of your model in a fine layer of oil, which will do a great job of sticking dust and dirt to the moving parts and electronics inside the shell.
Check the couplers
Now that you’ve put the chassis back together, give it a try on your test track. If everything works as you expect, you can reinstall the chassis in the locomotive shell. The last mechanical thing you’ll need to check is the coupler height. Use a Kadee or Micro-Trains Line coupler height gauge.
Most likely, the couplers will be at the correct height. Make sure they don’t sag or droop, and that the trip pin is at the correct height. I’ve used Kadee’s fiber washers to keep couplers from flopping around in their draft-gear boxes. You can also use them if your couplers are too high to shim the draft-gear box lower, assuming the draft-gear box is a separate part.
If the draft-gear box is molded to the chassis or body shell, you may have to replace the couplers with underset or overset shank versions. See the Kadee and Micro-Trains Line websites for options.
Dusting
While the shell is off the chassis, it’s a good time to give it a thorough cleaning. If it’s just dusty, use soft brushes and canned air for cleaning electronics to remove loose dirt. If the dust is stubborn, use a soft toothbrush and some mild soap. Be careful not to knock off any details. You may consider working over a shallow pan to catch any parts that may come off.
Detail repairs
With everything cleaned and running well, the last step is to repair broken or missing details. Again, check the manufacturer’s website to see if replacement parts are available. If they’re not, you might find what you need from some of the detail parts manufacturers such as Detail Associates (they don’t have a website, but you’ll find their parts on many retail sites), Details West, or Cal Scale, among others.
With everything back together, you can enjoy your new old locomotive!




I reworked 2 of my Athearn Blue Box SD40-2’s recently. I used different motors, the existing Athearn power trucks and soldered wires from the power trucks on both of the pickups. As Cody describes, make sure the gears and wheel sets are clean.
I used the Athearn universal assembly which I modified to fit the new motor universal ball assembly. It did work out quite well. One of my SD40-2 modifications used a Bachmann E-33 motor while the other one used a Tan Can motor. Both motors were secured using DAP caulk which I let dry overnight.
I reassembled the parts to the frame, connected the pick up wires and tested the unit without the frame so I could see if anything was binding.
Once you do one modification, the others are easier.
I did the similar modifications to my older Atlas/Roco GP-38’s and SD-35 models. One of the Kato screw mounts align with the frame hole while the other hole needs to be drilled. I used the Roco power trucks and made modifications to the universal assemblies to connect to the Kato motor flywheel assembly. I made this universal modification with Evergreen PVC tubing.
The older Atlas/Roco models can be found at the local hobby shop or the train shows. Most of the time, the price is low. for these older models.
I Added around $50.00 of detail parts and once the models are painted and you will have a nice running model without spending $200.00 plus dollars.
One more thing, since I run with DC, I designed an electronic circuit to prevent the lights from flickering. Of course, I installed Miniatronics warm yellow LED bulbs with directional circuitry.