


I love details. Thirty years ago, I built my first craftsman structure kit and found out what details could do to “raise the roof” on my modeling. If you think about it, what you mostly see of a structure on a layout is the roof. On my railroad, a roof has to have one or more points of interest. Follow along as I share some of the common details I use to make my rooftops more interesting for the viewer.
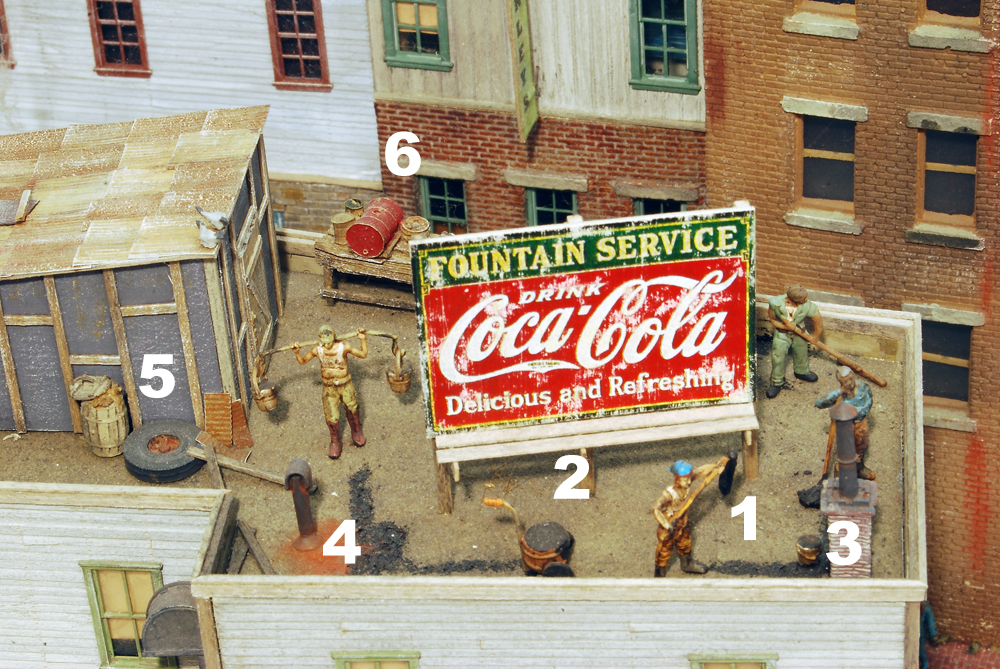
This is the roof of VanDeWater Freight and Storage. People always add interest to a scene, so I added a roofing crew beginning some repair work (1). But that’s not all. My layout has that “lived in/worked in” look, so I’ve included other details as well. I placed a worn and weathered billboard on the roof (2). There’s also a chimney (3) and some vents (4). And I added a
trashcan and old tire (5), as well as a small workbench (6). Why would someone bring a tire up to the roof? Maybe to hold something down on a windy day, but no one really knows.
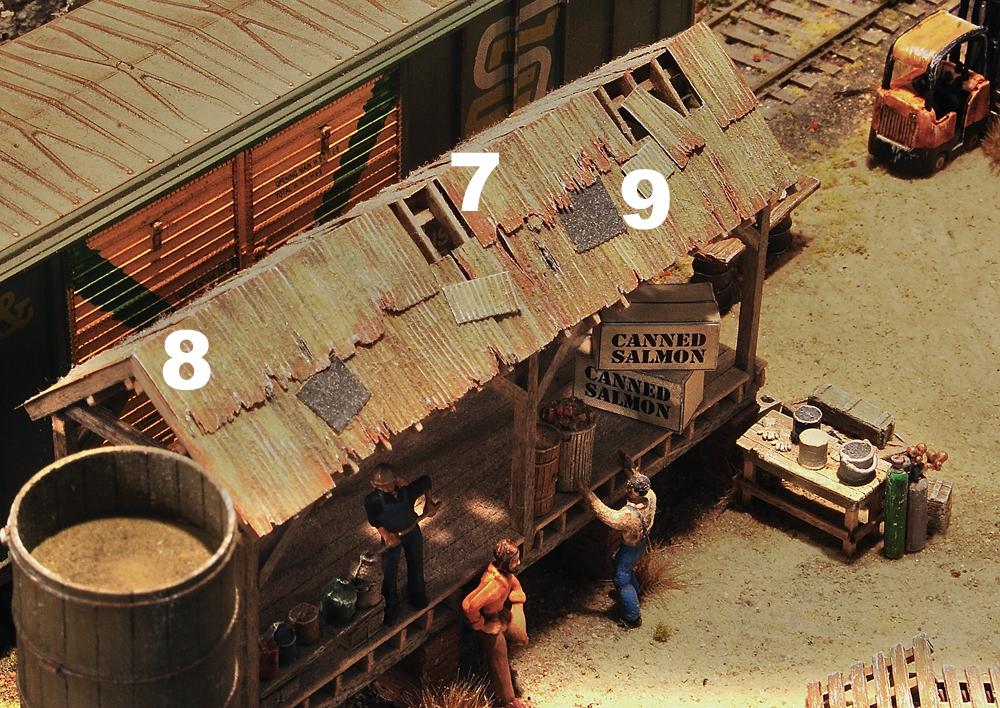
I patterned this loading dock after one I found in a Fine Scale Miniatures kit. I liked the one that came with that kit so much, that I scratchbuilt this one that I added on to a scene with a Bar Mills Cannery. I went a little further with the roof by building it run down. Some of the corrugated roofing panels are missing so you can see the rafters underneath (7). I also cut away some of the edges of the metal roofing to look as though it is rotting away, and I added some rust detail to reinforce that effect (8). And I added a couple of paper patches made from black construction paper to give it more variety (9).
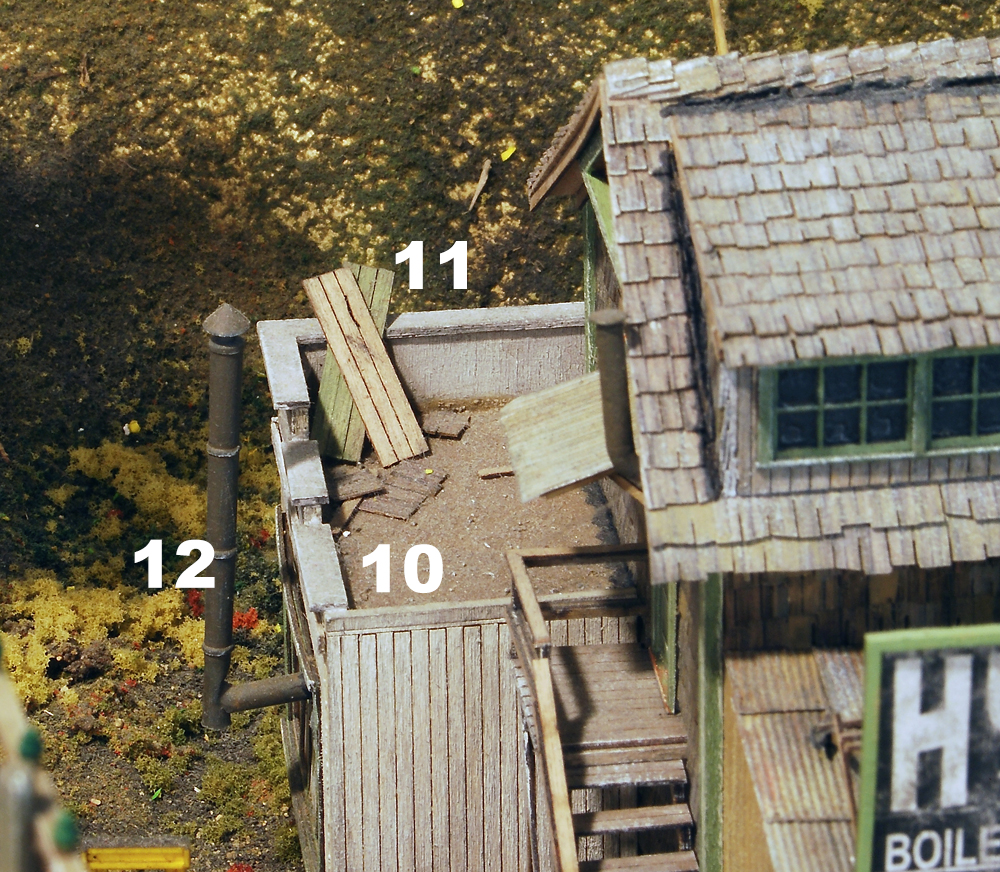
Sometimes just a few pieces of scrap wood are all you need. This is a Bar Mills kit that has a section of flat roof on the rear, that I coated it with some fine sand to look like roofing gravel (10). The scraps came from leftover pieces during construction, and I stained them to look worn and like they’ve been there a very long time (11). The two smokestacks in the photo were white metal parts that came with the kit (12). I primed them with a gray primer. When the parts had dried, I painted them with a grimy black and rust color mixed to age them some.

Even the roof on a building flat can use some detail. For some reason the folks at HR Puffnsnuf have hoisted a coal bin up to the roof (13). Tall smokestacks (14), vents (15), and a chimney (16) also make it look there must be some kind of manufacturing going on here. The gray part on the far right is a piece from an old disposable film camera (17). A little paint and a dark wash make it look like some sort of air handler, so it looks like something that belongs on a roof to me.
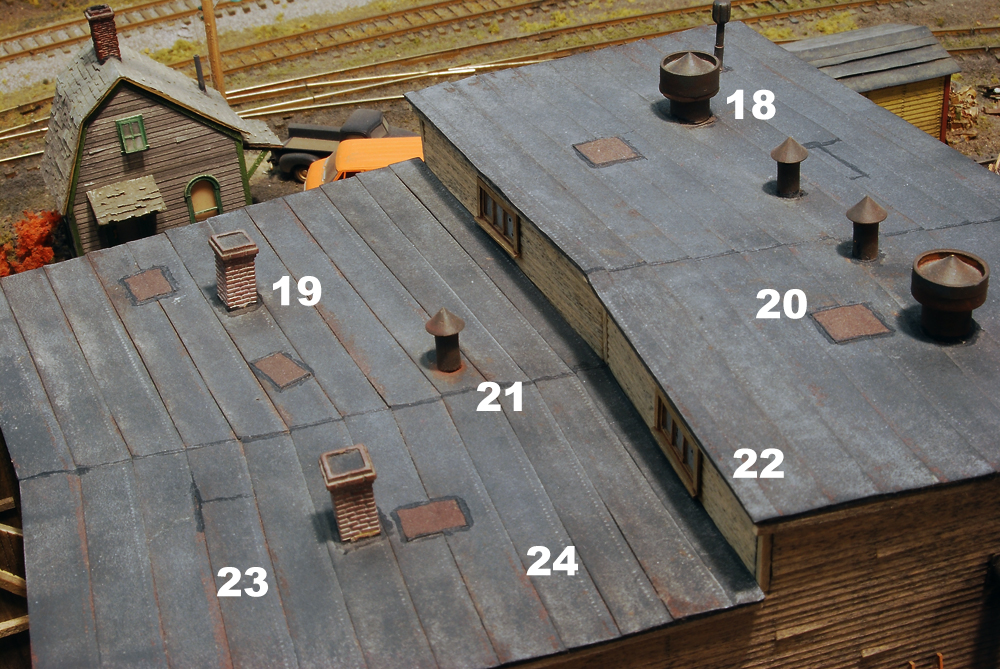
This is the roof of my two-stall roundhouse. I designed the roof to be removable so guests can see the interior details. The vents (18) and chimneys (19) are firmly attached to allow for handling. I added a few patches (20) and tar lines (21) to make it look like the roundhouse crew has had to make some repairs. I weathered the roof by painting the tar paper with a grimy black color. When that dried, I sprayed Dullcote on it which is a matte lacquer. I then brushed it with an alcohol/ink wash. When the wash dries, the Dullcote “frosts” the roofing because it reacts with the alcohol and gives it that well-worn look (22). I used Rustall to make some rust deposits between the layers of the rolled roofing (23). I applied the material with a fine brush. Be careful with this material — a little goes a long way. I made the nail holes on the tar paper using a pounce wheel (24).
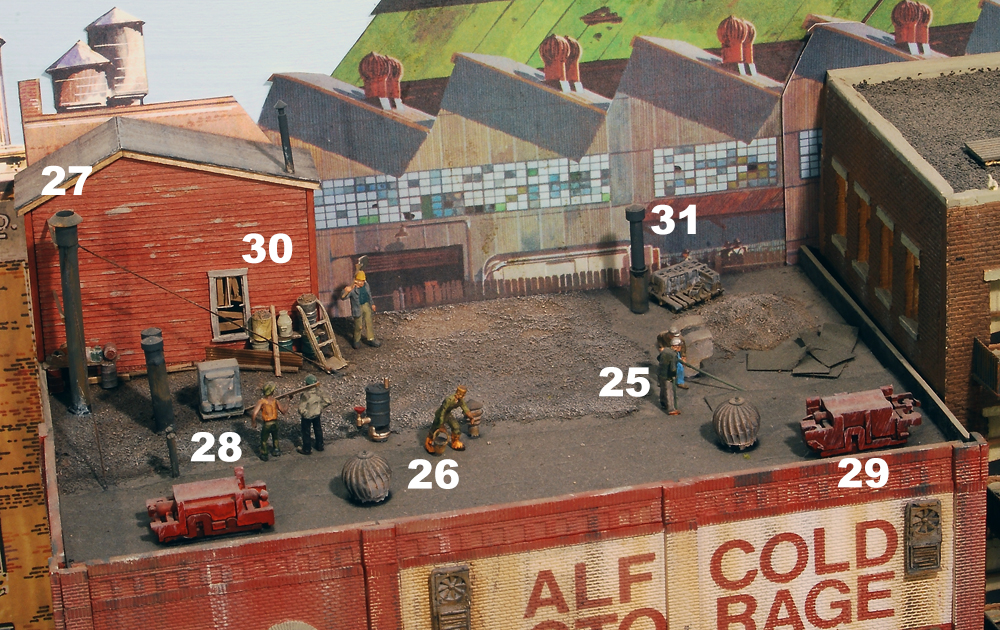
Here’s another roofing crew on the Alf Cold Storage warehouse (25). This is another structure on the layout that butts against the backdrop. Once again, the crew is center stage, but there’s also an assortment of vents (26), stacks (27), and other items on the roof, including more “disposable camera” air handlers (28), some using different parts from the camera (29). Assorted junk, including barrels of scrap, old boards, and a hand cart add to the detail (30). And who doesn’t need a skid of cinder blocks on their roof (31)? These can be used to support other rooftop machinery.
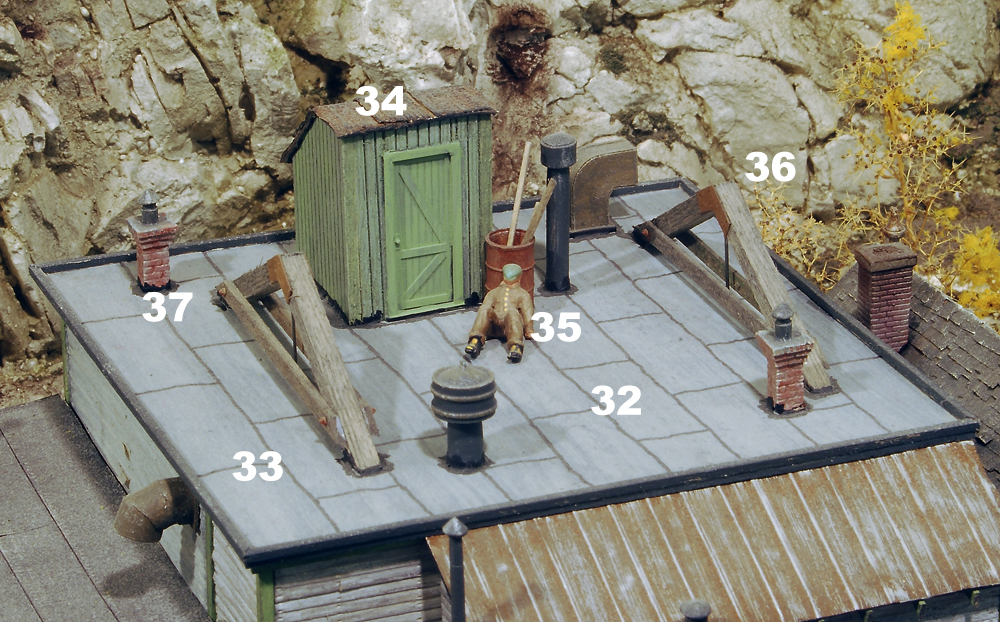
This scratchbuilt structure shows a little different approach to roofing material. When it came to adding the main roof, I simply brush painted the cardstock roof. While not easily visible in the photo, the paint soaked into the cardstock giving the roof a slightly uneven look (32). When the paint dried, I took an ultra-fine Sharpie pen and drew in the tar lines, being careful not to make them perfectly straight (33). A roof access covered stairway (34) and a dozing worker (35) draw the eye to the scene. The exposed roof trusses also add another unusual visual element (36). Note that all the vent and chimney details have tar around their bases to make the areas they poke through the roof watertight (37).
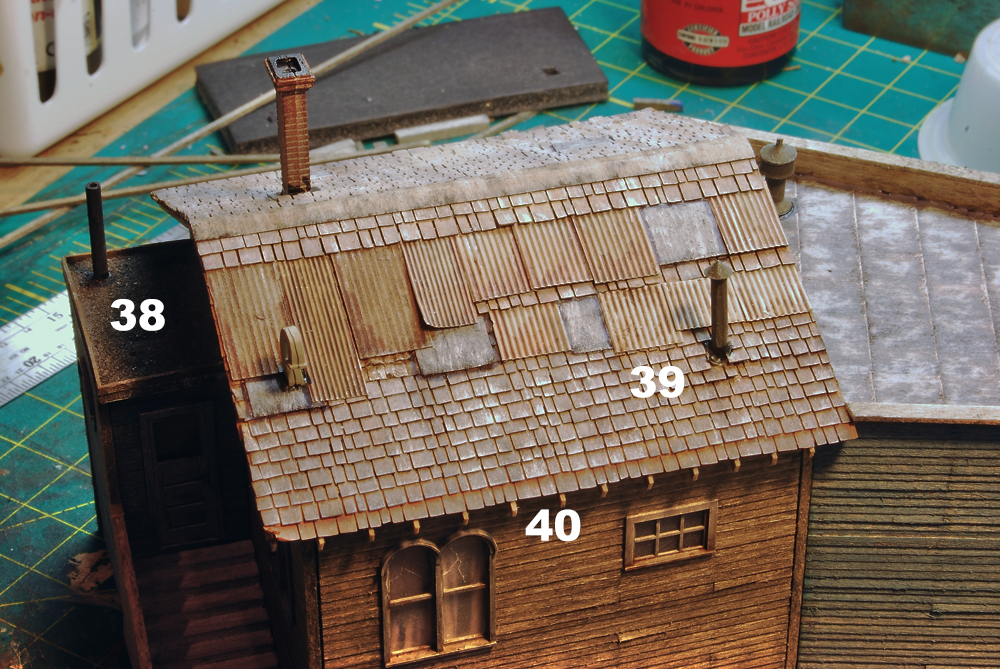
This is a recent project where I ran into an interesting issue. The kit didn’t contain enough roofing shingles to cover the office. I had extra roofing shingles from other manufacturers, but nothing really matched the kind supplied with the kit. So, I improvised and added some corrugated metal (38) and paper patches (39). The building could have experienced wind damage, and this was a fast solution to fix it. And while the exposed rafter tails were part of the kit, they add interest to this structure’s roof (40).
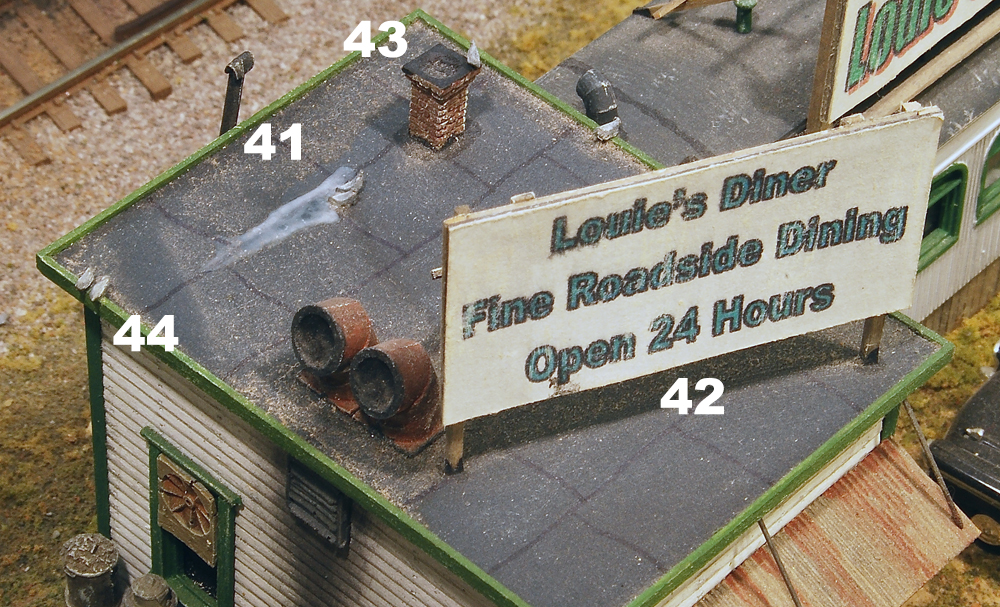
Many roofs sag over time, which means they can collect pools of water. Louie’s Diner is near the front edge of the layout, and it has this attached kitchen. I spread a little leftover epoxy on a small part of the roof to represent water that has pooled in a low area (41). It stayed clear for a long time, but as you can see in the photo, it has since turned a milky white. Since there’s all kinds of stuff on a roof that might make it look that way, I’m OK with leaving it as is. The building also includes another weathered sign (42), chimney (43), and a few simple bird figures (44). Birds are everywhere, and I use them on the roofs of many of my models.
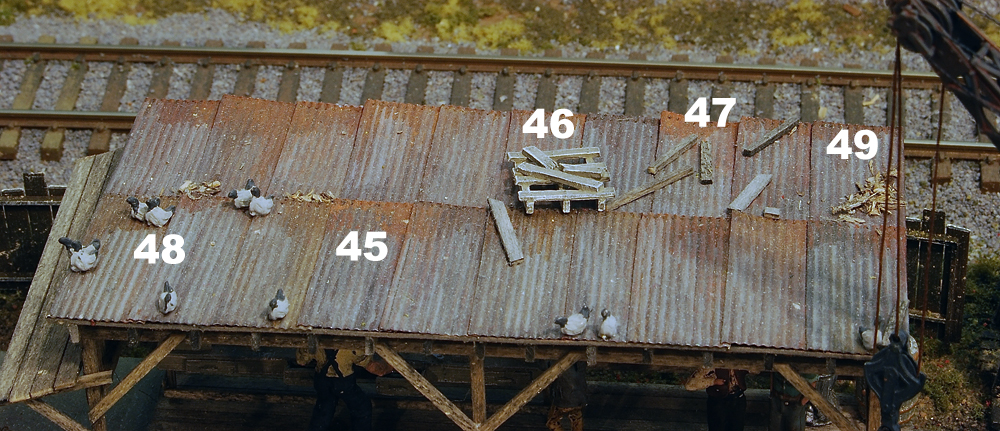
Sometimes the kit will supply you with all you need for a great looking roof. The photo shows a shed that comes with FMS’s Elijah Roth kit. After painting the corrugated metal, I added a variety of rust detail (45) using diluted paint and powdered pastels. I also added a skid casting (46), a few leftover boards (47), and an assortment of pigeons (48). Wood shavings make a great rooftop detail as well (49), particularly if something has been stored or stacked there, as evidenced by the pallet and boards.
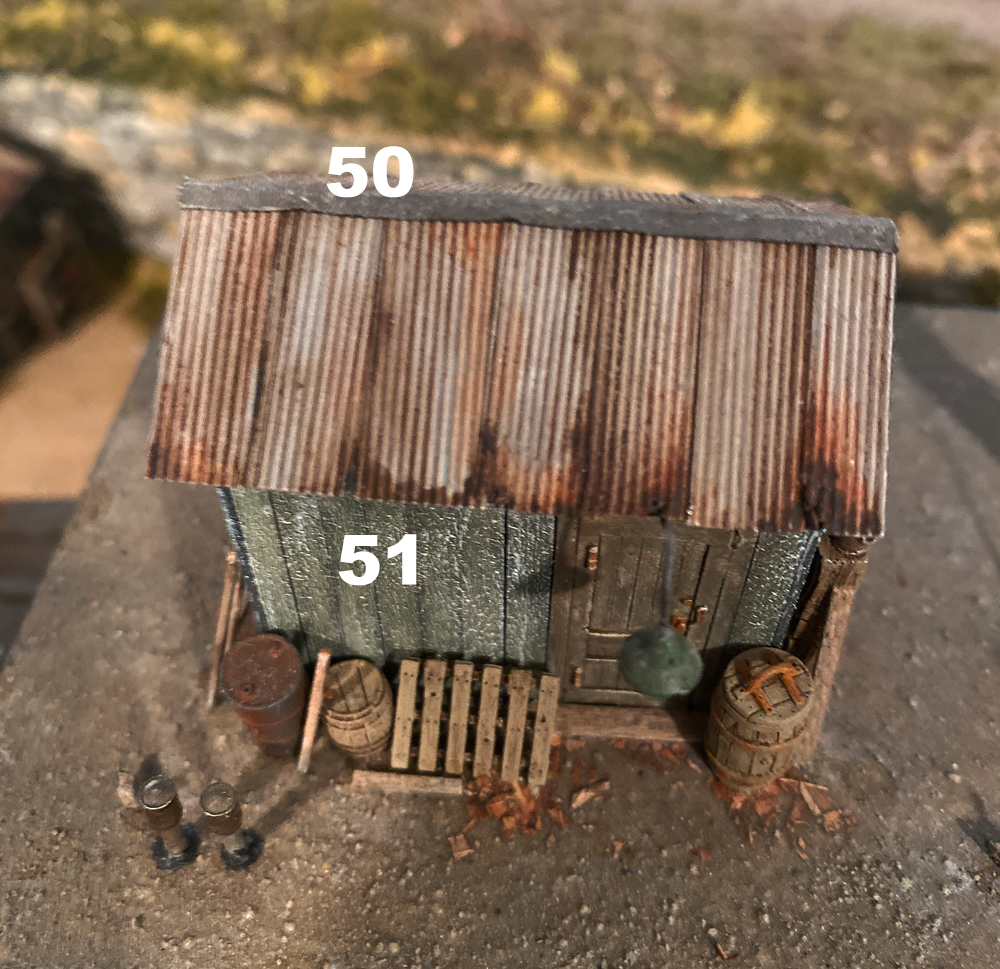
I like weathering corrugated metal the best. I happen to have a lot of it in my storehouse of stuff, and many kits come with it. There’s just something about a rusty metal roof that is artistically pleasing, and it’s a fun challenge to make it look right on a model. I always prime the bare metal because, at least to my eye, it usually weathers to gray almost immediately (50). Then, my favorite rust technique is to use artist oil paints to get the look I’m after (51). Mine are usually pretty rusty and crusty, so I use burnt umber and burnt sienna thinned with odorless paint thinner in a wash to get the effects I’m after. For darker rust I use less thinner, applying it on edges and seams.
Hopefully, these tips for better rooftop details help you to improve the roofs of your structures, and add visual interest to your layout!
This story originally appeared in Model Railroading: The Ultimate Guide 2023 – Ed.


OUTSTANDING detail work !!!
Your use of rolled roofing (#s 23 & 24) on the roundhouse reminds me of the types of rolled roofing/tarpaper roofing material found in so many wooden kits. Unfortunately, the realism, scale and appearance of such is too often incorrectly presented in those kits.
In general, roofing is measured by the “square” with a “square” meaning 100 square feet. Shingles typically are packaged in 1/3-square bundles, where as rolled roofing typically comes in a 1-square roll – 100 SF or 3 ft. wide x 33~1/3 ft. long.
IMO, trimming the rolled or tar paper roofing to these dimensions enhances the overall appearance and realism of such roofs (13/32″ x 4~19/32″ actual, though 3/8″ x 4~5/8″ gives a good visual standoff scale appearance).
I once built a N Scale structure where the supplied tap paper roofing was 3/8″ wide by about 6~1/2″ long. I Would NOT look anything near “‘real” until I cut it down to the scale 3′ x 33~1/3’ size. I believe it is a very believable model.
FWIW, this is on my railroad, not on yours ¯\_(ツ)_/¯