How To Realistic model railroad ground cover

Realistic model railroad ground cover

By Angela Cotey | March 27, 2014

| Last updated on November 3, 2020

Use long grass fiber mats to add overgrown areas to your model train layout

Email Newsletter

Get the newest photos, videos, stories, and more from Trains.com brands. Sign-up for email today!

Fromgrassmattoweedpatch
As the prototype photo depicts (below), even urban roads like this CSX route through Miami aren’t immune to weeds sprouting up along the rails. To model these scruffy patches on his HO scale layout, Thomas Klimoski used Heki Wild Grass Fiber.
Prototype
When adding scenery to a model railroad, many layout builders tend to overlook the scruffy, overgrown areas along the railroad right-of-way. A recent trip to a local trackside location was all I needed to remind me how overrun with tall grasses and weeds some of these areas can be. It’s the differing heights, colors, and textures of these untamed areas that make them so appealing to model.

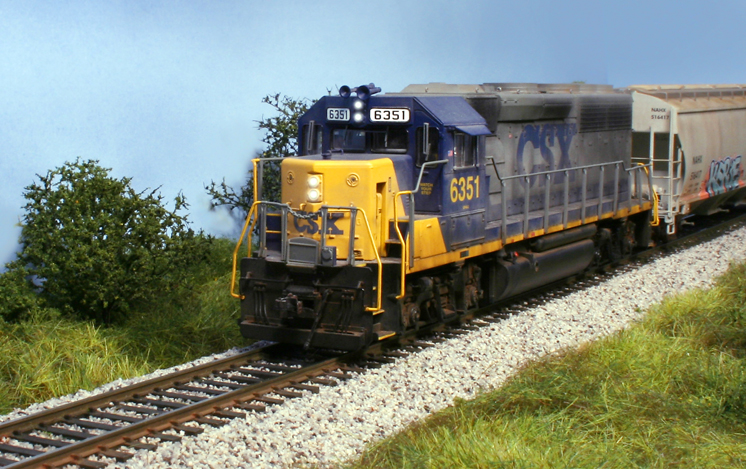
A friend suggested that I use Heki Wild Grass Fiber to represent these rough parcels of land. Although the product consists of grass fibers attached to a nearly invisible mesh net, it isn’t as orderly as a manicured grass mat, ground foam, or even static grass. In addition to offerings in various colors, Heki Wild Grass Fiber, available in North America from Scenic Express (scenicexpress.com), also comes in two different mat sizes.

The 6mm long grass fiber mats come in 5½” x 11″ and 15½” x 15½” sheets that easily cover an area twice that size when following my techniques for application. When used along with common scenery materials, the wild grass fiber shapes into a natural-looking landscape that complements the other details you’d expect to find along the tracks. After adding it to my HO scale shelf-style layout, I’ve found this type of grass fiber ideal for mid-sized foreground areas, and it doesn’t require a static grass applicator.

Step1preparingtheterrain
Step 1. Preparing the terrain

Step 1. Preparing the terrain

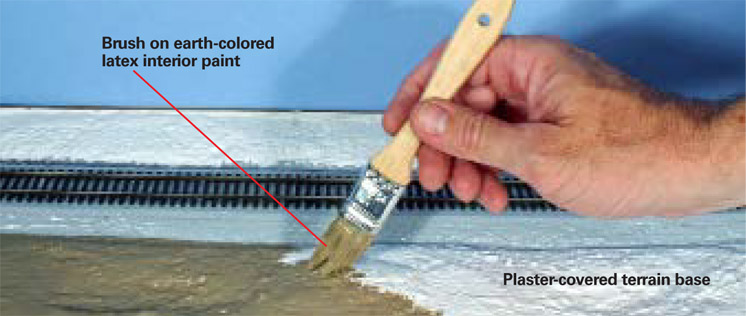
I prepared the area by painting the base with earth-colored latex interior wall paint. In this case, I simply used a beige paint that was left over from a home improvement project. The paint color isn’t especially critical here, as most of the area will be covered up in later steps. However, a few spots might show through, so it’s best to use an earth color that’s common to the region you model.

Step2Applyingthefristlayer
Step 2. Applying the first layer

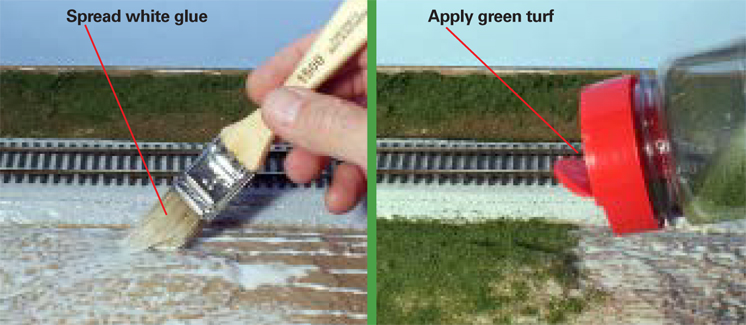
After allowing the paint to dry, I used a paintbrush to spread an even coat of full-strength white glue over the painted terrain. Next, I applied a covering layer of Woodland Scenics Green Blended Turf to the wet glue. After applying an even coat of turf, I then added patches of Woodland Scenics earth-colored Fine Turf to define areas I planned to cover with grass fiber.

Step3Gluingitalldown
Step 3. Gluing it all down

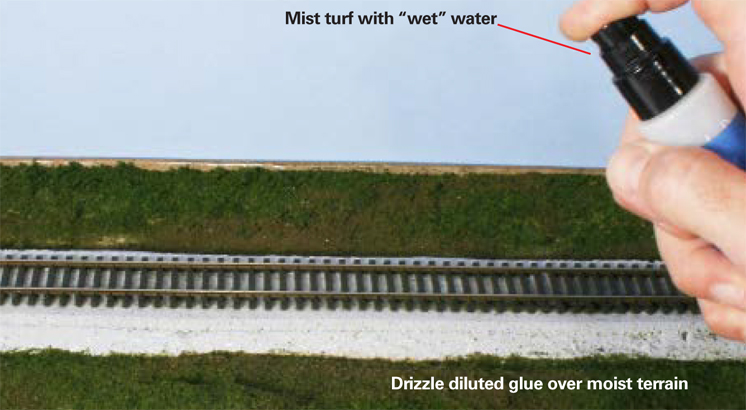
First, I used a spray bottle to apply a light mist of “wet” water (2 to 3 drops of dish detergent per bottle)
over the turf and earth covered terrain. The wet water helps to break the surface tension, which then allows the glue to bond all layers of scenery. To prevent the loose turf from scattering, I held the spray bottle about a
foot above the area I sprayed. Next, I prepared a diluted mix (1:1) of white glue and tap water. Using a small plastic pipette, I applied drops of the diluted glue to the damp terrain.

Step4Preparingforthesecondlayer
Step 4. Preparing for the second layer
Step 4 Preparing for the second layer

After allowing the scenery to dry overnight, some might be tempted to stop there. Because I wanted a less manicured appearance for this area, I continued by adding another coat of full-strength white glue directly over the terrain. To help spread the glue, I used a paintbrush that I first wet with tap water. For this step, I found it was best to work in a 6″ x 6″ area to avoid having the glue dry too quickly before I applied the grass fiber.

Step5Stretchingthegrassfiber
Step 5. Stretching the grass fiber

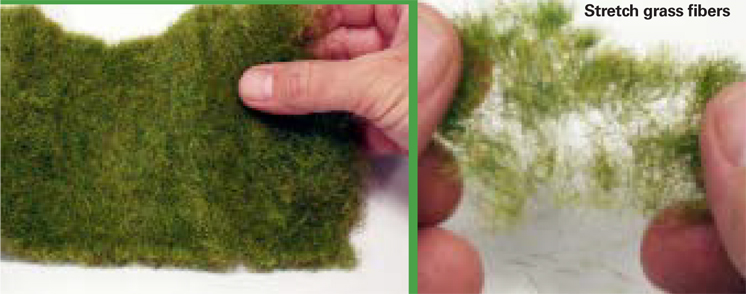
I removed the Heki grass fiber from the packaging and tore off a 2″ x 3″ patch. Next, I grasped each edge of the tuft and stretched it into an irregular shape. My objective was to produce a thin net that still had clumps of grass fibers clinging together. The more I worked with these pieces, the easier it became to gauge how much to stretch them to yield natural-looking clusters of weeds.

Step6Applyingthetufts
Step 6. Applying the tufts

I prepared several thinned patches. One by one, I laid each on the terrain and used my fingers to press the grass fiber into the wet glue. The thin mesh that once held the grass fiber together in a mat now helped secure the weeds to the turf while the glue dries. To avoid making unnatural, monochromatic scenery, I applied grass of different colors and shapes in a random pattern. Finally, I added earth-colored Fine Turf to help blend the tufts together.

Step7Finishingdetails
Step 7. Finishing details

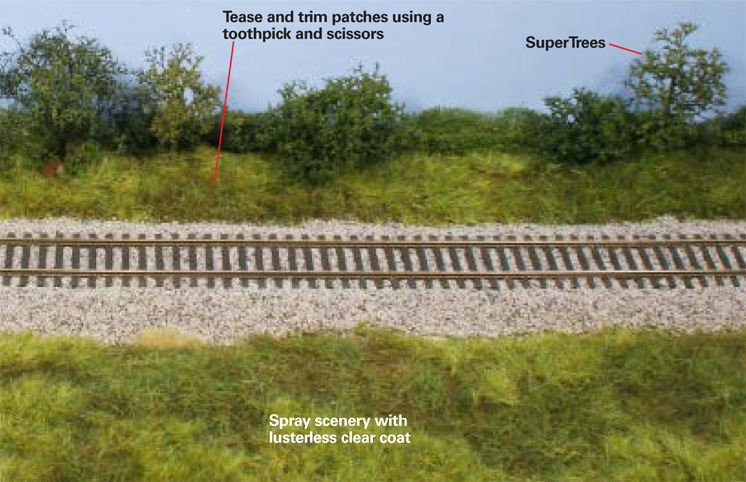
I let the area dry thoroughly and then used scissors to trim any stray fibers. I also used a toothpick to lift up a few matted areas. When viewed under certain lighting conditions, I noticed that the fibers had a slight sheen. I used a light overspray of lusterless clear coat to eliminate the sheen. To finish my overgrown areas, I added a few SuperTrees from Scenic Express and Woodland Scenics poly fiber covered with blended turf.

Materials list

Heki Wild Grass Fiber

  • HK1575 Meadow Green
  • HK1576 Pasture Green

Woodland Scenics

  • FP178 Poly Fiber, Green
  • T42 Fine Turf, Earth
  • T1349 Blended Turf, Green

Miscellaneous

  • Dish soap
  • Paintbrush
  • Pipette
  • Scissors
  • Spray bottle
  • Toothpick
  • White glue 


9 thoughts on “Realistic model railroad ground cover

  1. Down here in the South, weeds take over not only the ROW but lightly used track too. This is almost never modeled. Most layouts look like mowed parks with razor edge ballast lines.

    I've been doing the Heki grass technique for awhile now, but I did get some good tips. Thanks for a great article.

  2. Thanks for the compliments on my article. Since I wrote the article I have used the same technique for the grassy areas on my new layout but I have made some minor adjustments to the process.

    Instead of using the Woodland Scenic Green Blended Turf in the second step I used some dried and screened red clay dirt. The dirt was adhered in the same way as the Blended Turf. The red clay dirt represents the area that I am modeling and once completed it shows through the grass fiber mats giving it a very realistic look. I recommend looking at the area you model and determine an appropriate base ground covering to use. You can still use the blended turf if you like but add some various dirt products to improve the results.

    In addition to the two Hiki Wild Grass Fiber products listed in the article I added a third color, HK 1573 Moorland Green, to break up the monochromatic look. I also incorporated a different Hiki product called DecoGrass, HK1590 Light Green, which is a 2mm grass fiber mat. The look and texture of the product is slightly different from the Wild Grass Fiber but it blends very well. The difference in heights from the Wild Grass Fiber to the DecoGrass gave the area more texture.

    You can also use the leftover loose fibers to blend the different color areas together. Simply grab a pinch of the loose fibers and dab them into the wet glue between the stretched areas of the applied grass mats. As you release the fibers they will stick to the glue and stand up. Use a toothpick to make any necessary adjustments.

    I am very pleased with the results of using the Hiki Wild Grass Fiber and hope you give the technique a try.

    Thomas Klimoski

  3. The more different textures, and to some extent shades of color, the more realistic it all appears. This is a welcome addition to the palate.

  4. This is one of the better scenery articles I've seen in MR. I've done several scenery clinics and I always stress using different materials in layers. The Heki grass fibers are a really good product. They have lots of different colors and they are great for angled surfaces, where static grass is difficult to use. I think the process that you have described will give very good results.

  5. This seems to be an excellent and straightforward way to pay some attention to an often overlooked area of scenic importance.

You must login to submit a comment