Me and Steve
I had a good friend, Steve Tietz, whose main thing was building wood, craftsman-kit structures. Starting some 10 or 12 years ago, every November he’d come up from southern Illinois to Trainfest here in Milwaukee just to look for kits he didn’t have.
Steve and I had become friends when we were both English instructors at Western Illinois University in the early 1970s. Over the years his interest in HO kit building intensified, while I got hooked on N scale and layout building.
Steve liked to build older-style buildings with additions, dormers, and details that lend a lot of character. I look for simple, time-saving materials and methods to yield a structure that looks like its prototype and can play a convincing part in completing and operating the railroad. At the same time, I don’t want a sloppy model (which this one kind of is). As I’ve heard David Barrow say in his clinics, “Neatness goes a long way.”
A case in point
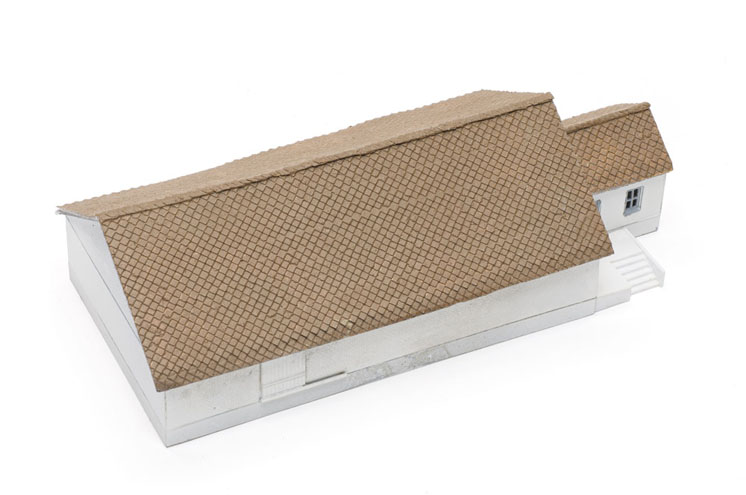
The model of Armstrong’s apple packing and shipping house in Tehachapi, Calif., was based on two photos, some walked-off measurements, and a few notes I made sometime in the middle ’80s. Thirty-five years later, I’m getting around to building it and other structures and I sure wish I had a lot more to go on.
I have to remind myself that I’m not out to build a museum model, I’m just looking for “good enough,” a concept popularized by Allen McClelland in building his landmark HO Virginian & Ohio, (although Allen’s “good enough” is way better than mine or that of most other modelers I know.) Still, I wanted to know how to make ‘good enough’ better.
From the ground up
First came the concrete foundation. Steve might have made a mold, cast the foundation in plaster, and added cracks and deterioration. I made mine from Evergreen no. 169 .080″ x .250″ styrene strips that put the door openings at the right height to align with the floors of boxcars parked alongside. I made no attempt at detailing or distressing the concrete.
Above that came the walls. My photos weren’t sharp enough to show me what they were made of, but my notes said they were “large bricks.” In my materials folder I found a piece of Kibri no. 7962 HO plastic brick sheet that I used.
My notes also told me that the peaks on the end walls were horizontal boards. For these I used Evergreen no. 4040 scribed siding to represent 6″ boards. Steve might have used scribed wood siding, or even built the peaks using individual boards and had some fun with lightly scribing in grain and board ends. Of course, I could also have done that with the plastic I used. You get the point – decisions, decisions, decisions.
I couldn’t be 100 percent sure, but judging from the photos, the roof was covered with the aforementioned diamond-pattern shingles. I searched Google but could find none done in plastic sheets, only the paper ones. I used an Elmer’s glue stick, purchased at Walgreen’s, to attach these to 1⁄16″ cardboard. The glue stick worked great, but the cardboard frizzied on the edges when I painted it. If I were to do it again, I’d try styrene panels, experimenting first to make sure it would work.
I put about six hours into this roof, whereas if I were using plastic I could have done it in about 30 minutes.
Would I do it again?
Yes. In modeling we’re always making trade-offs, and here I’d exchanged time for visual interest. This model will go in a prominent position near the front of the layout. Also, the diamond pattern adds a historic note: Such shingles were used often in the 1920s through the 1950s. And one more observation: We usually view our models from above, so roofs count a lot.
This article originally appeared in the March 2020 issue of Model Railroader – Ed.
The pinking shears idea is great. Craft stores sell patterned ones in various sizes and styles, so there is likely a set to visually match what you’re trying to make.
With the multitude of cutting machines available these days, you can make exactly what you want, to scale. It takes time to craft the pattern, but one you create one or download one, you can repeat it for many projects. My local library even had a cutting machine that patrons can use for free if they just provide the material – some of the design software is available online so you can set it up before you get there.
I’d love to have my own cutting machine, but good ones are not yet quite affordable. Mechanical cutters are still over $350 and laser cutters are about $3000. Sigh.
you could try using “Pinking Scissors” using thin styrene sheet?