


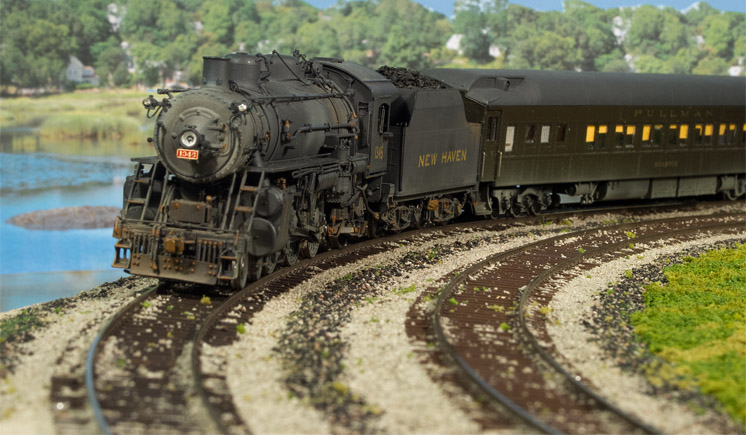
I think the most exciting railroad photos are of a locomotive at speed leaning into a curve. This “lean” results from a prototype practice called superelevation, and I’ve developed an easy way to achieve the effect on a model railroad.
Superelevation adds realism
Prototype railroads counteract this effect by superelevating curved track. On superelevated curves, the roadbed is raised so the outer rail is 4 to 6 inches higher than the inner rail. This shifts the weight of the train towards the inside of the curve and diminishes the effect.
Many modelers think adding superelevation to model railroad curves is difficult and involves complex transitions
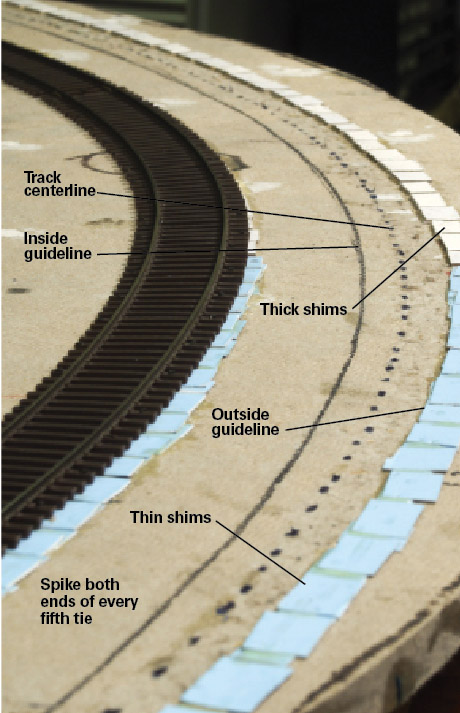
between straight and curved track sections. However, I’ve installed superelevated curves on three layouts using an easy 4-step technique. You can follow my method in the above right photo.
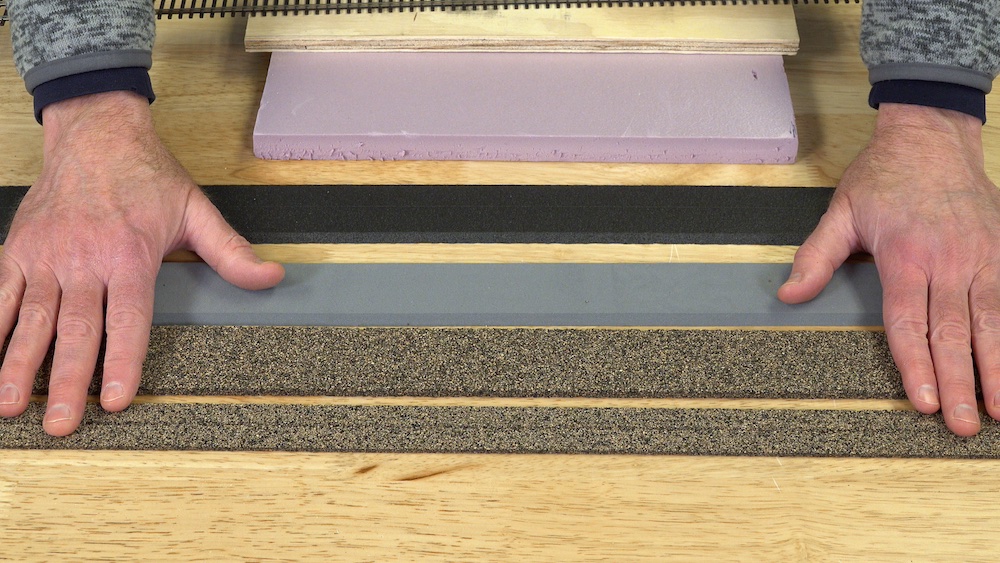
Step 1: Cut cardstock
First, I purchase two sheets of cardstock from an office or art supply store. I buy a thin (.030″) sheet of Oak Tag brand paper for this material. It’s often sold in various colors as construction paper for children’s projects. I also buy a sheet of .075″ thick poster board.
Usually, both products are available in 18″ x 24″ sheets. I cut each sheet into rectangular shims measuring 1⁄4″ x 1⁄2″.
Step 2: Install shims
After double-checking the guidelines, I glue down the cardstock shims in three sections, following the outside line of the curve. I use thin shims at each end of the curve and thick shims in the middle. Each of these sections is 12 to 18 inches long depending on the length of the curve.
I add a second layer of thin shims, starting a third of the way in from each end. This step helps smooth out the transition to and from the highest elevation.
Step 3: Spike down flextrack
I spike down both ends of every fifth tie. The spikes along the outside of the curve go through the shims. I drill no. 65 holes through the ties to make spiking easier.
Step 4: Cover shims with ballast
That’s it! By using these four simple steps, I’ve made my model railroad curves look more realistic.


John, of all the methods that I read about and watched video’s on, this concept seems easy, practical and light on the pocket book which is most important.
Thanks so much for sharing your modeling skills with all.
Best, Wiley T
Great, thanks for sharing!
I’ve used balsa wood strips (various sizes) for raising the outer radius rail , and as long as the layout is in a controlled environment without drastic temps or humidity , it’s easy.. but if you got the funds and time cut some (Evergreen plastic 1/8 stock) no shrinkage and flexible, but I think it’s safe to say only the larger radius curves would warrant super elevated speed curves (but) I’m not and civil engineer.. the effect is so much better than just-flat and really kicks the illusion from model to really track side ..
Recently re-entering the hobby after many years away, I wanted to super elevate my curves. I watched quite a few You Tube videos on this process, none to my satisfaction. My radius is about 34 inches at most of the places that I wanted to super elevate. With my compass I made an arc to match the track center line. I then created another arc one inch greater. With carpenters glue and push pins I glued lengths of strip wood, cut to the desired height of the super elevation, on that second line. When dry, I sanded a taper on each end of the curve. I then took pre- mixed sanded tile grout and a flexable putty knife approximately two and a half inches wide. I applied the grout to the curved area with one edge of the knife riding on the strip wood, the other approximately two and one quarter inches inboard. With a little practice it produces a nice taper. The grout dried hard over night. When dry a quick scuff with a sanding block, (80 grit paper) took off any high spots just like sanding cork roadbed. When dry it is solid. Re-swing the center line arc again, and then you can glue your roadbed to the grout using construction adhesive and the push pins to hold it in place while it dries. You can then either glue or spike down your track. It is cheap, easy and there are no gaps under the ties, no cutting little strips of card stock or styrene. I used one eighth square bass wood strips, and while it seems high it produced a good effect and the rolling stock track well. If that is too high for you, once glued in place, you can use your sanding block to sand the strip wood with little effort to produce the desired height. Mine has been in place for over a year and it works well.
Instead of using cardstock bits, I use styrene strips 1/8 inch wide by about 3/4 inch long. I begin with .010 thick, about five or six of them, followed by .020 thick, and finally .030 thick around the body of the curve, then tapering back down to zero at the far end. This gives a smooth transition to full elevation. It is not too much as to cause excessive tilting, but gives a nice look. I don’t spike the track – I glue it down with Woodland Scenics Foam Tack Glue. No holes to drill. Push pins hold the track down and in place until the glue sets. Then comes ballasting.
Very interesting and useful article. Thanks for sharing!