


So long as your rails are clean and your rolling stock is fine-tuned, it’s time to inspect your right-of-way for problems. This is the third of five quick articles on how to check for and fix common mechanical and electrical track problems with model railroad track.
Checking for track power problems
As I run my test train along my layout, I watch the locomotive carefully. I note any spot where the locomotive hesitates or its headlight flickers. In those locations I’ll first wipe down the rails with a clean cloth to make sure I didn’t miss a dirty section when I cleaned the track. If that doesn’t help, I’ll run another locomotive over that section to make sure that the problem isn’t poor power pickup on the first locomotive.
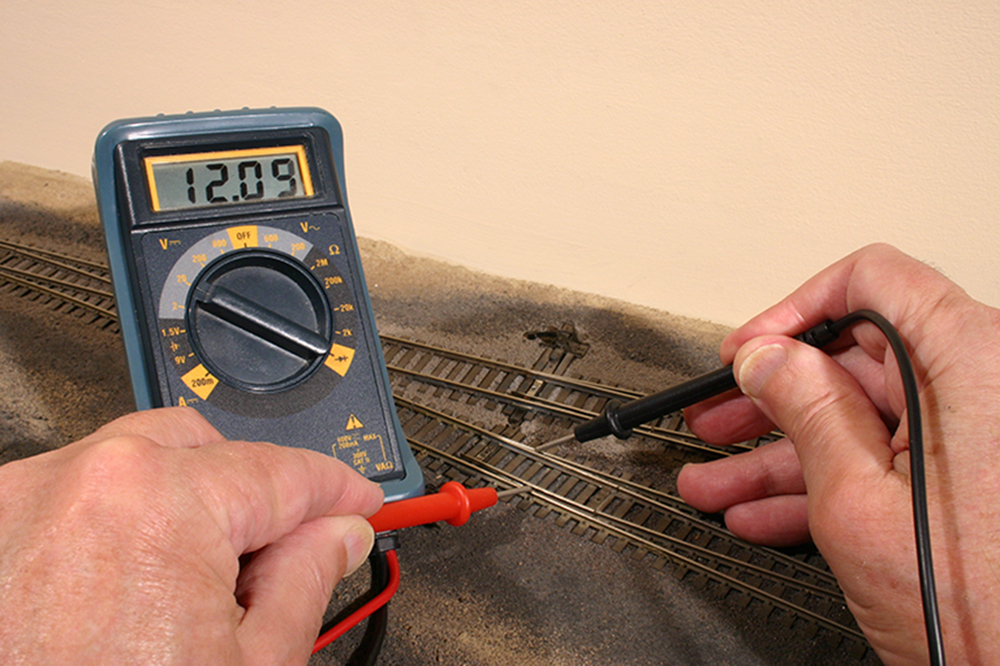
After I’m satisfied that the problem isn’t with dirty track or a faulty locomotive, I’ll check the track section with a multimeter, also called a volt-ohm meter or VOM. This is a portable electronic testing device that reads voltage, DC polarity, resistance (measured in ohms), and current (measured in amps).
To check the voltage of a track section, I’ll first apply power to the layout. Then I’ll set the multimeter to read DC voltage and touch the positive lead (red) to the rail with positive potential and touch the negative lead to the rail with negative potential. The meter will show the voltage from the power source that’s reaching that track section.
For a layout wired for Digital Command Control, I set the multimeter to read AC voltage. The multimeter won’t give an accurate voltage reading but will show the presence or absence of track power as well as the relative voltage.
When using a multimeter with DC power you’ll need to be aware of the polarity of the rails. If the meter reads zero, switch the leads to see if the polarity of the rails is reversed. If the meter still reads zero, then no current is reaching that section of track.
Power losses are more common if you use metal rail joiners to conduct current from a single feeder wire to adjoining rail lengths. Metal joiners can loosen or oxidize over time, weakening the current path. If you find that the current doesn’t pass through the joiner, attach a separate feeder to the dead rail length. I avoided this problem on my layout by attaching a feeder to each track section.
The solder joint between the feeder and the rail could also be broken or cold. A cold solder joint often occurs if the feeder or track moves before the solder can cool, resulting in a weak bond on both surfaces. When you wiggle the problem feeder you may see the multimeter indicate an intermittent connection. Re-melting the solder should reset the joint and fix the problem. If it doesn’t, then install a new feeder.


one issue I’ve had with turnouts is due to loose rivets not conducting, especially after gluing ballast and weathering track with spray paint
Just a thought for y’all. I use caulk/DAP Alex, less than $3 a tube that you use in a gun. That tube almost finished my “approx” 75 feet of track. Under the roadbed and under the track. But not turnouts. I did get into a second tube. There might have been some waste. When ready, I used a 2″ putty knife to spread. And first, used it under the roadbed. And as that was settling, laid track right then and weighted the track with paper towel and canned goods from the wife’s pantry (with her permission). Most of it was left for 24 hours. Some just overnight. When I tried taking the cans up after only a few hours, some was not set enough. the 24 hours is for cure. Oh yes. I bought clear caulk. It goes down white and is visible for the 24 hours. After that, it cures and is invisible. Finally, the best part. When I needed to make corrections, the roadbed pried right up with a 3″ putty knife. No mess, no fuss. And what little bit was left, was easily rubbed off with fingers. And then, simply re-caulked in the new location and did the same as before. I leave the turnouts uncaulked, so when required, simply push joiners onto the adjoining track and lift the turnout. Final thought for those who think ahead! LOL You can pre-determine where the feeders go, solder to the bottom of the rail and drill your hole. i.e. Set roadbed and track in the closest possible place you want to caulk. And know where the feeder is and drill right then as you caulk and lay down. That way, when the caulk has been down for a short time, you can shift and move the roadbed and track slightly to get the best alignment. That caulk is forgiving enough for a short time. I’d guess that after about 30 minutes or so, to not touch the caulked area for overnight/at minimum. I just thought. Paint the foam, and if possible, paint the roadbed. Your choice. I even sprayed the track before cutting and placing with a brown to “dull” and make the ties look better. PECO ties do look good to begin with, but are shiny. Obviously, wipe the rails asap after spraying. After all laid, caulk cured. I cleaned the track.with acetone. Not the best, but better than plain alcohol. Wipe the rails only, keep the acetone off plastic/ties. Then, use a graphite stick. Rub an inch, every 6 inches. And let the cars carry it all over. I like to stand at one end of my 24′ shelf and push a good rolling car hard. It sails along and I just walk along with it. One car ran easily all the way without a hitch. Only one turnout at one place needed to be realigned/it had a slight kink at one point with the adjoining track. Easily pried up, moved a smidgen, recaulked and has never been a problem since. No nails or spikes. Solder track as much as possible, not over 6 feet in one. Any questions, just ask.