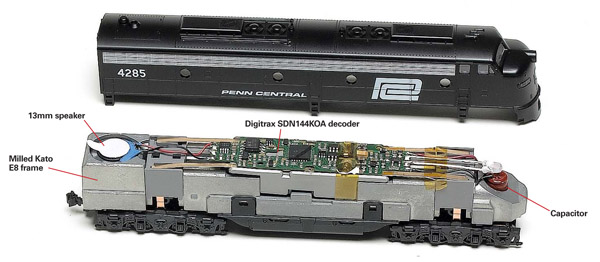
To begin the installation, you need to disassemble the locomotive and then send its die-cast metal frame to Aztec for milling. The firm lists complete instructions for the process on its website at www.aztectrains.com. The shipping and milling process is pretty quick (about 7 days). Atzec does a fantastic job, and the milling work is very clean, fitting the decoder, speaker, and capacitor perfectly.
Once the frame returned, I reassembled the locomotive’s drivetrain. Be especially careful to note the orientation of the engine’s trucks, since they work only one way – the arrows molded into the truck bottoms should point away from the fuel tank. Also, the power collection spring strips can be tricky to install properly. If they don’t seat correctly in the plastic frame that sits atop the motor, they will not contact the tabs on the trucks, and the locomotive will run poorly (or not at all). The only part from the original model you do not need is the light board, which can be discarded.
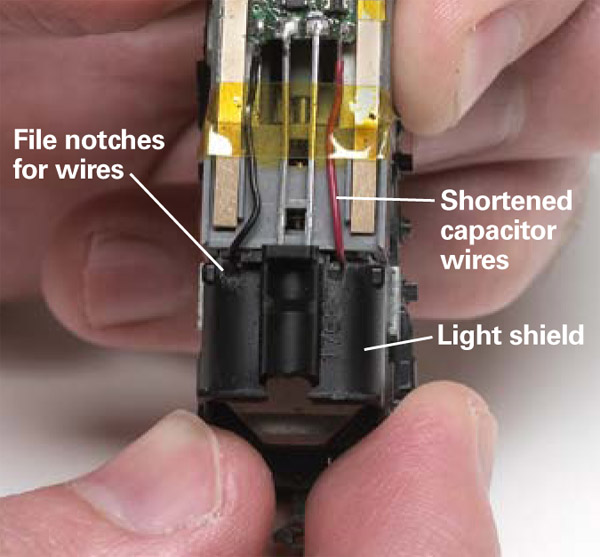
After I’d installed the decoder, I made a short test run with the mechanism on DCC, and it worked as it should. When I replaced the shell, however, it was apparent that the wires from the capacitor were preventing the shell from seating properly, causing the power contact springs to break contact with the forward truck pins.
To correct the problem, I unsoldered both the capacitor and speaker from the decoder, shortened their wires considerably, and then soldered them back in place. I also filed notches for the capacitor’s wires into the end of the cab light shield, as shown in the photo at left. After making those two fixes, the shell clicked into place as it should.
The decoder features several other sounds linked to function buttons, including a bell, horn, coupler crash, compressor noises, and brake squeal. All the sound volumes are adjustable.
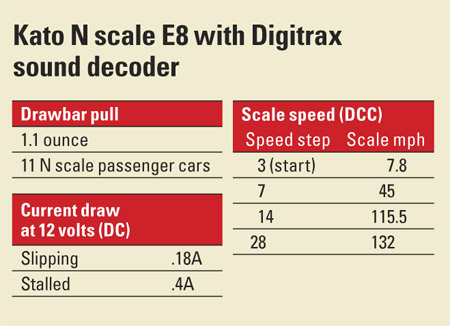
I tested the Digitrax-powered E8 on both DCC and DC. The locomotive performed smoothly on DCC operation. (See the chart above.) Although the decoder can be used with direct-current layouts, it performed poorly in my test with an MRC Tech 4 power pack, so I wouldn’t recommend it. The model didn’t start moving until 9 volts, where it then zoomed along at 137 scale mph.
With the frame milled and the decoder installed, the model weighs 4.64 ounces and provides a drawbar pull of 1.1 ounce, indicating that the E8 will pull 11 passenger cars on straight level track.
Aztec and Digitrax have made installing sound in the Kato model simpler, but having to completely disassemble the locomotive to do it is not what I’d call a drop-in installation. The process took about two hours, plus some tweaking. However, with the project behind me, it’s great to know that my E8 now has authentic twin EMD 567s rumbling under the shell, making it all the more fun to run!
TM3110S milled Kato E8 frame
Price: $20.00
Manufacturer
Aztec Manufacturing Co.
2701 Conestoga Drive no. 113
Carson City, NV 89706
aztectrains.com
—————–
SDN144KOA sound decoder
Price: $69.95
Manufacturer
Digitrax
2443 Transmitter Road
Panama City, FL 32404
digitrax.com





Why weren't the problems shown in the video mentioned in the review?