


By Don Chaney
In the previous articles I described my compact and scenic Forest River layout and how I established the correct room lighting and layout height. I also shared some of my favorite products and technics. In this installment, I’ll cover modeling a river and improving structures.

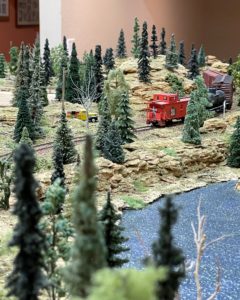
RIVER
The riverbed is a cut-out section of black board. First, I protect the outside ½-inch edge of the black board piece with painters’ tape. I coat the river surface with a thin, level layer of lightweight spackling. When that is dry, I stipple on dark blue gloss acrylic house paint with some green watercolor paint from a tube mixed in (or any paint color you find realistic). When that is dry, I coat with a layer of Liquitex Professional High Gloss Varnish; it dries clear, hard, and non-tacky. I apply a second coat of the gloss medium after the first dries. I then allow the river surface to completely harden, remove the tape, and attach the river piece to the plywood tabletop. Thin strips of jagged brown fiberboard may then be fitted and glued in place to form the river banks.
STRUCTURES
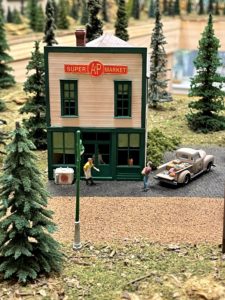
To complete the plastic building kits, I spray all kit parts (except window glazing) with Testors Dull Cote to remove the plastic sheen. I have found that painting only the brick portion of kits that have windows and doors built into the walls with an appropriate tone of watercolor paint (kids or artist tubes) makes the job quite easy, and leaves the windows, doors and frames unpainted, yet highlighted. I prefer watercolors as any painting mistakes may be immediately wiped clean with a wet tissue and repainted. Once dry, the watercolor paint is permanent. To weather my plastic buildings, I use earth tone and gray/black artist chalk sticks (such a rust color on pitched metal roofs) applied with a stiff brush. India ink wash makes wood siding appear weathered.
I simulate curtains and blinds with green painter’s tape and tan masking tape. For commercial buildings, I like City Classics window signs, curtains and blinds (selected from nos. 705, 706, 710 and 711); I install window covering after any painting and before gluing the parts together. To add texture, flat plastic roofs may be covered with N scale coal held in place with white glue.
DETAILS
A wonderful abundance of 1950s HO details, which make your various scenes come to life, are available. Replicas of many 1950s vehicles made by Classic Metal Works/Mini Metals as well as Oxford Diecast USA can be found on my layout. Some of the plastic vehicles are shiny. To remove the sheen, I lightly spray the car or truck with Testors Dull Cote and immediately clean the glass with a cotton swap soaked in alcohol.
Woodland Scenics no. D248 1950s cast metal streetlights need to have flash trimmed and then painted (I stand them in florist foam to dry).
I modify Atlas no. 775 telephone/utility poles by snipping off the bases, the top bracket and the outside insulators on each side of the remaining two brackets. I scrape the poles with a razor saw to simulate wood grain and then spray paint the poles brown. When the brown paint is dry, I hand paint the remaining eight insulators gloss green (stand the poles in floral foam to dry).
FINAL THOUGHTS
Take your time in planning and building. Enjoy the journey. If any aspect of the layout is not satisfactory, do not hesitate to redo it; in other words, do not settle for less than your idea of perfection.
While I have built and accumulated a substantial collection of 1950s HO structures as well as cars and trucks, I subscribe to the often-given caution “less is more” that in this case dictates not crowding the rural scenery with buildings and rural roads with vehicles. The table sections provide ample space for the single track mainline to meander through rural areas and uncluttered scenes with the train surrounded by scenery.
Continuous running is quite popular despite the emphasis in our modeling publications on operations. Whether a modeler prefers operations or continuous running, I would strongly recommend to those new to the hobby to employ DCC power and locomotives with sound and especially current keeper.
When I replace one train with another, I clean the locomotive wheels using a paper towel and alcohol.
I hope this article encourages a number of beginning and intermediate model railroaders to plan and complete a realistic and flawlessly running small layout no matter the era and locale selected.


I would love to see the track plan for this layout.