How To Kitbash a unique O gauge railroad station

Kitbash a unique O gauge railroad station

By Angela Cotey | September 9, 2010

| Last updated on January 11, 2021


This merger starts out with the acquisition of two identical MTH bank
structures and concludes with an impressive passenger
station.

Email Newsletter

Get the newest photos, videos, stories, and more from Trains.com brands. Sign-up for email today!

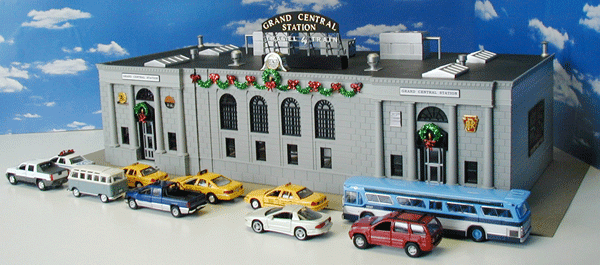
Richard Van de Kieft formed an impressive O gauge passenger terminal out of two MTH structures. Photos by Michael Raynor
2. A motor tool with a cutting disk quickly removes a tapered support along the interior ledge.
3. Use a razor saw to cut the ledge and separate the walls.
1. Use a Phillips-head screwdriver to remove six screws from the base and six screws from the interior of the bank.
4. Roof details can include roof vents, skylights, air conditioner units, and a variety of mechanical cabinets.
6. Entryway features can be as simple as railroad heralds or logos cut from printed materials, applied from decal sets, or derived from refrigerator magnets. In addition to the ¼-inch scale seasonal decorations you can find at craft stores, consider adding phone booths, vending machines, mailboxes, fire hydrants, pedestrians, vehicles, and even interior or exterior lighting.
5. Signs of the times help visitors identify structures on your layout. The Grand Central Station sign originates from a Bar Mills billboard kit with additional gold letters. The station clock is an appropriate detail that you can craft from an old watch.

Stories of mega mergers and capital acquisitions commonly appear in the business section of your newspaper, but not in the pages of Classic Toy Trains magazine. Up until now, that is. While a story about a bank merger may seem out of place here, this one yields big dividends for builders.

This merger starts out with the acquisition of two identical MTH bank structures and concludes with an impressive O gauge railroad passenger station. By carefully disassembling the two banks, making a few minor modifications, and fabricating a new roof, I was able to reconfigure the structures into a three-sided station that’s approximately 36 inches wide, 18 inches deep, and 9½ inches tall.

While I could’ve easily used the remaining bank walls to complete the fourth side, I planned to place the station on my layout where visitors couldn’t possibly view the rear of the building. If you decide, as I did, not to include all the bank walls in your station, be sure to save them for use in future building construction projects.
In the following pages, I’ll share what inspired me to tackle this project and the simple steps I used to merge two structures into something grander.

The inspiration station

The idea for this merged, or “kitbashed,” structure (kitbashing is a nickname for modifying manufactured kits into unique creations) actually came from a building that’s half the size of my finished passenger station. When I first saw an advertisement for a Walthers no. 933-3094 Union Station kit in HO scale, I was inspired to create something that grand for my O gauge layout. I’d thought about constructing something like this before seeing the Walthers building, but it all came together when I took a closer look at the details of an MTH Rail King no. 30-9065 First City Bank building.

The MTH stone-block bank is an impressive edifice by itself. The building features large arched windows on its left-side wall, tall columns at the entryway, blank stone blocks on its right-side wall, and other architectural details that seem appropriate as part of a big-city railroad station. After inspecting the details and construction of the MTH bank I already owned, I determined it would be fairly easy to reconfigure two of these structures into my own grand station. My first step was to disassemble both banks.

Breaking the bank

Not counting the windows and doors, the basic building breaks down into three sections: the base, the four walls, and the roof. Separate the base from the walls by removing six screws located underneath the bank, as seen in Photo 1. Once you’ve removed these screws and the base, you’ll see six more screws that hold the roof and walls together. Remove these screws, along with the interior light bulbs and fixtures, to disassemble the structure.

Mega merger

I used the left-side wall (featuring four arched windows) of one bank to form the center section of the new station. To add length and depth to the center section, I attached a front entryway wall (featuring door and steps) and a left-side windowed wall section from one bank, and a front entryway wall and a right-side blank wall section from a second bank.

In order to fit the new center section to the two end sections, I first had to cut away a few of the bank walls. In the process of removing walls, I discovered the inside of each wall section has a 1-inch ledge, that runs above the first-floor windows and over the front door. Before attempting to trim this ledge, you’ll need to use a motor tool with a cutoff disk, cutting pliers, or a razor saw to remove the tapered supports for the screws. See Photo 2. As shown in Photo 3, you can then use a razor saw to cut the ledge on a 45-degree angle where the front entryway walls are joined with the center section.
After separating the sections from the original structures, I used a hobby knife and small file to trim the details (masonry molding) on the center-wall section for a flush fit with the two front entryways. Once I was satisfied with the fit, I used liquid plastic cement to glue the sections in place.

Closing the deal

If you use only the wall sections referenced here, the station will be complete on three sides and you’ll end up with various sections left over from the two MTH bank buildings. I also chose not to use the roof section or the base from either bank. Consequently, I fabricated a new roof section, a blank rear wall, and a foundation using 3/16-inch-thick foam-core board to enclose the building.

You can purchase foam-core board in a variety of colors, but I chose to buy white board and spray-paint it colors appropriate for the location (e.g., flat black roof). To prevent the board from warping as the paint dries, be sure you apply only a light coat. Additionally, the roofline has a number of extended and indented areas that required careful study and precise cuts to fit correctly. Working slowly and trimming away small portions helped me avoid creating large gaps along the roof.

Preparing for a grand reopening

After completing the new structure, I added a number of signs and details to make the building appear more like a railroad station than a bank.

To add details and interest, I included roof vents and various air-conditioner units built from Walthers HO scale kits and other plastic models. See Photo 4. I also modified a Bar Mills brand “Union Station” billboard to sit on a small piece of black-painted wood and raise the height of the sign above the roof. To further customize my station sign, I added a small piece of cardboard and enough gold-colored plastic letters (typically found at an office supply or craft store) to spell out “Grand Central Station,” as shown in Photo 5.

Near the front entryways, I attached logos of my favorite New York City railroads. As a finishing touch, I added a miniature clock and appropriately scaled seasonal decorations such as holly and wreaths, shown in Photo 6. When I have more time and opportunity to finish my layout, I may also add lighting to both the interior and exterior of the station.

Completed transaction

Although my Grand Central Station may not be “museum quality,” the structure fits my needs for a large O gauge passenger station, without bearing the hefty bottom-line of a large, custom-crafted building

Materials
Bar Mills (barmillsmodels.com)
91702 HO and O scale “Union Station” billboard

MTH Electric Trains (mth-railking.com)
30-9065 RailKing First City Bank (two or more)

Testor Corp. (testors.com)
1149 Flat Black spray paint
3507 Liquid cement

Wm K. Walthers (walthers.com)
933-3157 HO scale roof air conditioning kit
933-3158 HO scale roof detailing kit with assorted vents

Miscellaneous
¼-inch scale holiday decorations available from craft stores
3/16-inch-thick foam-core board (white, black, or gray)

Tools
Phillips-head screwdriver, hobby knife, needle file, cutting pliers, razor saw, or motor tool with cutoff disk

References
12258 Basic Structure Modeling for Model Railroaders (Kalmbach)

One thought on “Kitbash a unique O gauge railroad station

You must login to submit a comment