


Restoring an old toy train can be great fun, and once the project’s done, it can give you a great feeling of accomplishment. Restoring your own items also can save money when compared with buying an original or a completed restoration in equivalent condition. One of the keys to a successful restoration, though, it picking a good candidate. Even if you’ve never met a toy train you didn’t like, some are just better restoration candidates than others. Here are some factors that help make for a good candidate, along with a few specific suggestions about trains you might consider – and a few you shouldn’t.
Consider the color
First of all, think about what color(s) you would want to paint the piece. Black is your friend; so is silver. These two colors are relatively easy to match to the originals and both are easy to spray. Gunmetal gray (in Lionel-speak, a dark gray metallic) is another good color. On the other hand, yellow, white, and light green can be tough, even when you use a light gray primer or a base coat of silver.
What type of finish?
Ditto for the kind of finish required. Semi-glosses and flats usually give the best results. Glosses take longer to dry, meaning more potential problems with airborne dirt, and are more likely to have a rough, “orange peel” finish.
Plastic versus metal base
The material you’re painting (technically, the substrate) also makes a difference. You can use nearly any type of paint, including hardware-store sprays like Krylon, over sheetmetal and metal castings. You can even bake your paints onto metal. Plastic bodies, however, can be ruined by the “hot” solvents in some spray enamels, so you’re best off using hobby enamels or acrylics on them. (Never try to bake paint onto a plastic body – they can melt.)
Complexity of paint scheme
The complexity of the paint scheme is another consideration. Single colors are simplest, followed by multicolored schemes where the piece you’re painting can be taken apart (as on many sheetmetal cars). Anytime you start having to mask, however, things get more involved, because you not only have to get your tape placed precisely, but you have to be sure that the tape doesn’t lift paint that lies underneath (using blue “long mask” tape helps). Schemes that require curved masks are harder still, though you can get better results by using a pattern and cutting your tape before application.
It’s usually best to wait until you have a few restorations under your belt before tackling a very complex paint scheme, like the multicolored stripes on some diesels or the outlined windows on some passenger coaches.
What kind of lettering?
Lettering is another factor. Is the lettering you want available as a dry transfer (easiest to use), a waterslide decal (next easiest), or a stick-on decal (trickiest, because you have only one shot at getting it in the right place). Also, did the piece you’re considering have heat-stamped lettering originally? If so, recognize that you’ll need to fill and sand it before you paint, because otherwise it will be visible through the new paint – and your chances of getting even dry-transfer lettering in exactly the same spot are very, very low. It might be easier to find a similar piece with rubber-stamped lettering to start with.
Condition of the item’s body
How much, if any, bodywork the piece needs is another concern. Simply stripping it to get a smooth, chip-free surface isn’t too difficult. Plastic pieces can be stripped with a commercial plastic stripper like Polly S ELO or even strong detergents like Tide or Castrol Super Clean. Metal pieces can be stripped with ELO, aircraft strippers, or even by boiling them in detergent water. You can even sandblast metal pieces – see if your local auto body shop will do a piece or two for a small fee.
Straightening sheetmetal can be tricky enough, but it’s still much simpler than straightening bent metal castings, which are prone to breaking. Warming them slightly first can help, but even if you do that, work slowly. Cracked or chipped plastic can be glued, filled, and sanded, but it’s extremely hard to re-create rivet or handrail detail. Sometimes the piece will look fine without it, but make sure you enjoy filling and sanding before you tackle a broken plastic body.
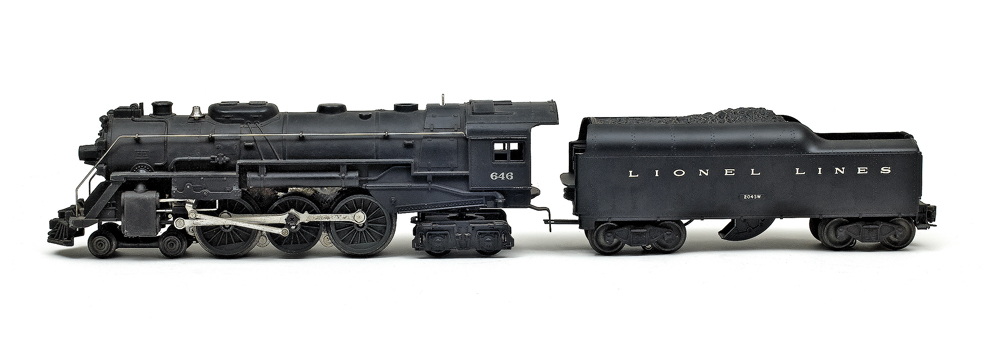
Keeping these factors in mind, some pieces look like better candidates than others. It’s a bit more expensive to start with a locomotive than a car, but black steam locomotives are often excellent candidates. There’s no tricky masking, you can use quick-drying Krylon satin black, and dry transfers are available for the cab number on most. If you start with a postwar (1945-69) Lionel, you don’t even have to restore the tender if you don’t want to – new, already lettered tender shells are easy to find. Tank cars can be good candidates as well. Many had silver tanks and black frames, and most Lionel tanks had rubber-stamped lettering, which means no indentations to fill. Sheetmetal passenger and freight cars can be fun to restore, as can silver plastic passenger cars.
Poor candidates for restoration?
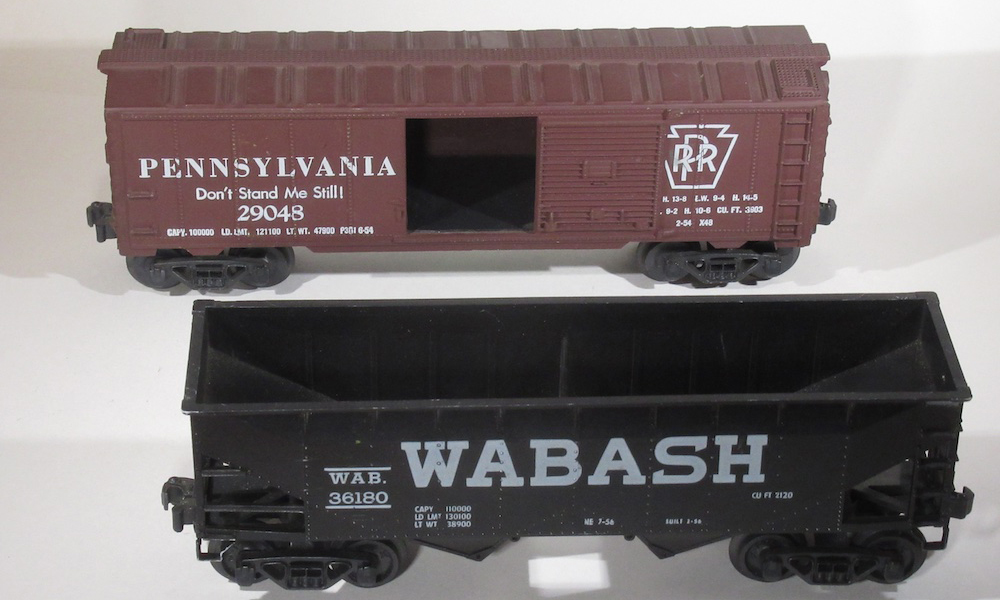
Multicolored boxcars (especially Lionel 6464 cars, most of which have not only complex paint schemes but heat-stamped lettering) and diesels are tough to do. GG1 electrics have single-color paint schemes and metal shells, but their stripes can be a challenge to apply. There’s usually no reason to start with an expensive variation, since you’re going to paint it anyway. On the other hand, unless you want to create a custom scheme or have a piece with sentimental value, it’s often not economically justified to restore a very common, low-priced piece either.
Still, if you were only interested in economics, you’d be trading stocks, right? So get a train, some paint, and some lettering, and give a restoration a try.


On repainting, and the number/lettering challenge. I have used this approach numerous times: Take cellephane tape and apply it over the number. Get your hands on the real small x-acto knife, and carefully (VERY CAREFULLY) trace the letter or number shape. You must cut through the tape, but not scratch the paint. With a steady hand and practice this can be done. Pry up the tape around your letters or numbers. Press the cellephane firmly onto the letter/number.
Once your have prepped the shell to be painted, i.e., cleaned, smoothed the edges of chips, etc., then you may prime it if you wish or use the Krylon color. This works best on black locomotives, but I also did this on a silver Burlington GP7.
Generally when you spray, you need only the lightest of overspray on the letters/numbers and of course heavier where there were major chips.
If you can apply paint with an airbrush the coverage may be even smoother.
Once done, peal off the cellephane tape. If there is any raised ridge this can generally be smoothed out or pressed down with the side of a toothpick.
If you are successful you will really like the result, and be satisfied that you did this all with a little sand paper, cellephane tape and a can of spraypaint.