Adding diesel sound to American Flyer trains is easier than ever thanks to ready-made electronics. If you can accomplish basic wiring tasks, you can install the needed components.
I run a mix of postwar American Flyer and Flyer produced by Lionel. That means with newer stuff I’m quite used to the sounds of modern electronics duplicating real diesel engines as they run on my layout. What I decided to do was find a way to load a diesel sound board into a Vintage Gilbert-made passenger train.
Get plans for some terrific S gauge layouts.
Adding diesel sound to American Flyer trains
The first task was to discover what products were on the market to use in my project. After considering several I decided on one produced by 3rd Rail of Sunset Models Inc. The company is licensed by Lionel to use the train maker’s technology in its Electric RR products.
Since I wanted to pull my train with a Gilbert Alco PA engine, I searched 3rd Rail’s website to locate the proper sound board for that engine. That kit is the ERR Diesel Railsounds Alco PA series. It includes the board, speaker with cable and baffle, power and data cable assembly, battery cable assembly, mounting hardware, heat-shrink tubing, and cable ties. You can even listen to the sounds for the prime mover, horn, and bells.
The kit, priced around $130, has everything you need except a 9-volt battery. (It helps maintain power over breaks in the track.)
Staying updated
The installation directions for the kit did not come in the shipping box. Instead, it’s available online. The advantage to that is the 25-page manual can be updated as needed and you can read it to make sure this is the kit you need.
Once I had the kit I needed to decide exactly how to mount it in my train. I took the shells off of the powered Alco A unit and the unpowered B unit. What I found was I didn’t have enough room to install the components of the kit in either.
With the motors and reversing unit in the powered unit there was no space. The B unit has the Gilbert horn, so with the shape of the floor there was not enough space either. I didn’t take it out because I didn’t want to destroy the value of the prized unit.
Finding a Plan B
I decided to install the kit in the first car behind the diesels. In a Flyer streamlined Budd passenger set, it’s the combination car. It has passenger windows in about half of the car and it is right behind the locomotives, so it’s putting out sound in the right place.
The great thing about using a passenger car is it has a flat floor, which means I could arrange the components without worrying about humps or indentions.
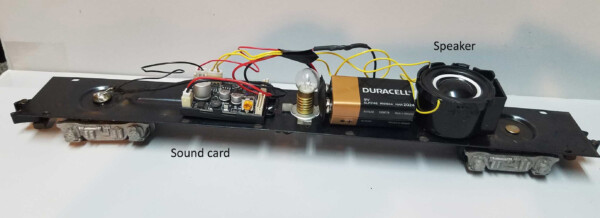
I did have to alter the speaker a little to get it to fit. It’s designed for O gauge trains and slightly too wide for the body shell. Using a rotary tool with a sanding attachment, I took enough off both sides of the speaker’s plastic enclosure to be able to fit the shell on.
The sound board was just narrow enough to fit in perfectly on the floor, but I did have to alter the shell on the inside. It has threaded plastic pillars to install screws to hold the shell to the floor. I used my rotary tool with a cut-off wheel to take a ¼ inch off to make space for the board. There are plenty of supports; missing two is not an issue.
Easy to follow
The speaker, battery, and board are all fastened to the car floor with double-sided foam tape. If needed the whole system could be removed in 10 minutes and the car would look the same as it did before the project.
With the components in place, follow the instructions and photographs to finish the wiring. They are clearly written, and the photos explain exactly where to place every wire. Since the kit has a number of uses to go with larger TMCC applications you will have parts left over. It always worries me when there are parts still on the table so I double checked my work before casting them aside.
The installation took less than an hour.
Now to the track
Placing the car on the track behind the Alco was a happy experience. The car performed well and acted as I anticipated. Being a Lionel TMCC related product, it likes all the power you can give it, so 17 volts from my Gilbert transformer is where all its features worked best.
At lower voltage its horn and bell sounds are harder to initiate. It needs at least 10 volts to do its job. With a Gilbert transformer you also have to have two of Lionel’s sound control buttons wired into your track power system for horn and bell.
From 2013 to 2018 Lionel produced S gauge American Flyer diesel sound box cars No. 49064 New Haven and 49065 Union Pacific. Since these car were supposed to do everything the Railsounds kit did, I decided to take the shell off my UP version and take a look. Sure enough, they looked like they had the same stuff inside.
Good if you can get them
These diesel sound box cars are no longer being made. In the latest American Flyer Pocket Price Guide they are valued at about what they cost new. It’s less expensive to get a kit like this and modify a freight car to house the electronics. Plus, you can use any road name for your railroad.
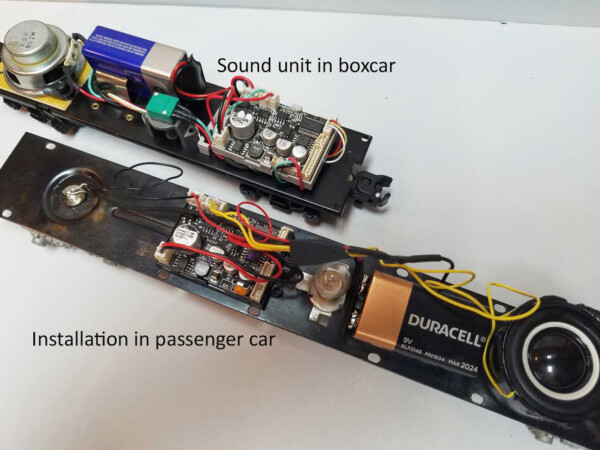
Construction of the car would mean installing trucks that can pick up power like those on a lighted caboose and isolating one electrically from the chassis. The passenger cars are easier to modify as they are wired to pick up power from the start because of the bulb inside.
If you want to make you Gilbert passenger trains have diesel sounds or freight trains too, I recommend you give this project a whirl. It’s a relatively easy project and it might help get comfortable with new technology.
Bill Clark writes the “S Gauge Now and Then” column in Classic Toy Trains as well as articles and reviews of S gauge products.




Nicely done, neat work.