Ornate architecture, magnificent concourses, and a seemingly endless parade of people and trains are just a few of the characteristics that make large passenger train terminals just as captivating on toy train layouts as they are in real life. But aside from the original Lionel no. 115 city station and recent reproductions, you won’t find this type of O gauge structure commercially sold.
However, with only a modest amount of time, materials, effort, and skills, it’s fairly easy and inexpensive to build one yourself.
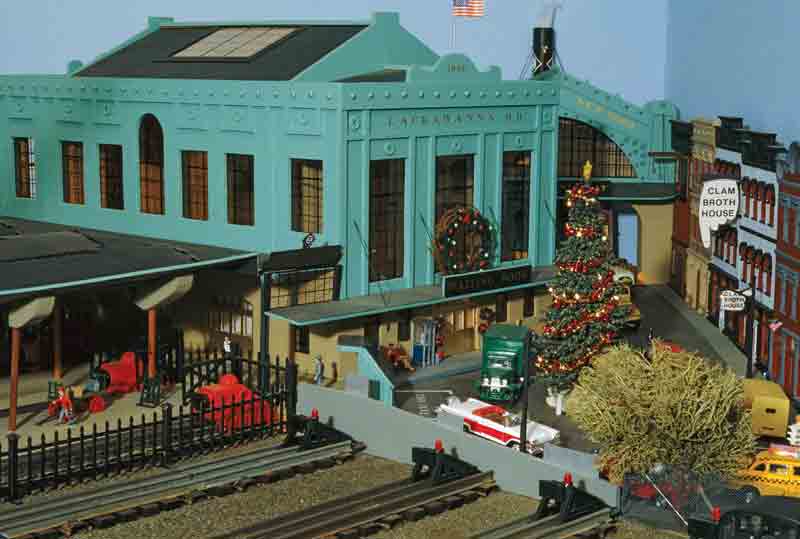
On my O gauge Erie Lackawanna Railroad layout, I wanted to include a model of the famous Hoboken Terminal. The actual terminal in Hoboken, N.J., rests on the banks of the Hudson River, within sight of Manhattan. Built in 1907 during the era of grand terminal construction, it served both commuter and long distance trains, while ferry and subway connections took passengers into New York City.
Even if you aren’t re-creating a famous landmark, it’s still beneficial to do a bit of historical research before you begin construction. Books and other historical references are often helpful. I also took photos and measurements of the actual structure, which I then turned into scale drawings of my proposed model.
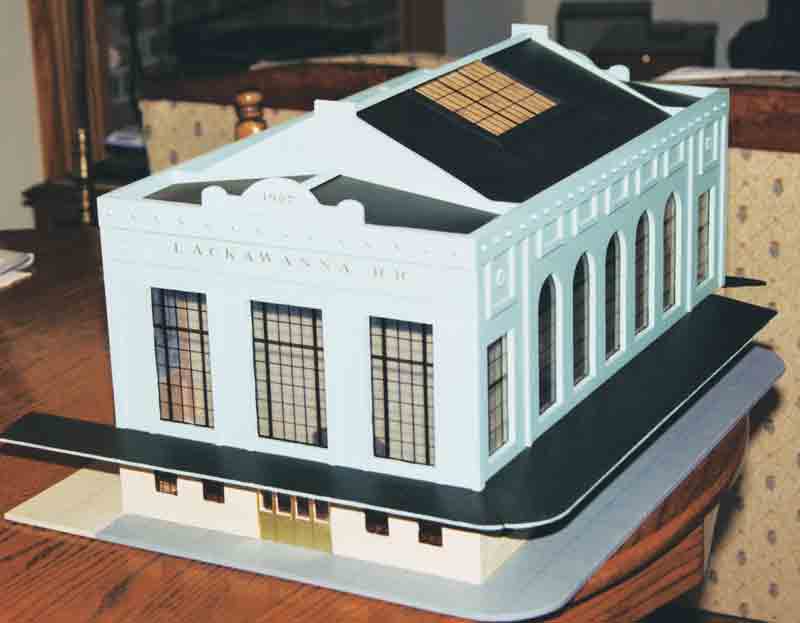
My goal was to create a model that captured the look and feel of the real terminal. Even with a bit of “selective compression” (dimensions reduced to suit the space available) to two-thirds the scale size of the actual structure, my 24-inch-long, 16-inch-wide, 15-inch-high model still dominates the rail yard and business district surrounding it on my O gauge layout.
Although the terminal I modeled has a real-life counterpart, you can easily adapt the following construction method to create a large terminal that suits your layout.
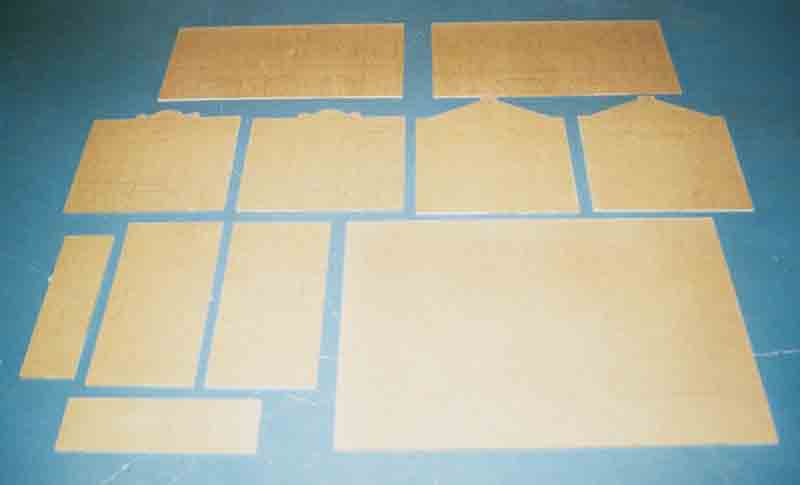
To form the main walls, roof, and base of my terminal, I used 1/4-inch thick hardboard (often referenced by the Masonite brand name). Although hardboard isn’t particularly dense material, the stock is still sturdy enough that it doesn’t need additional framing to support the structure. Using my scale drawings for reference, I began by measuring and marking the design on the smooth, finished side of a 4- by 8-foot hardboard sheet. After transferring the entire design to the board, I then used a table saw to cut out the base, wall, and roof components. I also used a jigsaw to cut a few of the tight angles and curves.
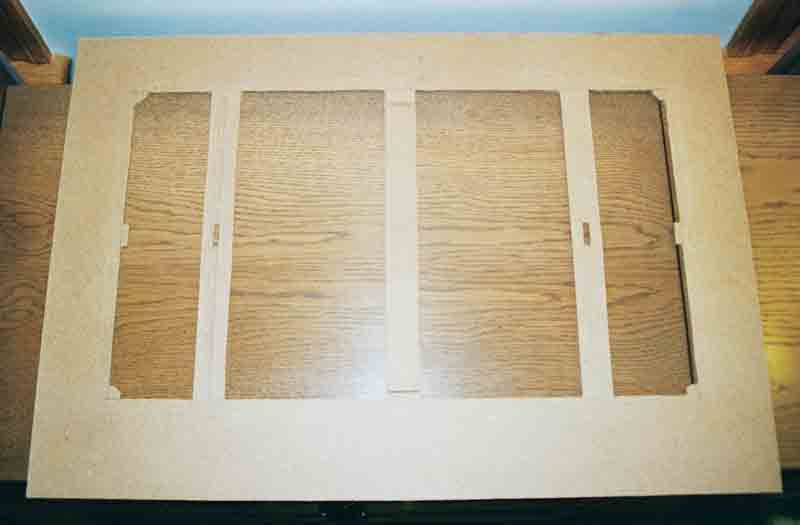
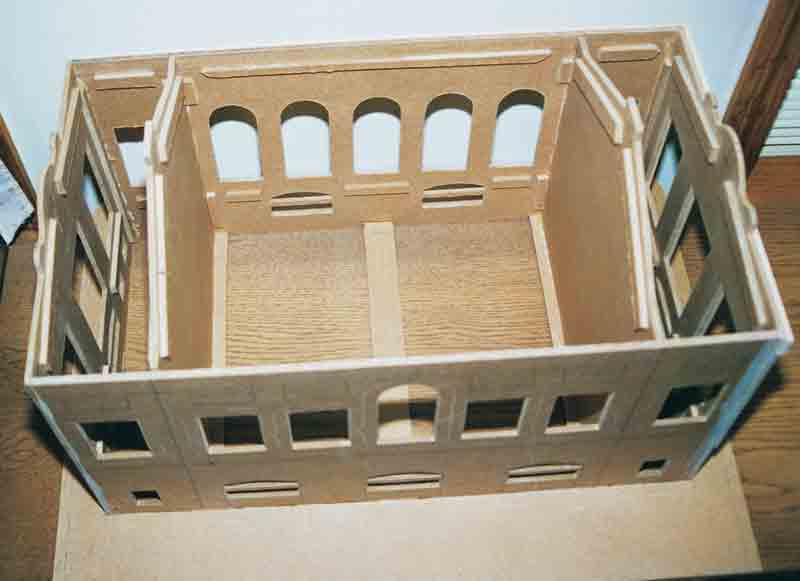
While I could have left the base as one solid piece, I decided to cut out most of the base and leave just a few narrow strips to support the inner walls. Leaving gaps in the base makes it much easier to route wires for interior lighting from below the layout.
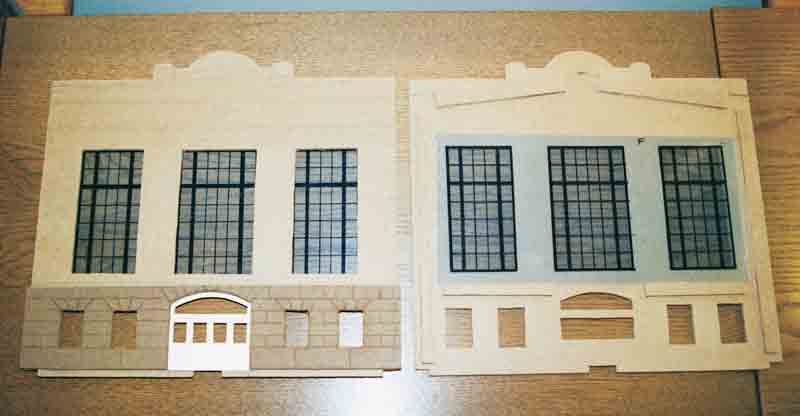
Next, I cut each window and door of the terminal out of the hardboard wall sections. To begin the process, I first drilled a 1/4-inch pilot hole through the middle of each opening. I used these holes to start my jigsaw cuts around the perimeter of each window and door, and then sanded the cut edges with 100- and 150-grit sandpaper. With about forty openings in the walls and a skylight in the roof, this was the most time-consuming part of the project. However, taking the time to make precise cuts and carefully sanded edges certianly helped give the structure a well-finished appearance.
3 Create the windows, doors, and exterior facade
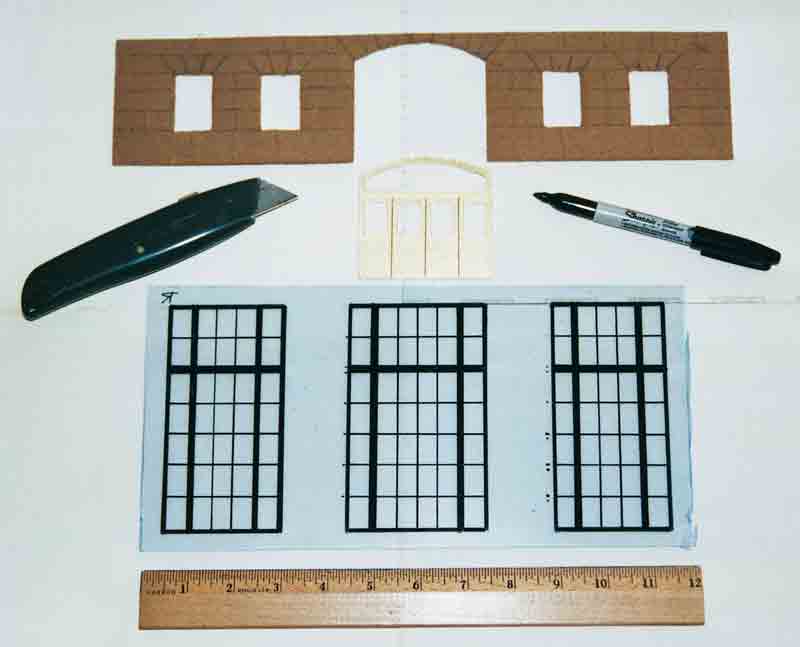
I chose clear acrylic plastic (often referenced by the Plexiglas brand name) to fill the windows of my terminal. I decided against cutting out individual plastic pieces for each window. Instead, I cut large, wall-length pieces of plastic, then used a fine-tip laundry-marking pen and a ruler to add windowpane details.
For doors, I used brass-colored scrap matting from a picture-framing store. I cut that to fit the openings then added doorframes and the suggestion of other details, also using a fine-tip pen.
The actual Hoboken Terminal has a cut limestone finish around the first floor. I replicated this using a 1/8-inch thick hardboard cut to size. After marking the windows and door openings to cut out, as previously described, I then penciled in the joint lines that appear between stones. Using a box cutter and straight edge, I made score marks along each joint line before lightly sanding the pieces with 200-grit sandpaper.
When completed, I loosely assembled all of the terminal sections and sanded or modified the pieces for a precise fit. Once satisfied with the fit, I made cleats from scrap hardboard and glued them inside the wall sections to help support the roof, window pieces, and corners where the wall sections join.
5 Raise the walls and roof
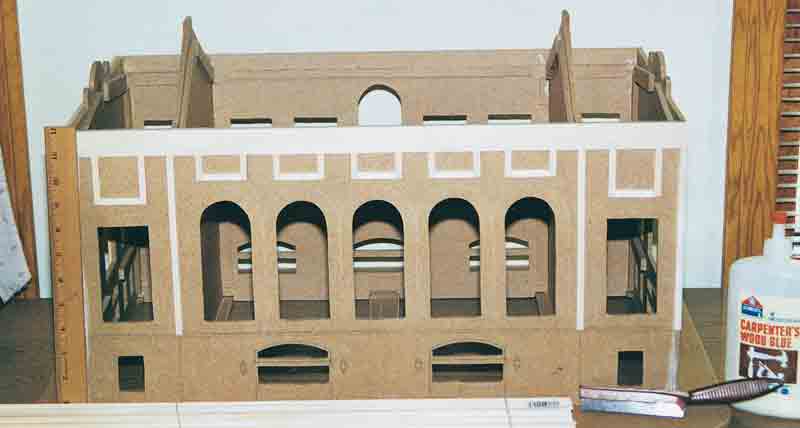
After the cleats dried, the walls were ready for assembly to the base. I first drilled a few 1/16-inch pilot holes in each corner of the wall sections. Next, I used carpenter’s wood glue to bond the interior and exterior wall sections together on the base. I then tapped wire nails into the pilot holes to help support the structure as the joints dried. The nails were later removed and the holes filled with vinyl spackling compound. I also used additional spackling to fill in any cracks or gaps in the wall joints and imperfections on the outer walls.
With the walls erected, I put the four pre-cut roof sections into place on top of the cleats I previously fixed inside the wall sections. I did not glue the roof sections, so I am able to remove them to add interior lighting, details, or to maintain the model.
6 Add architectural enhancements
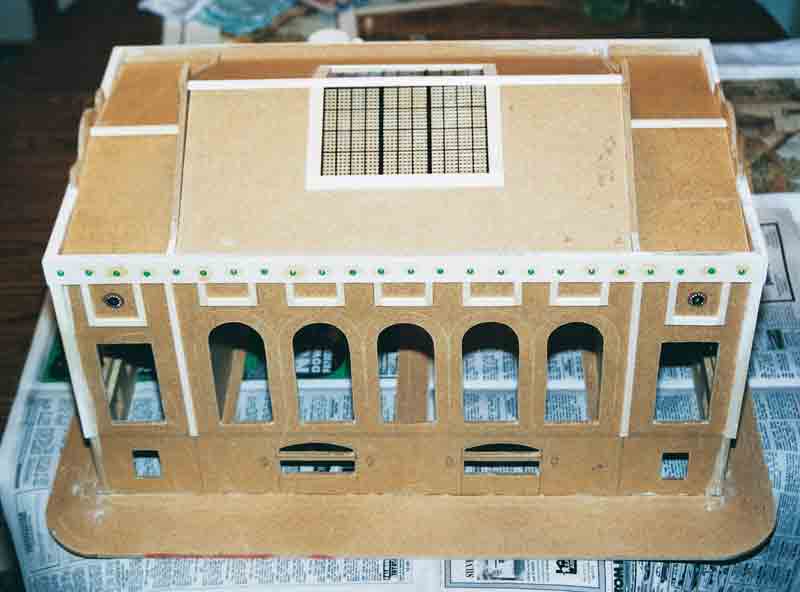
In effort to create some dimension and architectural detail on my terminal, I cut and applied various widths of balsa trim to the outer walls. Further detailing along the upper edges of the walls consists of various plastic beads and jewels I found in a craft store. I glued these to the hardboard and balsa with gel form super glue (CA or cyanoacrylate adhesive).
I formed the skylight in the center of the roof from two pieces of clear acrylic plastic and detailed them using a fine-tip marker. As with the windows, the detailed plastic looks nice by itself. However, I wanted to be sure that light from the interior fixtures I planned to add wouldn’t shine straight through. At a craft store, I found sections of plastic canvas used for needlepoint that worked well to diffuse light, so I attached these to the underside of the clear acrylic plastic. I then removed two large sections of the hardboard roof, and glued the plastic parts and balsa edging into place.
7 Prepare for painting
The upper sections of the actual Hoboken Terminal are sheathed in copper. Over the years, it has weathered to a shade of green. In effort to duplicate this effect, I had a quart of Benjamin Moore satin-finish latex paint custom mixed to color no. 634. I applied not one, not two, but three coats of it to the entire upper part of the terminal. Even when painting the smoother finished side of hardboard, initial coats will quickly soak in. After removing the roof sections to paint them flat black, I painted the interior walls flat beige. I painted the stone wall sections for the first floor a sandy limestone shade. Finally, I painted three sides of the sidewalk sections a gray, flagstone color and finished the remaining sidewalk area between the terminal concourse and train platforms in a concrete color.
When all the paint had dried, I fixed the acrylic plastic window panels back into place using gel form super glue. I also glued the stone wall sections around the first floor into place using carpenter’s wood glue.
8 Install fine details
To finish the terminal, I added a number of details. First, I applied dry transfer lettering to both ends and street side of the model. I then fabricated sidewalk canopy sections from 1/8-inch thick hardboard, painted them flat black, and then placed them at the top of the stone-wall sections. To help support each canopy, I added guy wires made from seven-inch lengths of .055-inch diameter music wire I painted black. I attached these from the building walls to the sidewalk canopy through pre-drilled 1/16-inch holes and bent the wire at each end. I also lined the sidewalk and concourse sections using a fine-tip pen to simulate curbing, expansion joints, and pavement cracks.
After adding an American flag to the roof, I installed interior lighting using four sockets, one in each end section and two in the main waiting room. Each socket contains a small 18-volt clear bulb that I operate at 12 volts.
Finally, after dusting a bit of gray and black pastel chalk over the outside walls to create subtle weathering effects, I moved the completed model into the 24- by 30-inch space I cleared on my layout. There the terminal serves as a fitting departure and destination point for all of my passenger trains.
Materials list
- 1/4-inch hardboard (4- by 8-foot sheet)
- 1/8-inch hardboard (4- by 4-foot sheet)
- 1/10-inch clear acrylic plastic (19- by 24-inch sheet)
- 1/4- by 1- by 21-inch balsa strips (4)
- 1/9- by 1/4- by 21-inch balsa strips (12)
- Brass-colored frame matting (1)
- 10- by 12-inch needle-point plastic canvas (1)
- .055- by 3-inch music wire rods (3)
- 18-volt light sockets and bulbs (4)
- Gold or black letter dry transfer set (1)
- Miscellaneous plastic beads and jewels
- Green, black, gray, and tan latex paint






This is a superb article.