


Jumping right in
When the no. B51 kit arrived, I was a bit nervous. I am not exactly Mister Craftsman, so when I opened the package I was pleased that it wasn’t a bunch of fragile twigs needing to be connected.
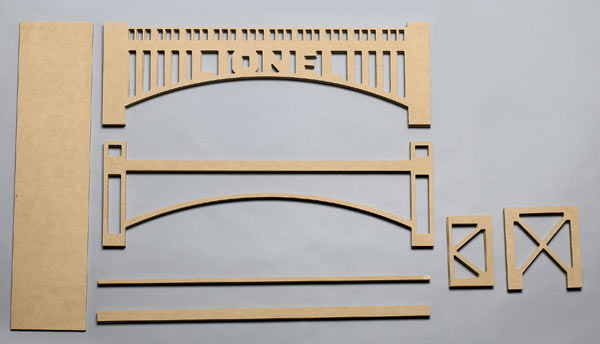
The material is made of pre-cut medium-density fiberboard. Basically, your task is to join 13 sturdy pieces, and that is it!
Need any skills? Nope, not really.
Being able to line up two straight lines helps, but a yardstick or straightedge may be of assistance if you need a helping hand in that department.
Few tools are needed.
T W Designs suggests wood glue or white glue. I had a fresh bottle of white glue, so that’s what I went with.
I was going to build my kit on the kitchen table, so I put down some waxed paper to catch glue spills, but an old newspaper would work just as well.
The instructions mentioned using a brush for spreading the glue, but I opted for folded paper towels.
This method may not be as precise as using a brush, but I can be certain where the glue is going by putting it there with my fingers.
I did have a few small plastic clamps that I used to tightly hold the pieces together while the glue dried, and I thought that this was essential. If you don’t have any clamps, and don’t want to buy any, you can probably achieve the same end if you stayed at the workbench and applied pressure for a while.
Finally, before getting started, I ran my fingers along all the edges, to see if I needed to use fine-grit sandpaper to smooth them down. Fortunately, all the cuts were clean.
Bridge mastery
The first step is assembling the two sides, or arches. This involves gluing together the base (the section with LIONEL on it), an outer frame, and two long sections of trim (one wider than the other), to be positioned just below the structure’s side rails.
Be sure to keep an eye on the ends – all the wood sections should align and stop at the end of the frame – nothing should hang over. It should all be square and tight. Make any adjustments in alignment while the glue is fresh.
I gave the glue a few minutes to begin to adhere at each step before I applied the clamps. After 40 minutes or so, it seemed to be as tight as it was going to get.
The next step was to install the end cross braces. I applied enough glue (and held it by hand long enough) to adhere to one side of the bridge and to hold it upright. I then glued the other side to the end supports. After I was satisfied with the alignment, I applied the clamps for about an hour.
Next was the placement of the bridge deck on the end supports.
I just applied glue to the top of the end cross braces, but in retrospect it would have been a good idea to have dabbed some glue along the sides of the frame. So I went back and applied a wee bit of glue along the length of the deck, where it meets the bridge sides.
I used four clamps to hold the deck in place – two on each end.
The final step was to flip the bridge over and install the last two (smaller) cross braces.
I put glue on all three sides. The braces held themselves in place.
An hour or so later, I returned and took the unorthodox step of grabbing one end and shaking it. Everything was snug as a bug. Now, I wouldn’t recommend everyone do that, but I was confident my gluing would hold.
Layout installation
You can place this bridge anyplace you have the space. The overall length is 20 inches. The width of the bridge (including the decorative pieces) is approximately 61/8 inches.
The width of the deck (for track placement) is 4½ inches.
The height from the ground to the deck is 5½ inches, while the height from the ground to the center of the arch is a bit more than 3 inches. If you plan to have a railroad run under the bridge, you’ll need to increase the height by adding corner supports.
Go to twtrainworx.com to see a variety of Lionel-branded bidges.
This is an easy-to-assemble kit of a distinctive structure. It is affordably priced, and, painted or natural, it will look fine on a layout or even your desk at work.


I assembled the B-53 bridge, which closely matches the one on the 1952 catalog cover. It is 30 inches long with enough room for several tracks below the arch. I agree that it is important to apply glue to the long edges of the top deck. I too was quite pleased with the finished product. If the bridge is going to be painted, I would suggest painting after assembly is complete. I wonder how some of the stone type paints sold in spray cans would look. They would be an easy way to give the bridge a stone look for those like me who have no experience doing scenic work on a layout.
Best to all.
What type of paint would you use on this kit? and when to paint it?
Thanks