TrainAmerica Studios is marketing the Universal Command Upgrade Board (UCUB), which, when installed, gives any conventional locomotive the ability to respond to Command Control signals. We’re not talking about TrainMaster conventional mode here, but full Command Control. Also, “any locomotive” indeed means any – from prewar American Flyer to MTH ProtoSound-equipped locomotives. You could even convert a Standard gauge locomotive or an S gauge Flyer locomotive to Command Control.
The UCUB is sold as a kit for home installation or you can send your locomotive to TrainAmerica Studios where technicians will install the circuit board for an extra $30.
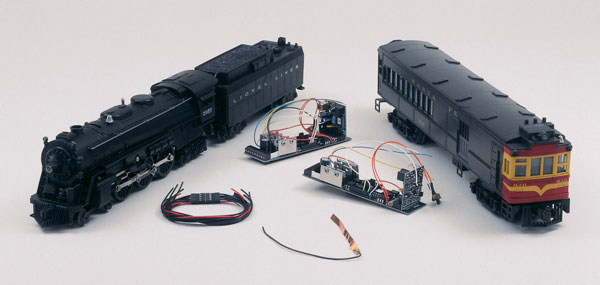
For our review, we targeted two locomotives typical of those that hobbyists would likely convert to Command Control – a postwar Lionel steam locomotive and a new MTH doodlebug, which, beneath the shell, is nearly identical to an MTH diesel locomotive. TrainAmerica Studios reports it has been selling about a 50-50 mix of AC and DC boards, reflecting installation in both new and old locomotives.
The circuit board is 5-inches long by 15/16-inches wide, but it’s also more than 11/2-inches tall, so depending upon the locomotive being converted to Command Control, there may or may not be enough room within the locomotive’s shell. If not, as is the case on nearly all steam locomotives, you’ll need to install the UCUB in the tender or, in the case of a small diesel, a trailing dummy unit. Tender and dummy-unit installations require an electrical tether to the powered unit. Besides room for the UCUB, you’ll also need to allow space in your locomotive for wires, which can become numerous if your locomotive has a sound system, coil couplers, directional lighting, and a smoke unit.
MTH doodlebug
From the outside, the can-motored doodlebug looks like an easy installation with plenty of space beneath its passenger car-like shell. However, as the photos show, it isn’t as roomy on the inside as it appears.
The 36-page TrainAmerica Studios instruction booklet has a separate chapter on installing the UCUB into DC can-motored diesel locomotives, which applies to the doodlebug. The chapter is geared specifically to MTH installation, so much so that it might leave some hobbyists with non-MTH can-motored diesels scratching their heads.
The can-motored diesel instructions were clear and straightforward, aided tremendously by the doodlebug’s color-coded wiring, which matches the colors on the UCUB. Be warned, however, that all modern locomotive wiring may not be color-coded, or it may be color-coded quite differently than specified in the TrainAmerica Studios instruction booklet. Also, the instruction booklet contains some color-coding errors. For instance, on our UCUB, the white “Motor 2” wire specified in the instructions is really blue.
The only frustrating task we encountered with the doodlebug was electronically locking it into forward before taking it apart, as specified in the TrainAmerica Studios booklet. This involved climbing to level 40 of the ProtoSound programming and referring numerous times to both the doodlebug instruction manual and the programming instructions that came with our Z-4000 transformer.
Why lock into forward? A ProtoSound-equipped locomotive powers up in a neutral (really reset) mode, but Command-equipped locomotives start up in forward, although they actually don’t start moving until the throttle is turned up. If a ProtoSound-equipped locomotive isn’t locked into forward, it won’t properly work with the UCUB.
Once the doodlebug was locked into forward, we starting disassembling it. Since the UCUB fits beneath the ProtoSound board, we had to strip the doodlebug down to a nearly bare frame. We reconnected the motor, roller pickup, and ground wires, reinstalled the ProtoSound board gingerly atop the UCUB board, and powered up the doodlebug for a quick test run. Success.
We later hooked up the doodlebug’s lights and Protocouplers. Depending upon your locomotive’s sophistication, reconnecting some lighting and LEDs (sometimes used for marker lights) may require a trip to an electronics supply store for appropriate resistors.
Operation of the doodlebug in Command mode was flawless, and the horn, bell, lights, and couplers responded to CAB 1 remote throttle commands as if we were operating a Lionel Command-equipped locomotive fresh from the factory. Keep in mind however, that since the doodlebug – from the perspective of the ProtoSound circuit board – is permanently locked into forward, the MTH neutral/reset sounds, such as the delightful starter-motor cranking sound when powering up the doodlebug, are gone. Gone, too, are ProtoSound features such as station announcements.
Lionel postwar No. 2055 engine
We installed an AC-version UCUB board in a postwar Lionel no. 2055 steam locomotive. For space reasons the UCUB rests in the tender, but the locomotive’s motor, headlight, and smoke unit are in the boiler. An electrical tether consisting of eight wires runs from the tender to the locomotive and can be disconnected by a plug and socket at the drawbar. Finding a reasonable path for this bundle of wires can be tricky. Before starting installation, it would be a good idea to establish the best route for the electrical harness.
Installing the UCUB into a postwar steam locomotive requires manual dexterity, soldering ability, patience, and the willingness to wade through complex (and occasionally inaccurate) AC-motor installation instructions. The chapter devoted to AC steam locomotives reversed the locations of the nos. 6 and 8 wires and the nos. 1 and 2 wires. It also made reference to hooking one of the harness wires to a white wire on the circuit board. There are actually three white wires on the board, but they are only used to connect Ott sound boards.
We were able to connect everything properly by using the illustration of the UCUB shown on page 4 of the instruction booklet and the illustration of an AC motor on page 16 (suitably reversing the locations of the nos. 1 and 2 and 6 and 8 wires).
The UCUB performed in our no. 2055 locomotive as promised, but its installation into a postwar steamer was needlessly complicated by weak instructions, although the folks at TrainAmerica Studios’ technical support line (1-330-629-6047) were quite helpful. There are also useful postings on the internet at www.tastudios.com concerning UCUB installation.
Overall evaluation
Once installed, the TrainAmerica Studios boards delivered all that was promised. It’s quite a kick to see a postwar piece or an MTH locomotive operating in Command mode shoulder to shoulder with the latest from Lionel. Depending upon the locomotive’s original features, you can blow the horn/whistle, ring the bell, turn lights on and off, turn smoke units on or off, and open front or rear couplers, all from the keypad of a Lionel CAB-1 remote throttle.
Mike Reagan of TrainAmerica Studios said the company hopes to offer for separate purchase Lionel Railsounds 2.5 sound boards and speakers that would plug right into the UCUB. Can anyone say postwar Berkshire with RailSounds?
UCUB installation isn’t brain surgery, but it may be pretty close for many hobbyists unaccustomed to handling circuit boards, pencil soldering irons, and jeweler’s screwdrivers. Installation into locomotives with Ott sound systems can get especially tricky.
Given that the UCUB can be installed in nearly every AC-operated toy train ever made, it would be impossible for TrainAmerica Studios to address the installation of its board into each and every one of those locomotives. However, the installation instruction booklet is weak.
We recommend that if you’re comfortable disassembling and reassembling locomotives, or have installed items such as sound systems and electronic E-units in the past – go ahead and give self-installation a try. Once you’re over the hump on your first installation, subsequent installations are easy. Otherwise, avoid any frustration and pay TrainAmerica Studios to install the UCUB for you.
Either way, the UCUB from TrainAmerica Studios has opened dozens upon dozens of doors for TrainMaster fans who favor older or non-Lionel locomotives.