LGB’s Stainz locomotive is an icon in the large scale hobby. Not only is it instantly recognizable, it also tugs at the strings in our modeling hearts. For many garden railway fans (myself included), the Stainz was most likely their first locomotive. When I found a milk crate full of used large scale items, including a worn LGB Stainz at a garage sale, all these emotions surfaced. I purchased the whole lot on the spot.
The engine was in terrible shape. Many of the plastic parts were missing or broken, one of the pick-up shoes was bent, and the body had many nicks and scratches. However, after straightening the pick-up shoe, I put it on a test track, and it ran well.
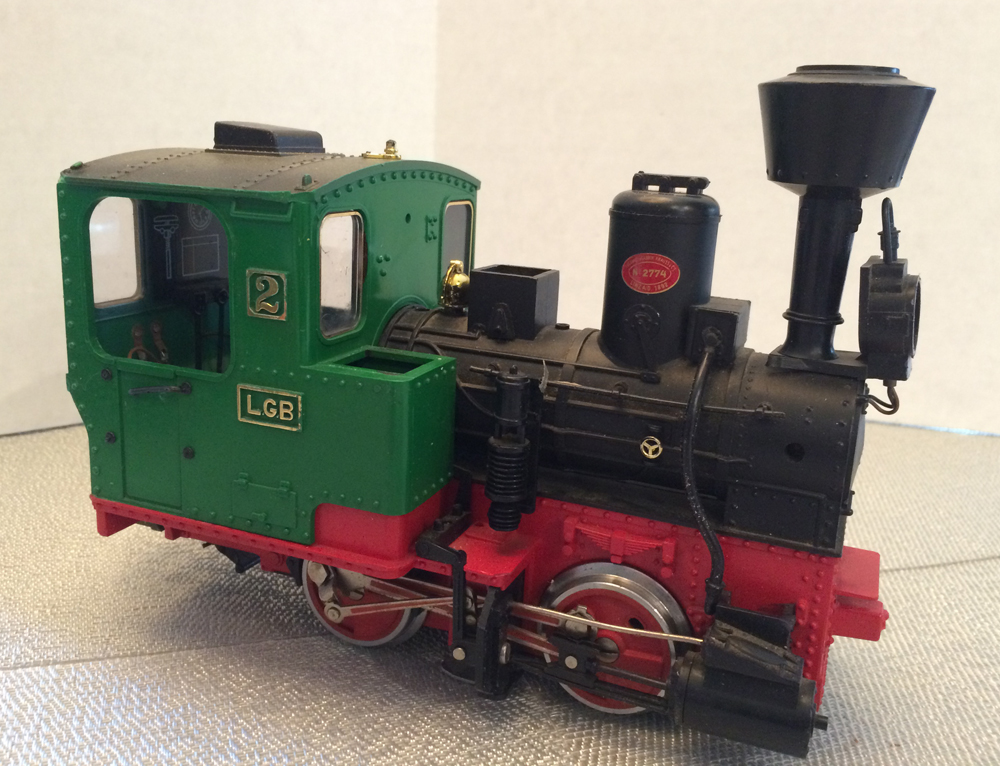
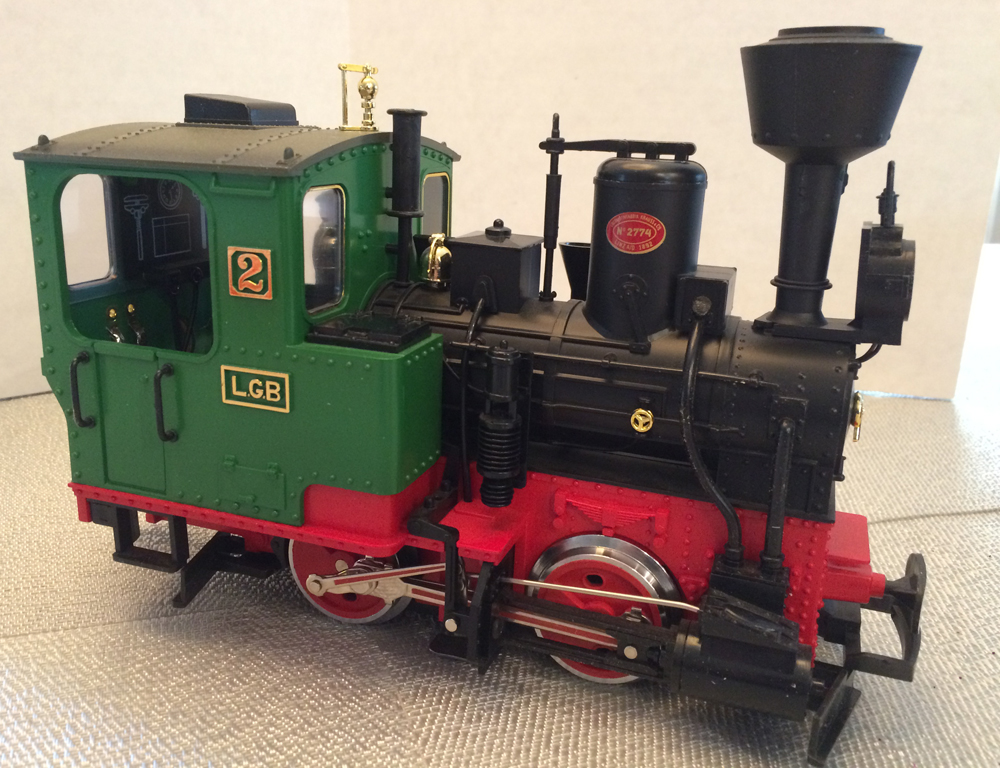
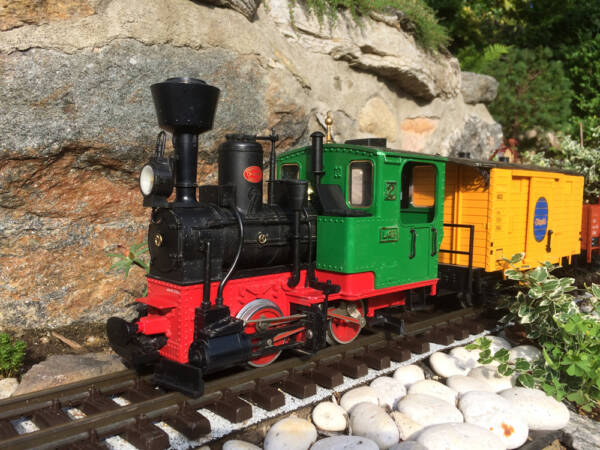
Wanting to compare the Stainz from my own starter set with this oldie, I placed both engines side by side. An even bleaker picture emerged! Now I could see clearly what was missing, broken, damaged, etc.
My first instinct was to purchase the parts, but a quick eBay revealed that it would cost me upward of $200. I decided to make the parts myself. It would be a labor of love worthy of this venerable icon.
Having the newer Stainz available made my job easier, since I was able to closely examine the replacement parts and take measurements.
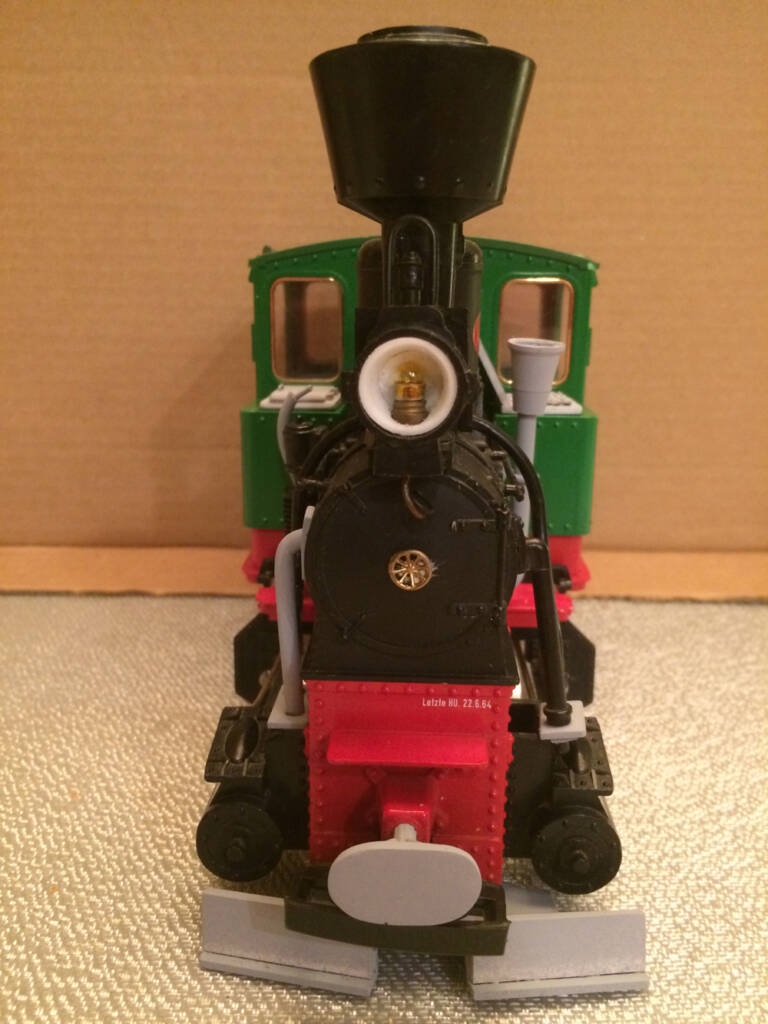
(I was trying to determine the pedigree of the old locomotive, but the only clue was the small white lettering under the smoke box in the front of the engine. The old locomotive has: Letzte HU. 22.6.64., and the new locomotive has: Letzte HU. 10.2.76. I guess this means the last date it was overhauled?)
When looking at the new and old engines side-by-side, the old one looked “naked.” It was time to work to put some new “clothes” on the oldie-but-goodie Stainz.
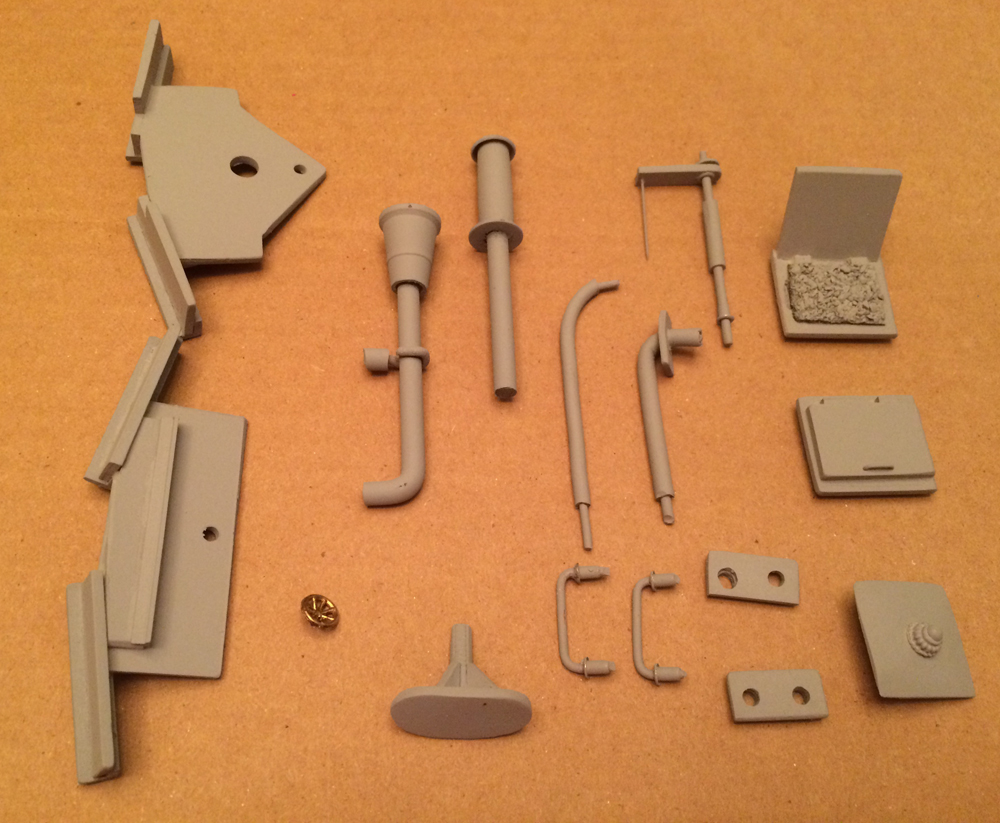
Missing parts
- Front light white insert and lens
- Rear light lens
- Front bumper
- Front plow
- Rear plow
- Steam cylinder covers (2)
- Steam exhaust pipe (right side)
- Steam valve attached to steam dome
- Water funnel
- Coal box covers (2)
- Sandbox cover
- Sand pipe (right side)
- Smoke box handle/lock
- Pressure control valve
- Cab steps (2)
- Whistle
- Cab door handles (2 on right side)
- Upper track in the right crosshead
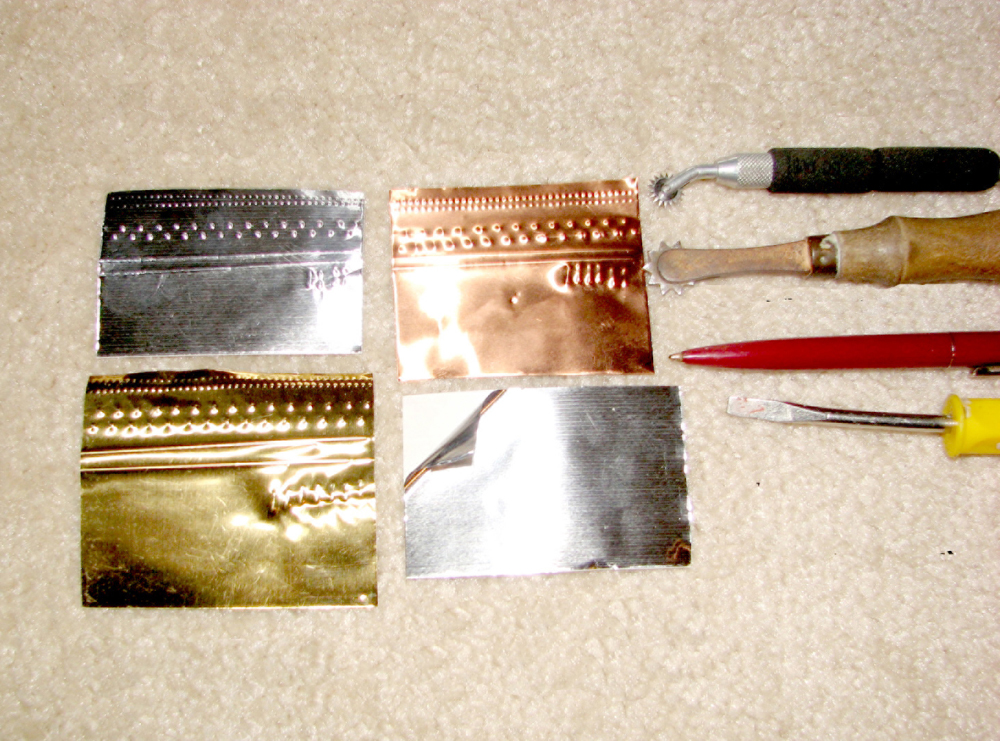
Some of the raw materials I used to build the parts include: styrene sheets, styrene structural shapes, electrical wire, aluminum and copper sheet, and other items from my junk box. For adhesives, I used plastic cement, silicone, and epoxy.
I started with the plows. They looked straightforward, but they needed to be functional, since the potential for these parts meeting obstacles on the track is rather high. I used 3/32” sheet styrene for the main plate that attaches to the engine. The plow part is split in two, and for these, I combined pieces of the same sheet styrene with ¼” angle to give these two parts strength. (It also provided more gluing area when attaching them to the main plate).
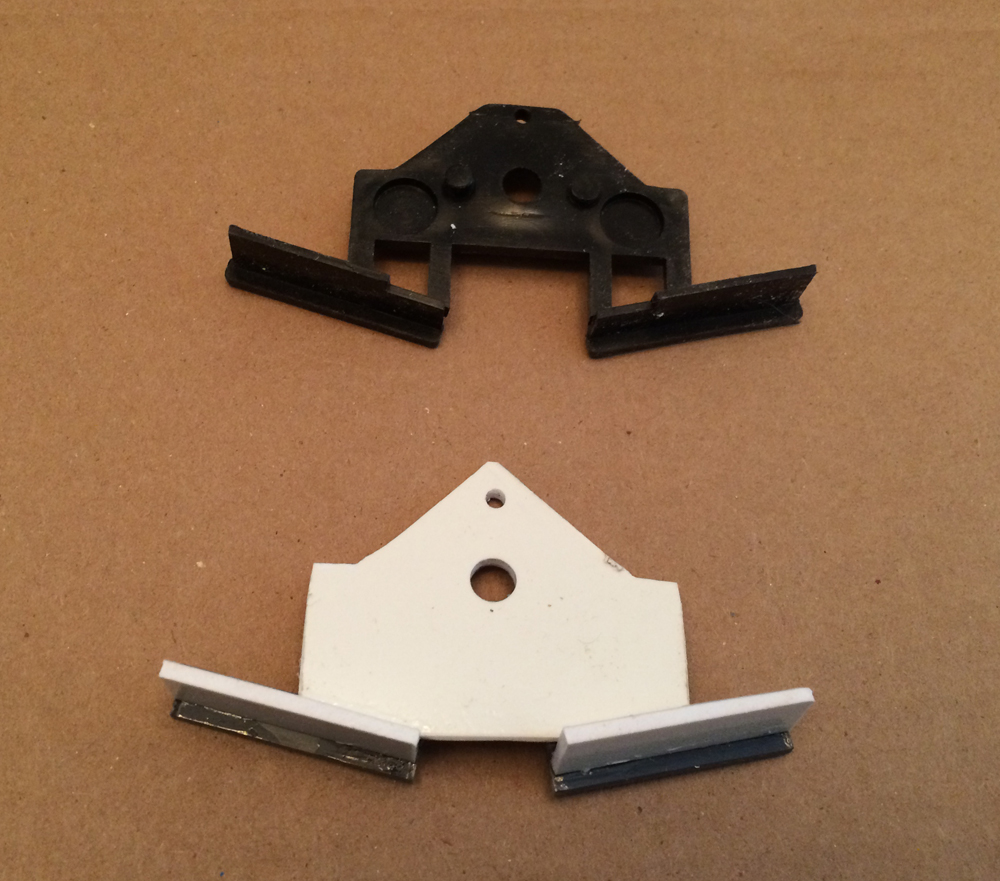
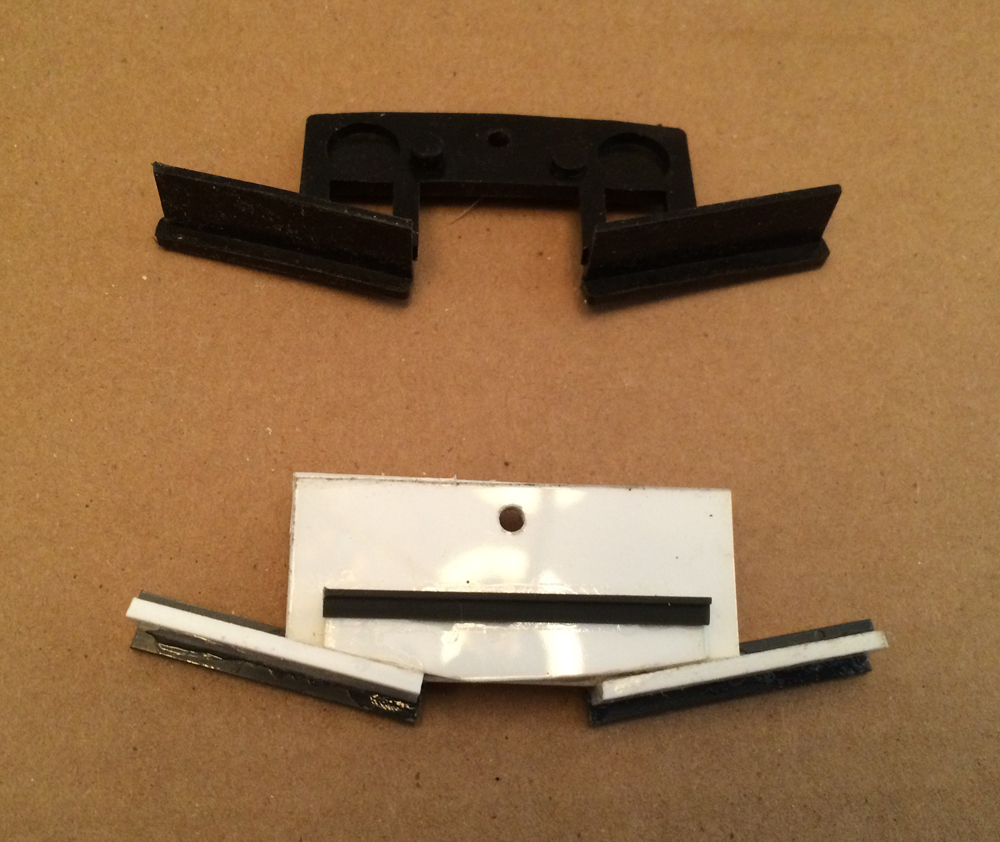
For simplicity’s sake, I did not mimic the original design (in black), in which the plows are attached to the main plate by thin links. Instead, in my version (in white), I fused the main plate to each of the front plows using a larger surface.
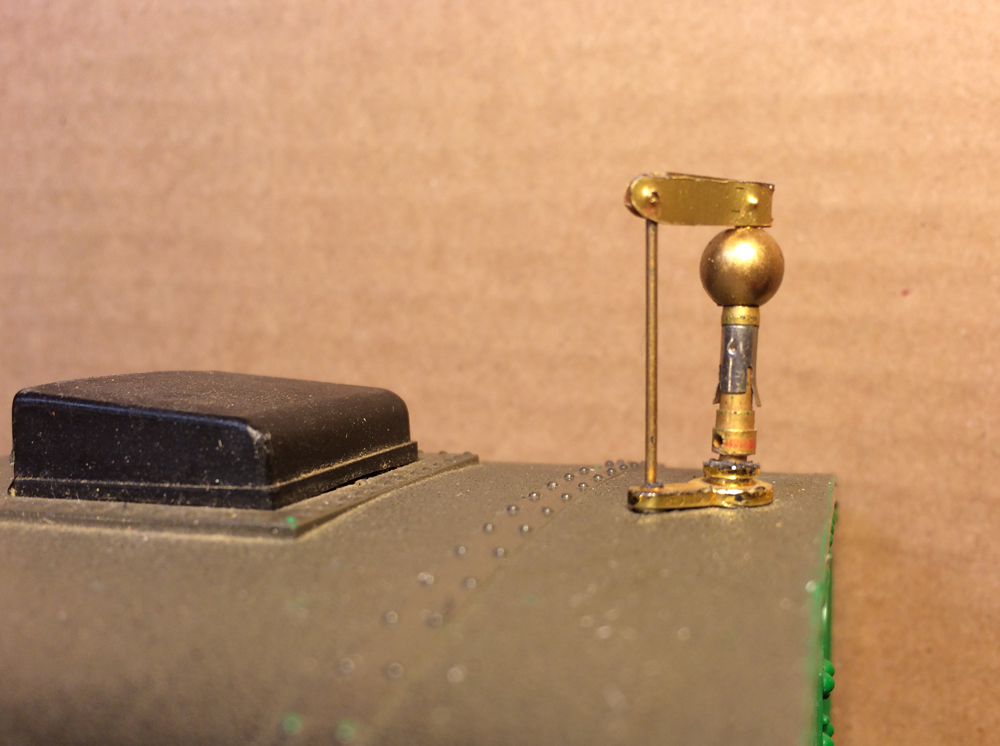
The whistle seemed to be a challenge. It looked delicate and complicated. I was not sure how to start, but finding a round bead and a brass pin in one of my junk boxes gave me the basic parts to start. Then, using a piece of thin brass, a bit of shaping, soldering, epoxying, and painting, I produced the whistle, ready to be installed.
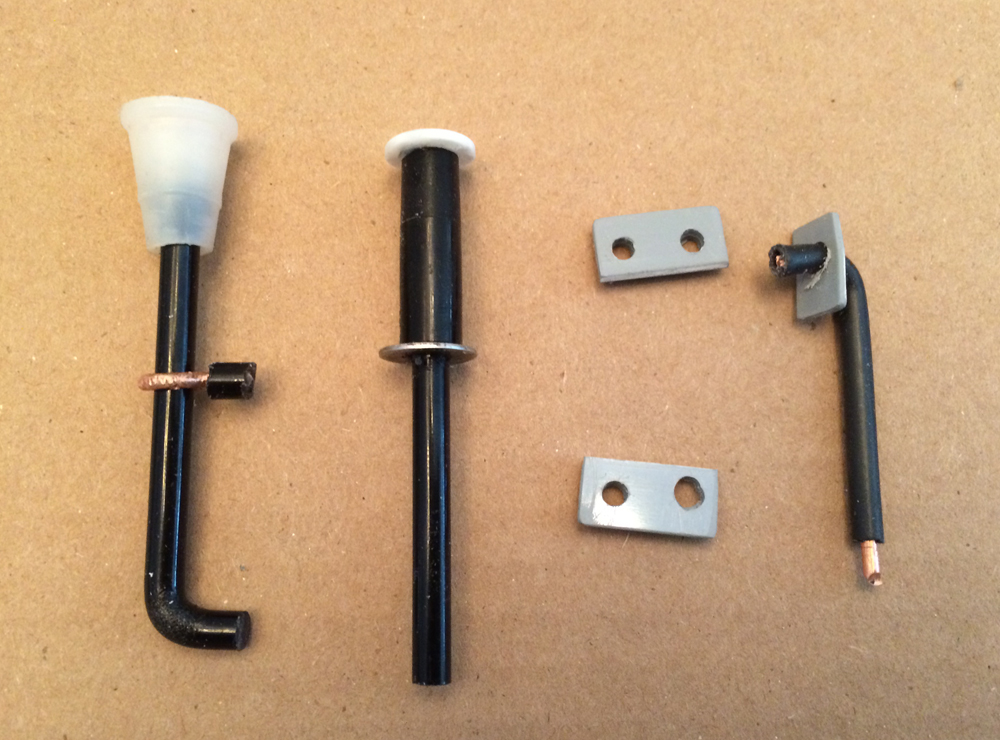
Then I built the water funnel, pressure control valve, two steam cylinder covers, and steam exhaust pipe.
For the funnel I used the cap that comes with caulking tubes, a 2½” piece of 3/16” plastic rod, and a piece of 14 gauge copper wire. After lightly heating the rod with my mini torch, I bent ½” of the rod to a 90 degree angle. This end fits in the lower part of the boiler. Then I cut the tip of the cap to fit the other end of the plastic rod and glued it with silicone to form the funnel top. I then shaped the piece of copper wire to look like a question mark. The curved portion forms a collar that wraps around the funnel pipe (tight fit). Then I cut a ¼” long slice of the plastic rod and drilled a hole in the center of this slice so it would fit (tightly) over the straight end of the copper wire. This end fits in the upper part of the boiler.
The pressure control valve uses a piece of the same 3/16” plastic rod, a piece of a black ballpoint pen casing, a washer, and a thumbtack. I used silicone to hold these parts together..
For the steam pipe I used a piece of black 12 gauge copper wire and a small rectangular piece of styrene. I bent one end of the wire about ½” to a 90 degree angle and removed ¼” of insulation from the other end. After drilling a hole in the rectangular piece of styrene, I glued it to the bent part of the wire.
The steam cylinder covers are simply two rectangular pieces of styrene sized to fit the openings where the steam pipes enter the cylinders. I drilled two holes to fit the steam pipes.
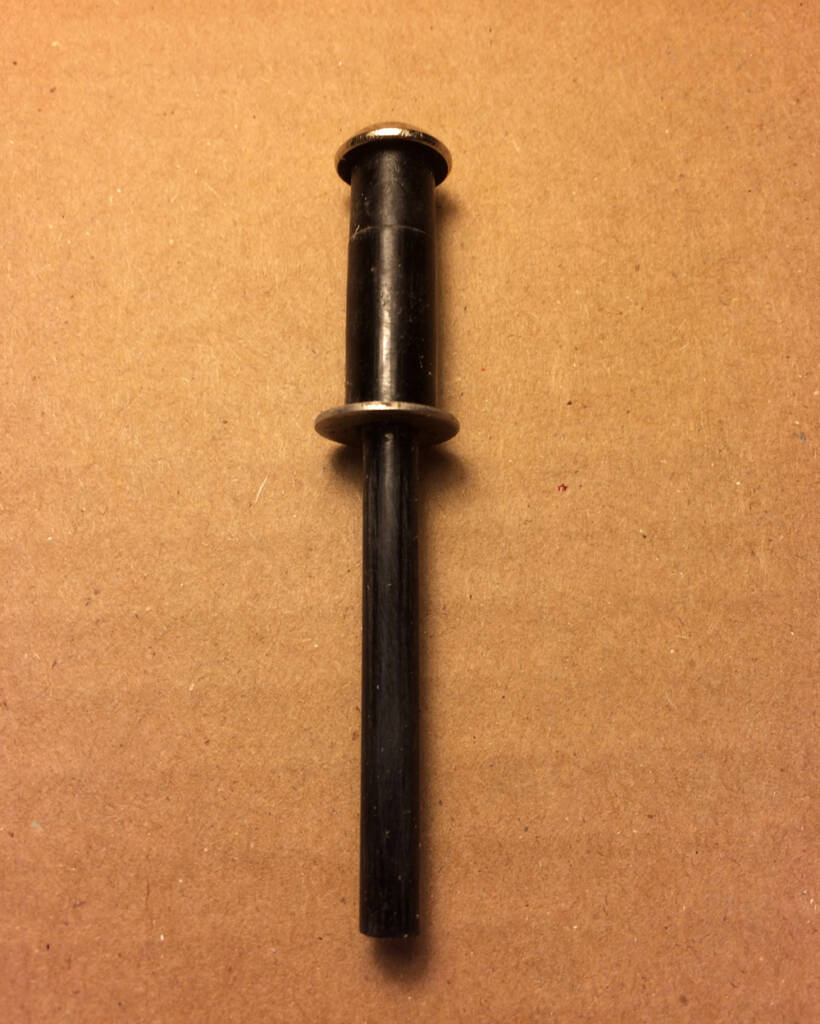
The valve attached to the steam dome was a bit tricky, since part of this piece had broken off from the steam dome and a portion remained attached (molded) to the top of the dome. I had to build just the portion that had broken off.
For this part I used a piece of black 12 gauge copper wire, plus a small brass grommet, a washer, a pin, and a piece of styrene.
I removed about ½” of insulation from one end (top) of the wire, about 1” from the other end (bottom), and ground both tips of the wire to give them a round shape. I soldered the grommet (with the collar down) to the bottom about ¼” from the tip. I shaped the piece of styrene to the dimensions of the leftover piece on top of the steam dome. I drilled a hole on one side of the styrene piece, big enough for the copper wire to fit tightly. I then drilled a small hole on the other end of this piece for the pin to fit. The pin serves two purposes: to help align this “patch” and secure it to the steam dome (where I drilled another small hole to receive the pin). The washer helps mimic the shape of the original piece.
Next I tackled the two coal box covers. The challenge was the small details, like hinges, handles, and the shape of the coal, which is molded on the original covers. Upon close examination I realized that I didn’t need to duplicate these details exactly. I just needed to create the illusion that there are hinges, handles, and a load of coal. So I used tiny rectangles of styrene to represent the hinges and a piece of thin wire shaped like a staple for the handle. To represent the coal load, I used a ½” x ¾” piece of roofing shingle. This material is made up of thick tar paper with one side covered by a layer of fine mineral particles. The size of the mineral particles is a perfect representation for the coal.
For the sand dome cover I cut two styrene squares, one 5/8” and the other 7/8”. I beveled all four sides on the larger piece to represent the top of the cover and glued the small square under the larger one to help the cover sit properly on the sand dome. (The opening of the sand dome is 5/8”.) The original cover has a small round protrusion on top. To duplicate this I used a small doughnut-shaped bead and a pin. I drilled a small hole in the center of the cover, put the pin through the bead, inserted the pin-bead into the small hole, and applied some plastic glue. After the glue dried, I trimmed the excess portion of the pin.
For the front bumper I used a piece of 3/16” sheet styrene and a hardened steel nail with a large flat head. The shank of this nail had the right diameter to fit in the receptacle of the engine. I trimmed the styrene to form an oval and slightly curved it in the shape of the original bumper. I also cut four small triangles from styrene for the reinforcements behind the bumper. I used a lot of plastic glue to attach the nail head to the back of the oval. As the glue was dissolving the styrene, I applied pressure so the nail head was embedded deeply into the oval. Next I glued the four reinforcements around the nail in the back of the bumper.
That leaves the light insert and lenses, sand pipe, smoke box handle/lock, cab steps and handles, and the upper track in the right crosshead.
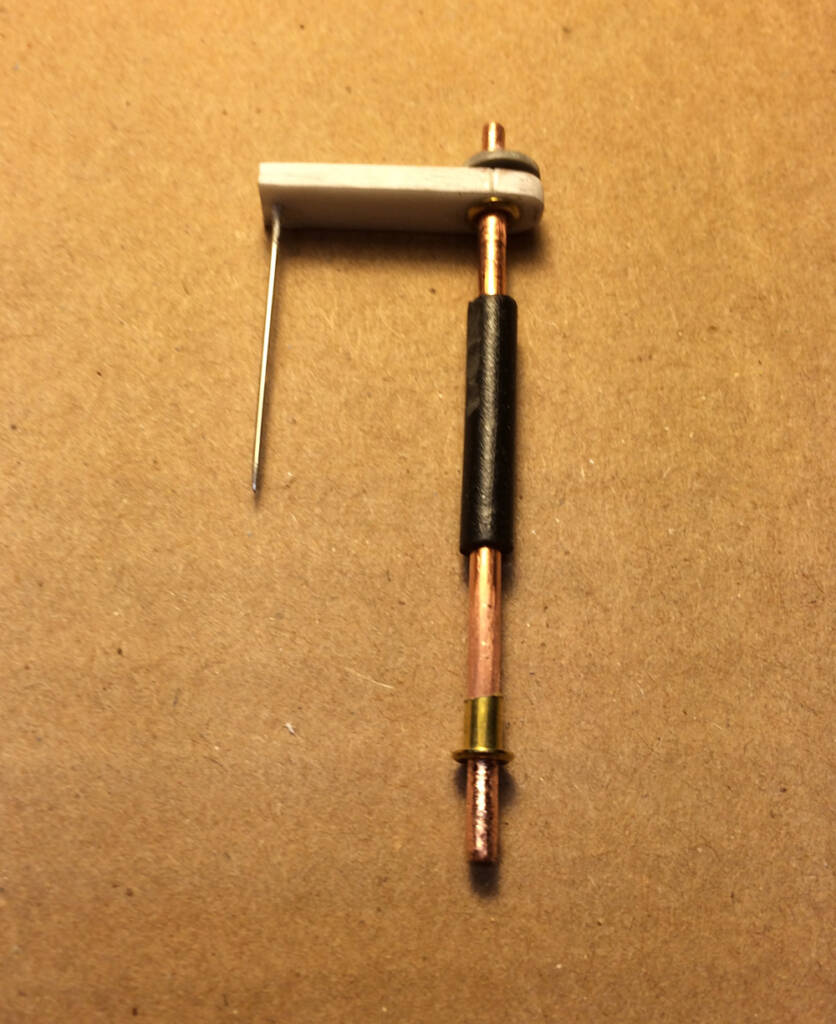
For the cab grab irons I used 14 gauge copper wire with the insulation removed, and small rivets. I bent the wire pieces so they would fit in the mounting holes and soldered the rivets to each bent tip.
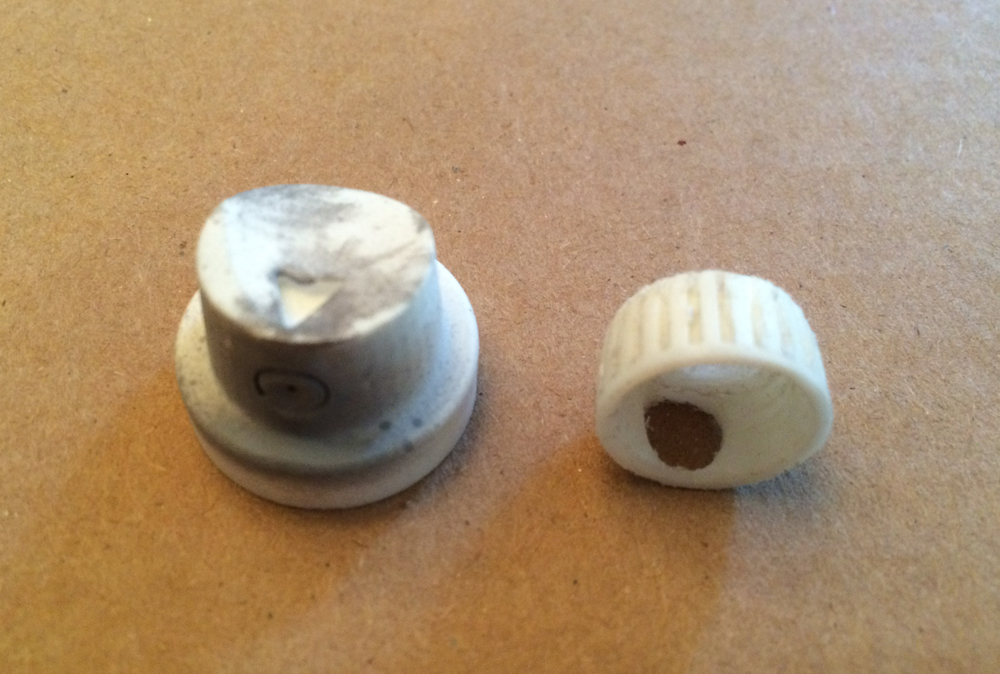
The white light insert began as the tip of a spray paint can (¾” round tip made of white plastic). Using a carving tip in my motor tool I carved the light bulb area, reduced the circumference a bit until it fit in the light case, and made the opening for the light bulb.
I used clear plastic from a package to trim the two light lenses.
The smoke box handle/lock is an HO brake wheel painted gold.
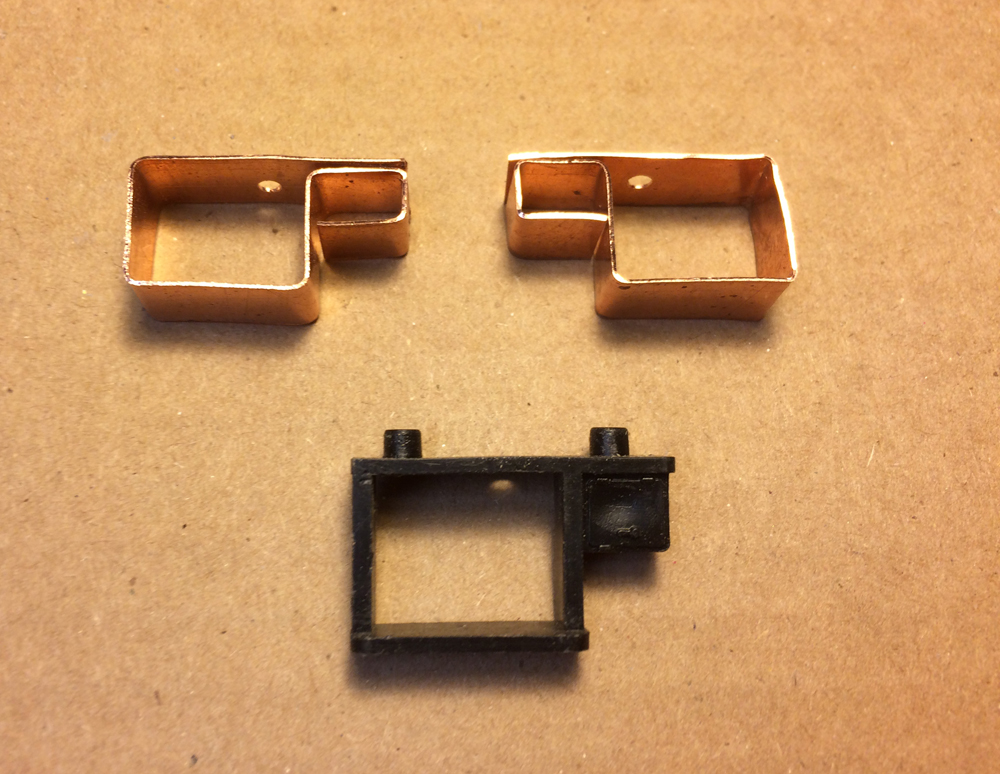
For the cab steps I thought plastic would be too vulnerable, so I made them out of copper strips. The tricky part was accurately locating the holes for the screws to attach them to the body of the engine. Once the hole was done, then I just bent the copper strip to the right size and shape.
For the crosshead’s upper track I used a piece of “T” shaped styrene. Because of the two different plastic types, I used epoxy to join the styrene to the crosshead.
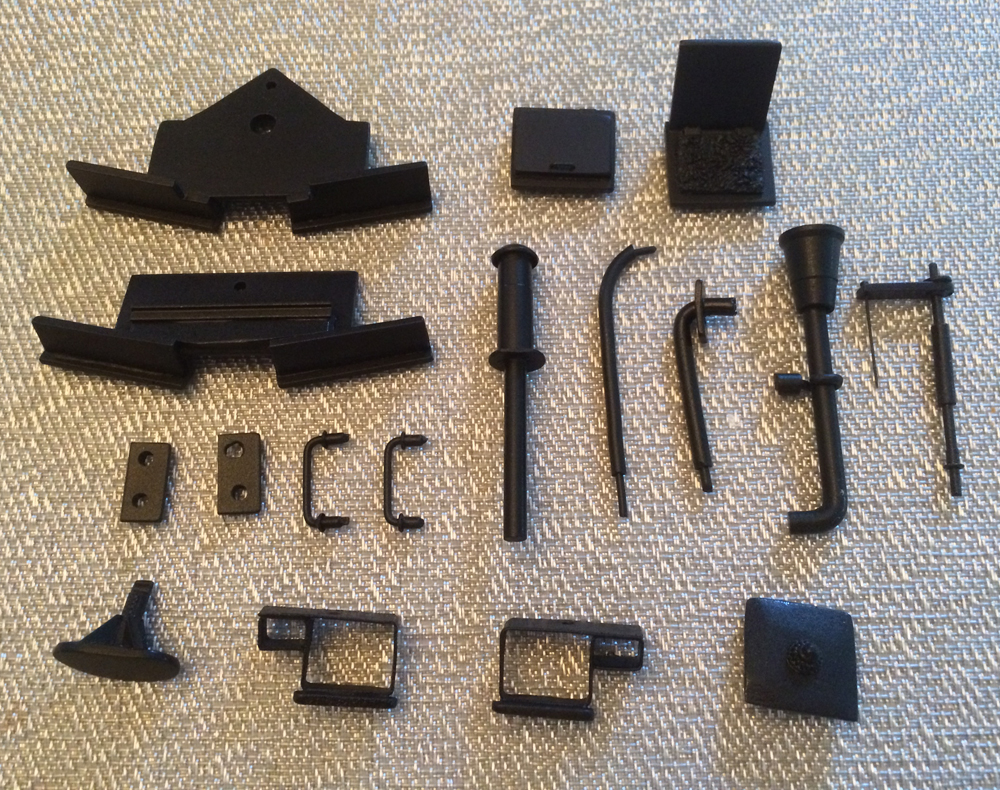
With the exception of the whistle, smoke box handle/lock (which are gold), the lenses and white insert (which were left as they were), I sanded and cleaned the rest of the pieces before spraying them with primer and then with black paint. To tone down the shine of the black paint I used clear mate for the final coat.
This has been a rewarding task. It forced me to be a bit creative to come up with raw materials to recreate these parts. It helped me develop a new way of seeing things that went into the rebuilding of the parts. The biggest reward, however, was to see the old engine and the new engine side by side again, but this time they both look sharp.