Create mountains in your garden railway: If you want to model a mountain in order to add some cool accoutrements, like cribbing, cog railways, or trams, the civil engineer in you needs to survey your yard and figure out where best to place it. Would you like the mountain far away so it won’t block scenes? How about at the top of a slope? What will make your mountain believable?
All mountains have a summit, but not all peaks, ridges, and foothills look alike. Some mountains have treelines, above which are no trees-just rock and low alpine plants. Others are green, with trees to the top, or all gray-brown, with sparse vegetation. Rather than listing the hardscape steps to create a certain type of mountain, I’ll share several ideas so you can build your own unique mountain to suit the needs of your railway. Let’s see how others have chosen their locations, styles, and building materials.
All-around centerpiece
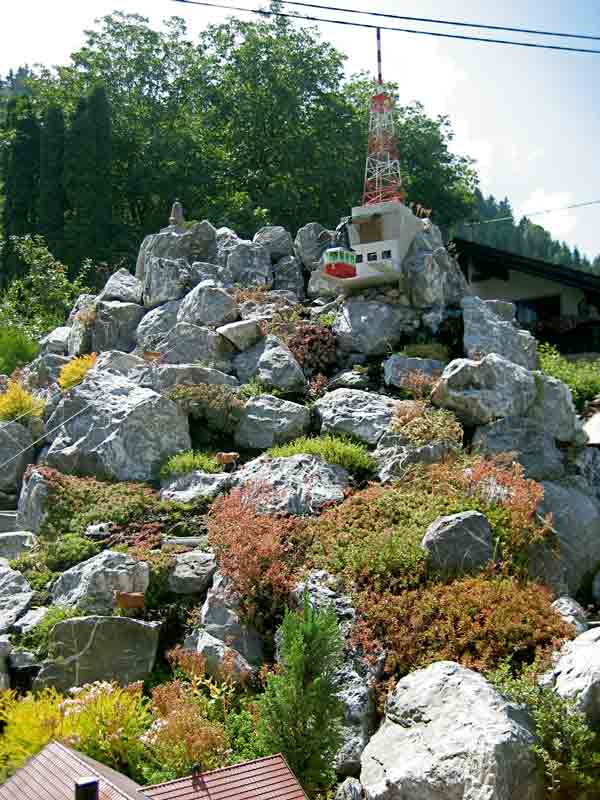
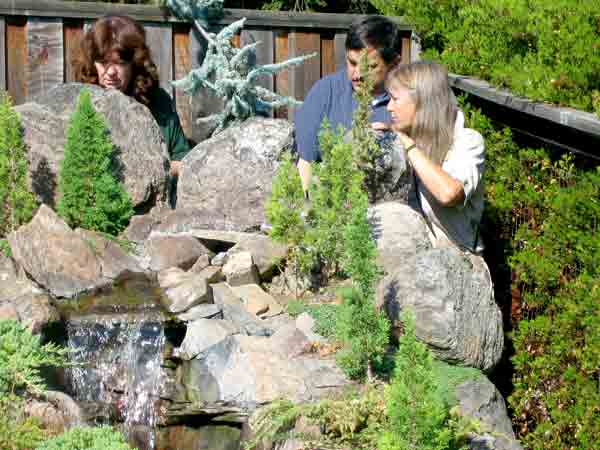
Given time and good trails, we can hike around any summit to view all sides. In our gardens, this dominant focal point will serve as a backdrop for all scenes below. Height inspires awe and the human impulse to scale the monument. We imagine riding geared trains pulling their loads up steep switchbacks, and we wonder if those timber retaining walls below us are going to hold. The builders of the mountain in photo 1 blocked their street view and simultaneously gave passersby a hint of the valley beyond. This colorful European peak sets the mood of the railway, impressive and imposing, high overhead; yet it’s playfully enticing, making me wish it would snow so we could ski down to the chalet for Swiss cocoa.
Building a mountain with boulders is a game of stacking, leaning, and recessing, leaving spaces for plants or, more efficiently, planting as you build. Study each rock to find the face that wants to be seen. Turn it several times to see how it wants to fall into place solidly and securely above and between two rocks, like brickwork, to prevent erosion. Alpine gardeners call it a “rockery.” Check out these articles: June 2008, “Cascading trees and the rocks that support them,” and April 2009, “Step up to terraces,” for techniques on mountain construction.
One-sided grandstand
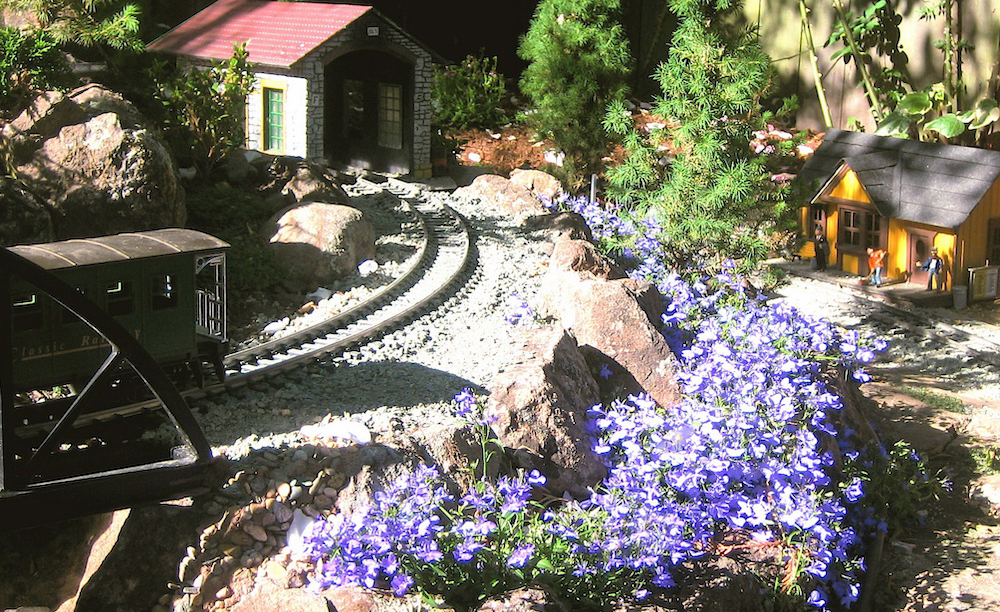
At some point in your simulation of a mountain or range, decide when to end the railway and create a maintenance path. Photos 2 and 3 show the front and back of a one-sided hillside, built into the corner of a perimeter railway. This style makes the most of the space, so that you see the whole landscape, rather than hiding the back of the mountain facing the fence. In an effort to create a “distant” mountain range at the top of the mountain, we placed a row of striated feather rock on top of the retaining wall to contrast with the sharper, “close-up” rocks among the trees.
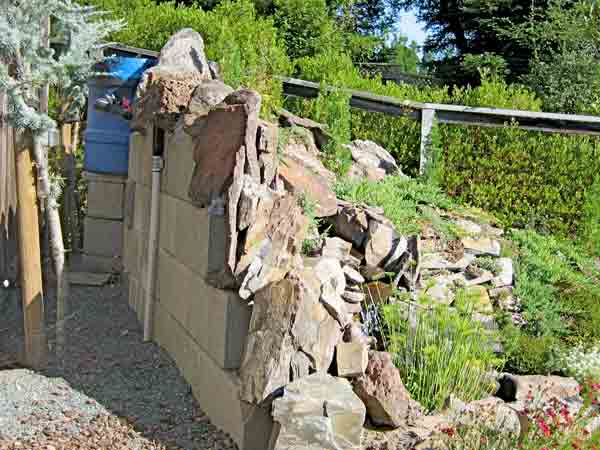
In photo 3 the concrete-block retaining wall leans 5-10° into the soil. We anchored the two-hole blocks with long rebar rods pounded into the ground, filled the holes with dry cement mix, then wet the mix. The rebar extends up, out of the blocks, so the feather rock could be drilled and mounted safely on the wall. Another advantage of the one-sided mountain is that it can hide your water filter and other plumbing, as well as the fence.
Tunnel mechanics
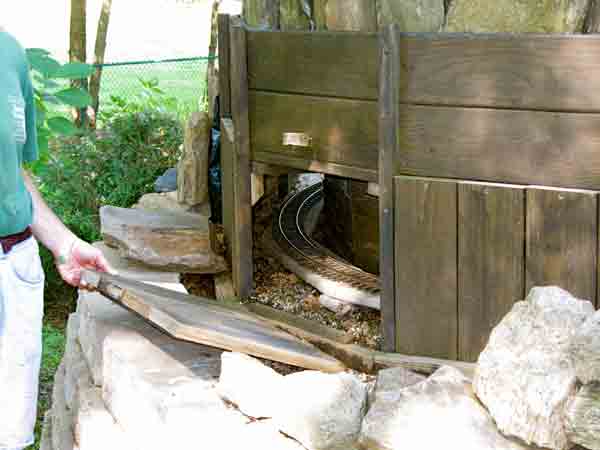
Garden-railroad mountains usually exist so that trains can travel through tunnels. The tunnel under the mountain in photo 2 has two access doors in case of accidents or animals: one behind the railway and one above the tunnel, through a covered irrigation box (bought at a home-improvement store), which is the foundation for a building. Photo 4 shows the clean-out door behind a mountain framed with lumber. The roadbed has been carefully centered and leveled, side to side. Raising the track on the curved board helps to keep rails free of debris.
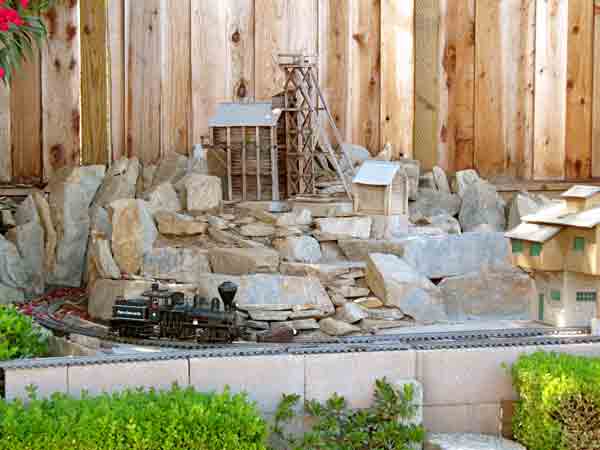
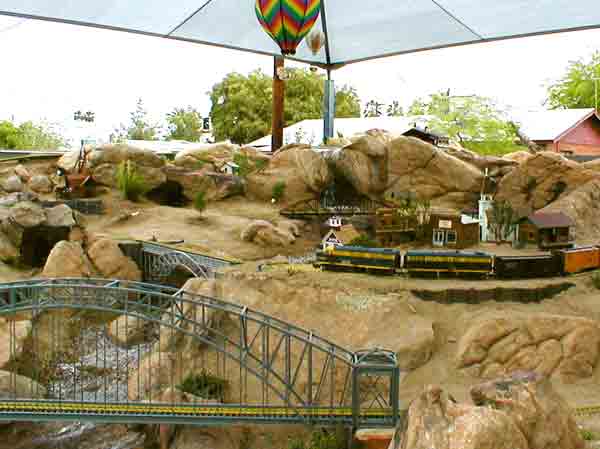
Most garden railroaders would like a continuous loop but some have limited real estate. Folding the loop (photo 5) allows the train to run on a cement-block retaining wall in a classic, bent dog-bone pattern and turn around through a tunnel at the back of a mountain, where there is just enough room for a 4′-radius arc. A tunnel was the best solution to allow more planting space on top, but it could have been a canyon. Ledger rocks prevent erosion as they form canyons approaching the tunnel and are stepped in front for access to the center of the mountain. Matching flagstone will be mortared to the face of the concrete blocks to expand and complete the mountainous look. Then all that’s left is to plant the trees and groundcover. Although a tiny building would make the mountain seem taller and farther away, we needed space for the mill, which seems nicely framed, elevated near the top.
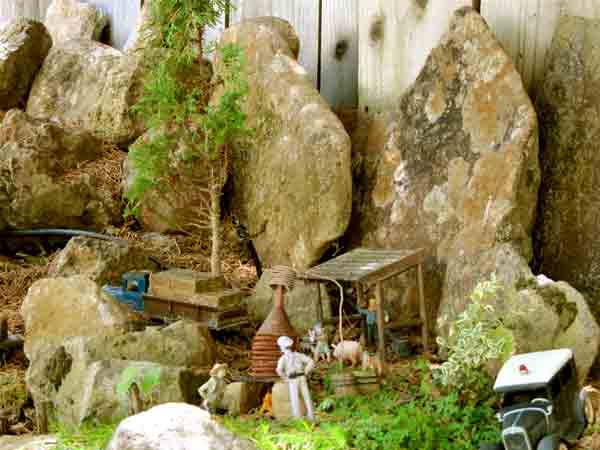
Mountains can dry out because of constant draining, but alpine plants and succulents will thrive in those conditions, given regular, but infrequent, irrigation. Keep your mountain trees smaller than valley trees to force the perspective of height and distance. This is where true dwarf conifers with needle-like leaves shine best. Groundcover should be low, too, although bushy, spreading plants, like juniper (photo 3), look like forests or scrub. For lists of mountain groundcover, see “Miniscaping: Benefits of rock garden techniques,” GR, Feb. 2009.
Façades for fun

Nancy Norris photo
When you run out of room for a mountain, there are alternatives. As in the old-time movies, murals have long been used on indoor model-railroads to set and extend the scene. I’ve seen simple-but-effective mountains raised on a stucco wall, made by sculpting a 1-2″-thick layer of textured stucco into the shape and color of mountains to match real ones on the horizon. This uncluttered artwork brings the focus back to the garden. In photo 6, a three-dimensional mural of a rocky range towering over grazing buffalo is framed similarly to indoor railways. Pockets of soil have been incorporated into the faux hills to accommodate future plantings.
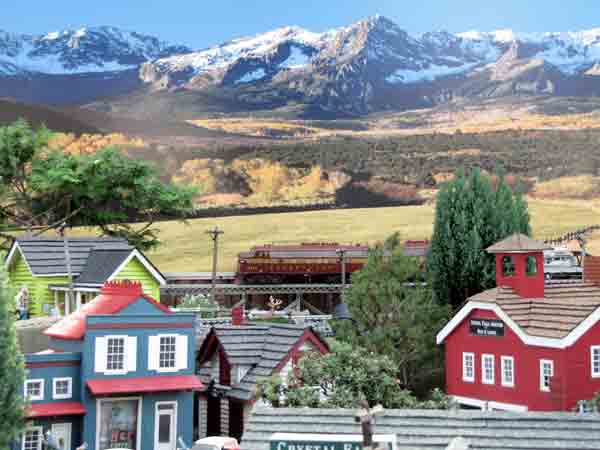
Two-dimensional murals work, too. Because your fence or wall rises vertically above your railway, you could paint it to portray some hills in the distance. In photo 7, a busy town of highly detailed buildings in bright colors, surrounded by a healthy assortment of miniature trees, enjoys a suitable backdrop-an enlarged photograph depicting the countryside beyond city limits. A speeding locomotive calls attention to the mural, tying the two worlds together.
Zones listed are USDA Hardiness Zones
Question: Can you offer some tips for modeling a mountain?
Doug Matheson
Ontario, Canada, Zone 4
Geo-logic
The old adage of studying nature is never more true than when building mountains or hills for our railroads. Whether it be the Rockies of the West, with their many exposed features, or the Canadian Shield of the East, with its boreal forest cover, study of nature pays dividends in avoiding what is best called geological improbability. My own gardens are based on the Shield country so I will comment on that.
The Canadian Shield is made up of some of the oldest and hardest rock on the planet, so I try to use rocks other than limestone or sedimentary formations to represent exposed faces. The hills are rugged but are also covered mainly with the conifers of the boreal forest. I use rock-gardening techniques to align the grain of the exposed rocks on an underlying hillside of soil. This provides support to prevent erosion and also creates deep pockets of soil for plantings. A mix of upright, dwarf conifers and low, spreading junipers eventually create the dark, brooding, green hillsides characteristic of the region. Shade plantings are a problem, but dwarf hemlock grows well in shade, filling much of this niche.
Frank Lucas
Pleasant Hill, California, Zone 9
Still searching?
We chose the Appalachian Mountains as our setting but the 6′ depth of our retaining wall left little room for actual mountains. To solve this problem, we made two-dimensional mountains out of flagstone, which also nicely hide the bottom of our neighbor’s fence. We chose “Coldwater Canyon” flag, hand-selected for 1″-maximum-thickness pieces, which meant many, many trips to the three rock yards nearby to pick pieces off the top of their open baskets as they became available. We put everything on hold when the winter rains began. When we resumed construction in the spring, we were dismayed to find that no one had any Coldwater Canyon flagstone. We were told that it was “out of season” (flagstone is seasonal!?). It seems that this stone is quarried on US Forest Service land, and they do not issue permits until they are sure that the roads have thawed, dried out, and are passable.
Patience Hoag
Phoenix, Arizona, Zone 10
Peak planning
Patience Hoag photo
It would be good to know what climate zone you live in and go from there. For those of us in the desert southwest, planning the mountain would have to include incorporating a drip-irrigation system. Try to stay away from larger plants toward the top of the mountain, to increase the illusion of height. Don’t forget to plan a good way to climb up and down the mountain (a pathway that would be clear of plants and/or scenes)-otherwise you’ll be replacing plants and buildings in pretty short order. Another tip I’d toss in is, if you build a mountain or a series of hills, be sure to allocate plenty of space so it doesn’t look odd. A larger space will help to add depth to the whole scene, and a gradual incline for a mountain would certainly look better than a sharp incline and a peaked summit.
Dick Friedman
Sacramento, California, Zone 9
Just build it!
For me, there were two considerations: break up the view from front to back, and don’t over-think the project. I did plan for water and electricity in the mountain area. Then I piled a circle (more or less) of cabbage-sized rocks in a shallow ditch, so the rocks did not look like they were sitting on the ground. I filled the interior of the circle with dirt, rocks, Styrofoam containers, etc. to get a mountain shape. After a little settling, I planted two dwarf Alberta spruces, some ajuga, a boxwood, and some cuttings from my little roses, and ran drippers to them. After the National Garden Railway Convention in Las Vegas, I added a loop of track on Red Mountain for some movement and a place to run our Fairy Trains. Then I added some (bird house) buildings and ran lights to them. Later, I installed a green-eyed Shrek to oversee Red Mountain-a touch of whimsy.