Other filaments
I have touched on other available filaments in earlier articles. Most are specialty filaments, like carbon fiber or wood—not something that I particularly want or need in my railroad. However, there are a couple of new plastics (out for a couple of years now) that I would like to use. Nylon, called PETG and Ryno, have been around for a time. I have used nylon on printers other than my own with mediocre results. You can pay up to $55 for 0.75kg of filament, so you’d really want some good parts coming out for your money. Other people I know have had excellent results. Nylon is a tough, durable material but I just can’t get it to work for me.
According to what I have read, Ryno is an excellent material. Its good bridging characteristics and good retraction qualities means post-processing of your part is usually not necessary. It, too, is expensive at $48 for 0.75kg.
PETG filament
Polyethylene terephthalate (with a glycol modification) is one of the most widely used polymers in industry. You see it almost every day in plastic Coke bottles, water bottles, food packaging, etc. It has some of the same advantages as ABS, including environmental tolerance, rigidity, full recyclability, and excellent mechanical properties. But there are disadvantages as well: cost, difficulty in printing, adhesion to the print plate, it’s hygroscopic, and it’s very “stringy,” which means a lot of post processing. Let me go through each of the disadvantages first.
Cost
As stated before, I purchase all of my filament from a company called MatterHackers because of their quality control, not their price. At MatterHackers, a one-pound spool of 1.75mm PETG filament goes for around $38. This is not cheap at all, so I first make and test my parts using PLA. When I am satisfied, I move on to the PETG. It’s a little more time and work, but worth it when I am not throwing away expensive material.
Printing problems
MatterHackers recommends an extruder temperature between 230-255°C and a heated-bed temperature of between 55-77°C. My printer comes with a layer cooling fan. I do not use the fan for the first couple of layers because I want really good adhesion for these layers. After that, I use the cooling fan to minimize the PETG “strings” that occur during extruder movement when not extruding material.
Glass transition temperature and print bed temperature
Knowing the glass-transition temperature of your filament is very important. This is the temperature at which the filament starts to soften. For most PETG, the glass-transition temperature is 85°C. Why is this important? You do not want your heated print bed to get above that temperature, as it will deform the part. Also, there is no way of really knowing what the temperature of the print bed is—it can be cold in some spots and much hotter in others, depending on the quality of the print bed and if it came from a reputable manufacturer. The placement of the thermistor or other temperature-sensing device is critical. The processor can only work with the data that it is given. Based on what I know about my printer, I set the printer-bed temperature at 60°C.
Hygroscopic
PETG is considered hygroscopic, meaning the filament will actively absorb moisture from the atmosphere. Therefore, the filament should be stored in a cool, dry place, and dried if exposed to humid air for an extended period. (This can be as little as a couple of days to weeks, depending on the humidity. In Southern California I only have this problem in the winter; it is usually very dry here.) Printing “wet” PETG can lead to hydrolysis, which can alter the filament on a molecular level, making it significantly weaker.
You can tell if you have “wet” material (including nylon) by extruding some material from the hot extruder and watching and listening. Clearly visible steam will come out of the extruder tip with wet material. (Read and watch a video of wet vs. dry at https://www.matterhackers.com/news/filament-and-water) You can also hear “popping” as the steam escapes.
You cannot dry the filament sufficiently if it gets “wet” by just adding silica get or packets—you will have to use a filament dryer. Several can be found if you do a search with your favorite search engine, or you could actually build one (go to www.instructables.com and search for “filament dryer”). You can also use an oven, set at 150-180F for 4 to 6 hours, for drying the filament. Note: I do not recommend this because my food is going to be in the oven some time after the filament and I don’t want to take a chance. After you have dried the filament, I recommend that you store it in an airtight container with desiccant.
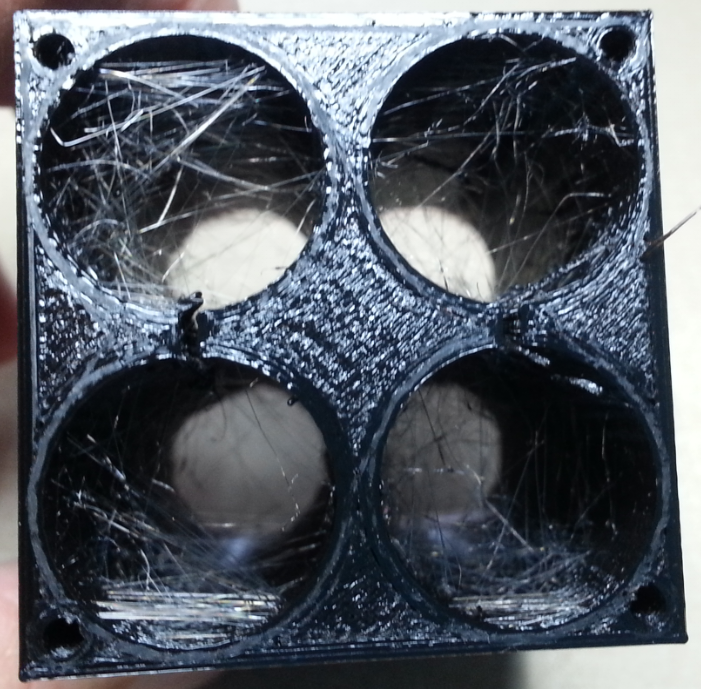
No matter what I do, I get strings of material as the extruder moves to the next extrusion point. This is often because the temperature is too hot or the filament will not retract sufficiently. You will have to experiment with the heat, since it varies from printer to printer and from spool to spool. These strings do not weaken the part; they just require additional post-processing (photo 1).
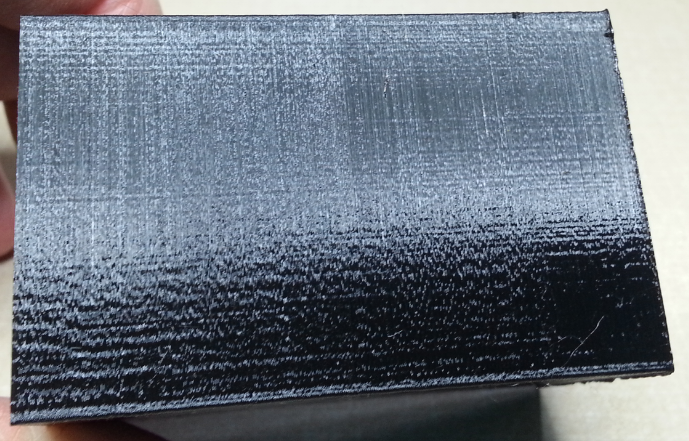
If you do not mind having your part show noticeable layers, then you will not have to post-process the part. In the case in photo 2, the part that I have made will not be seen so there is no problem. However, if it was going to be visible, then I would sand it down and paint it.


