Many garden railways occupy a corner of the back yard in an area big enough for only a simple loop of track. Although an HO or N scale railroad would be an empire in the same space, drawing up a track plan for realistic operation on a large-scale railroad can be a challenge.
There is hope for those with limited acreage. The trick is to design a railway that gives the impression there’s more than meets the eye.
Basic designs
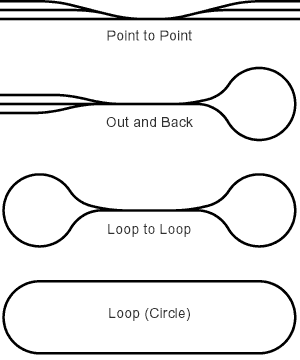
First of all, understand there are several basic railway designs to choose from. Each has their advantages and disadvantages.
* The Point to Point is most like real railroading. The train starts at point A and arrives at point B. A yard is located at each end. This type of design is best suited for a long, narrow railway. A drawback to this design is that it does not allow for continuous running of trains.
* The Out and Back or Point to Loop is similar to the Point to Point except that turning around becomes an automatic function at the loop end of the railway. However, this design creates a reversing loop, which can be difficult to wire for trains running on track power.
* The Loop to Loop arrangement allows continuous running, but creates two reversing loops.
* A Loopor Circleis the simplest type of track designs and allows for continuous running. The challenge with the loop is to lay out the track in such a way that a train appears to be doing more than just chasing its own tail.
Hide the tracks
There are several ways to give the impression that a simple loop of track is an extensive railroad with a purpose and a place to go.
First of all, hide portions of the loop with scenery. Miniature trees and plants are excellent in creating view blocks. And after all, they are the “garden” in garden railroading. Structures, livestock and people placed along the tracks give the impression that the train is doing more than just going around in circles. It’s going somewhere, carrying something, keeping a schedule.
Multiple levels
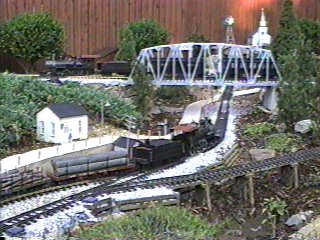
Another way to make the loop layout more interesting is to fold the loop over itself on a second level. The upper level of track crosses over the lower level on bridges and trestles, which are interesting to watch as a train crosses over. By folding a loop over itself and hiding portions of it, the illusion of trains actually going somewhere increases and there is no need to tackle difficult wiring.
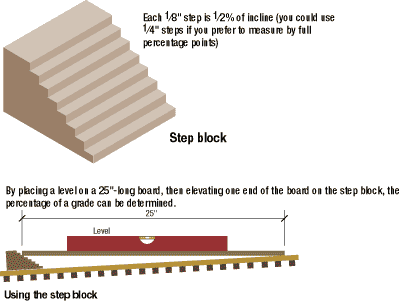
Click on the picture to find out how to determine what the grade of a track is
Be aware, however, that by adding a second level to a railway, grades will become a factor in planning. A grade is the measure of the steepness of a hill or incline, most often measured in terms of a percentage. For example, a 2% grade has 2 inches of rise for every 100 inches of length. There are a couple of things to keep in mind when building grades:
* Make the grades as flat as possible. Unless you want to run very short trains, 3% or less is best.
* If you have a grade on a curve, the effective grade will be much more than the mere grade of the track due to the friction (drag) of the wheels on a curve. If you incorporate a grade on a curve, either reduce the grade or widen the curve as much as possible to reduce the drag so the effective grade remains as low as possible.
Build a tunnel, make a mountain
Use tunnels and/or “mountains” of rock and dirt piled several feet higher than track level to give the illusion the railway is larger than it really is and more is going on than meets the eye. Tunnels are not difficult. Just remember they need to be accessible for maintenance. They should be not much more than two-arms-reach in length – it’s not easy getting a derailed train out of a long tunnel.
Multiple levels, bridges, hills, tunnels, trees and structures all combine to break a simple loop of track into various “scenes” and make your garden railway more interesting to run and watch.
My trackplan
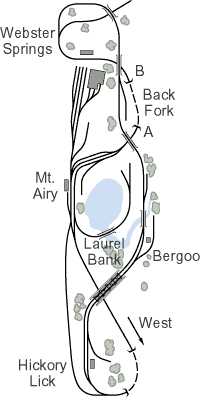
To the right is a track plan for my garden railway, the GC&E Railway. Although my layout is essentially a loop, I operate it as a point to point. A train enters the railway when it exits the tunnel and comes under the bridge at point “A.” It can then enter the yard or run through Mt. Airy and up the hill past Laurel Bank west to Hickory Lick. Then the train can travel through Bergoo, Back Fork, and end up at Webster Springs. After leaving Webster Springs the train enters the tunnel (point “B”) and travels further west down the line to Mt. Airy. By operating in this way the train travels in a complete circle and at the same time has a reason to run.
I hope this gives you some ideas to try. Get some graph paper and start doodling out some rough diagrams for you new railway’s track plan. Good luck and happy track planning!





Looks good on paper but there must be a minimum 70 feet of track in the loop at point B. This layout is probably 120 feet long. Despite discussing the difficulty of wiring a reversing loop his layout contains at least two loops.
I want to build a ‘Y” which requires the same wiring as a loop. I am running Revolution with track power. Can you help?