G-Scale Graphics
4118 Clayton Ct.
Fort Collins CO 80525
Price: $209 + s&h
Website: www.GScaleGraphics.net
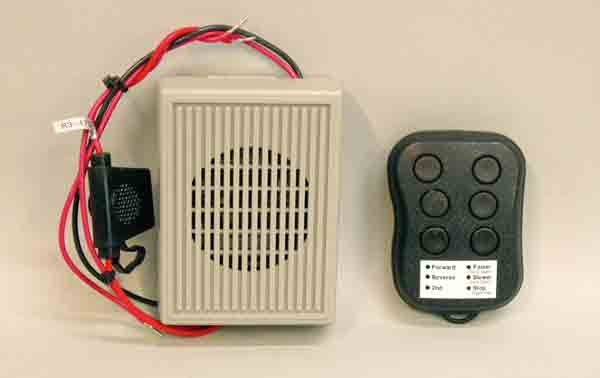
RailBoss 4 Trackside; 2.4Ghz system for controlling track-powered trains via radio; includes transmitter, receiving base station, online instruction manual
Pros: 10amp power; pocket sized transmitter; easy-to-program features; excellent range; smooth operating characteristics; thorough instruction manual
Cons: Size of the labeling on the TX handset may be a bit small for some older eyes
The Trackside 4 receiver/base station is 41/2 ” x 31/4″ x 15/8″, and goes between your existing power pack or any other 7-25V DC power supply and the track. It is rated at 10 amps output to the track, so it should be able to run those big engines and consists. The power input is protected from damage due to reverse polarity—it will not operate until the polarity is correct. Further protection is supplied by a 10 amp, blade-type automotive fuse.
The base station is a combination speed-and-direction control board and radio transceiver. Transmitter commands control a pulse-width-modulation motor driver designed to allow nice, slow, prototypical speed control of your locomotive. Momentum is fully programmable, and can be turned on and off via the transmitter for switching operations.
The pocket sized, six-button TX (transmitter) is 25/8″ x 31/2″ x 1″ and controls the trackside RX (receiver) via a 2.4GHz direct-sequence-spread-spectrum (DSSS) radio system. The manufacturer indicates a line-of-sight range of up to 250′. The TX is powered by a 3V button-type battery that uses power only when a button is pushed; there is no on/off switch. “Forward” and “reverse” will not function while the locomotive is in motion, and pressing “stop” gives a quick speed reduction but it is not instantaneous. Both of these save on wear and tear on gears. My only concern was with the size of the labeling on the TX handset, which may be a bit small for some older eyes. However, the label size is limited by the small size of the handset itself.
I tested the RailBoss 4 Trackside at the DGRS garden railway on the grounds of the Colorado Railroad Museum. Wiring it in was easy, with just two power wires in and two track-feed wires out. I made sure that the ventilation screen on the RX box was not covered. The receiver had already been “taught” at the factory what transmitter it was shipped with, so there were no frequency settings to deal with. That was all it took to start operating using the factory settings for speed, with momentum off. Control was smooth and straightforward, with short-duration inputs giving small results and longer ones giving faster responses. I used the RailBoss with locomotives from Accucraft, Aristo-Craft, Bachmann, Hartland, LGB, and USA Trains with no problems.
The direction of locomotive travel is based on the way you place your locomotive on the track. Just put your engine on the track in the direction it would normally travel. When the Trackside RX is first powered up, “Forward” will be selected. If your locomotive runs backwards, you can either reverse the wires to the track or change User Parameter 1, as directed in the manual.
To test the range, I simply paced a distance until I reached a point where I could not operate the locomotive, which was around 220′ and was not line of sight—all of the radio-control equipment at the DGRS railway is inside a wood-framed building. This is an impressive operating range, well beyond what the average garden railway might require.
Next, I decided to change the programming for speed. The default minimum and maximum speed settings are 0% battery voltage for minimum and 100% battery voltage for maximum.
The instructions indicate that most motors require more than zero volts to get moving. You can set the minimum voltage to just slightly less than what it would take to make the locomotive move, so there will be no delay in getting the locomotive going.
To start the throttle-programming mode, I held down the “2nd” key, “Slower,” and “Stop” buttons together, until the LED in the receiver box started flashing quickly. To set minimum speed, I pressed the “Faster” button to just barely get the locomotive moving. Then I pressed the “Slower” button to stop it. Pressing “Reverse” saved the minimum-speed setting. (The minimum speed must be less than 50% battery voltage.) I set the maximum speed, by using the “Faster” and “Slower” buttons to run the locomotive at the desired speed. Pressing “Forward” saved the maximum-speed setting (which must be greater than 50% battery voltage). Pressing the “Stop” button saved the setting and exited throttle-programming mode. The LED stopped flashing. The label on the TX handset has helpful notations about which buttons can be used with the “2nd” button for programming.
To change from the momentum rate of acceleration to the fast rate for switching operations was just a matter of pressing the “2nd” and “Stop” buttons. Saving the running speed was done with the “2nd” and “Slower” buttons; recalling the saved speed was done with the “2nd” and “Faster” buttons. Going back to the default settings was easy as well. All of these programming steps are simple and clear.
Further programming can be done for the throttle momentum and direction control by using the pair of two-position DIP switches housed in the trackside RX box. Parameters can be changed by moving the switches as per the drawings.
The RailBoss 4 Trackside R/C is a good choice for anyone wanting use track power with radio control, either for a first-time operation or to replace a unit that has failed and cannot be repaired. It is simple to use, operation is smooth, range is excellent, and it has a variety of easily programmable functions.