G-Scale Graphics
4118 Clayton Ct.
Fort Collins CO 80525
Prices: Railboss 4 receiver, $89; six-button transmitter, $89
Website: www.gscalegraphics.net
Railboss 4 radio-control system; 2.4 gHz; controls speed, direction, plus four sound and/or light functions, with automation capability
Pros: Small transmitter size; easy installation; simple operation; low-battery warning
Cons: Whistle trigger does not allow for “real time” playing of whistle; directional lighting the only means of visually telling which direction you’re set to travel
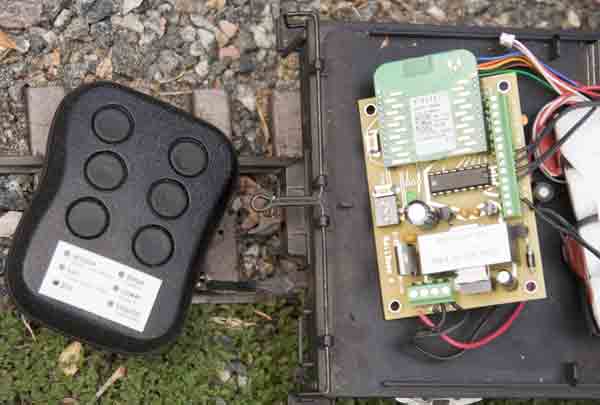
G-Scale Graphics’ new Railboss 4 throttle and receiver is just that kind of product. G-Scale Graphics has been doing R/C electronics for a while now, and this board is the latest in their evolving product line. The throttle fits easily into the palm of your hand. It has six buttons to control the locomotive and its available functions.
The functions of these buttons are labeled on a sticker at the bottom of the transmitter. I’d probably take a paint marker and paint arrows or other symbols on the buttons themselves, just for an easier-to-see reference, especially for the little engineers. The transmitter is powered by button-type batteries but only draws power when the buttons are pressed, so the batteries should last for a reasonable amount of time.
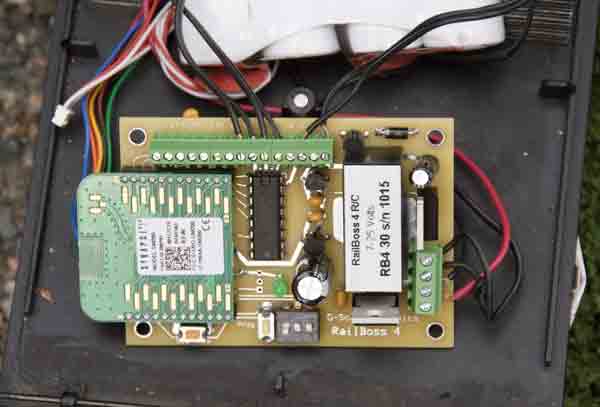
The receiver measures 31⁄4″ x 2″ x 1″, and has inputs for battery power; outputs for the motor; a row of outputs for lights and sound functions; and reed-switch inputs for automation, bell, and whistle triggers (more on that later). The motor driver will handle 5 amps, easily sufficient for a large-scale locomotive. The system will operate on from 7 to 25 volts.
I wasn’t sure what to expect with this. I’ve used simple pushbutton systems in years past and found them to be basic in their operation (hence my gravitation toward newer, more feature-filled systems). I was pleasantly surprised to find that many of the features I like with the more advanced control systems are available with this throttle as well. You can set start voltage and top speed, and adjust the level of momentum your locomotive has. Because you can link multiple receivers to the same transmitter, you can run as many locomotives together in a consist as you like. (Unlike more complex systems, however, if you want to run multiple locomotives independently, you must use a different transmitter for each locomotive. But, because of the 2.4 gHz technology, you can run many transmitters at the same time without interference.) So, after reading what it could do, I was eager to give the unit a try.
I installed the system in the tender of my Bachmann K-27, for no other reason than it was easy to remove the existing control system and replace it with this one. I’ve got an old Sierra sound board installed in that locomotive (out of production), which also allowed me to test how the system controls sounds.
Installation was easy; the online instructions illustrate which wires need to go where. One neat thing is that there are separate taps for using LEDs for the headlights that do not require the use of dropping resistors in series. If there are already resistors installed with your LEDs or you’re using incandescent bulbs, you can connect those to another tap. All connections are made with screw terminals so it’s easy to hook everything up.
The receiver must be linked to the transmitter, which is a simple matter of turning on the receiver, then pushing a button on it and a button on the transmitter. The link was made almost immediately. From that point, I was up and running.
Right off the bat, I was impressed with the control. Pushing the “raise” button slowly increased the motor speed. Quick pushes of the button raised it just a bit, while holding it down raised it more quickly. I’m personally a fan of a little momentum dialed in to smooth things out, so I turned that on as well. Control was very responsive with regard to what I wanted the locomotive to do. I could get the engine to crawl fairly slowly to couple up to the train, and stop and start easily and smoothly.
The one thing I did miss was an indicator on the throttle that showed what direction the engine is going. If you’ve got directional headlights hooked up on your locomotive, you can use them as indicators, but I like my forward headlight on all the time so, unless I was looking at the back of the locomotive when switching, I was never certain it was in reverse. The reason this is an issue is that the locomotive will stop moving when the throttle voltage gets low enough but not necessarily be at zero volts. “Stop” and “change direction” are the same button; pressing it before the voltage gets to zero stops the motor, while pressing it when it is at zero changes the direction. I found myself pressing it, thinking the voltage was at zero when it really wasn’t, so my train didn’t change direction as I thought it would. I’d have to stop again, and change direction. One notable thing is that pressing the “stop” button while the train is moving will bring the motor to a stop fairly quickly, but not instantly, which will prevent damage to gears by sudden stops.
Range was very good. I could control the locomotive from any spot in my backyard and even around the side of the house, which is probably about 100′ from where the train was at its furthest. The instructions claim ranges of twice that but that’s about as far away as I can get and still see and hear my train.
The buttons to trigger the sounds work well, with one issue; the whistle does not allow for “real time” blowing of the whistle. All the sound triggers are quick, momentary pulses. This is fine for sound systems programmed to blow a particular whistle pattern (grade crossing, etc.) when the whistle trigger is pressed, but you cannot hold the whistle button down and have it blow for the duration you’re holding it down. (You can—at least with the Sierra board in my K-27—keep continually pressing the whistle button to make it blow longer. It just gets tiring.) G-Scale Graphics tells me they’re hoping to fix that in a future software upgrade.
You can also use track magnets and reed switches to trigger these sounds. Another feature of the Railboss allows you to tell the receiver to “skip” magnets, so the whistle doesn’t blow every time it crosses over the magnet.
Track magnets and reed switches can also be used to program in some automation. With this, you can do automatic station stops, back-and-forth operations, even run multiple trains on the same loop of track. (The receivers “talk” to one another through some technical wizardry.) I did not mount reed switches on the test locomotive to test these features on my railroad, though I did simulate some of their operations on the workbench. (Also, with only one receiver provided, multiple-train operation could not be tested.) Programming these features is done via the transmitter and programming buttons, as well as switches on the receiver itself. All of this is spelled out in the instruction manual, which I found to be readily understandable, though you’ll want to pay particular attention to which button combinations on the transmitter you have to press to get to the various features you’re trying to program.
Overall, I was pleasantly surprised by this system. It was simple to install, simple to operate, and it did much more than I expected it to do, given the simplicity of the interface. The lack of a real-time “playable” whistle is really the only operational weakness I found, and that’s only an issue if you’re controlling a sound system that allows you to play the whistle in real time.


