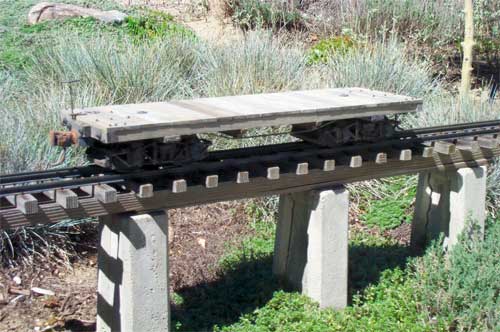
1:20.3 scale, gauge 1, 24′ flatcar kit
Hartford Products, Inc.
18 Ranch Rd.
Cedar Crest NM 87008
Price: $89.95 + $8 s&h
Web site: www.hartfordpr.com
Laser-cut wood and cast white-metal kit for West Side Lumber Company 24′ flatcar; includes trucks; instructions with assembly photos
Pros: Most parts pre-cut, pre-drilled, and notched as needed; assembly and alignment jigs supplied; high quality materials; photos assist with assembly; high level of detail; good kit for first-time builders
Cons: Some parts numbered incorrectly in instructions
Our review kit offered the option of using Hartford’s link-and-pin or Kadee’s knuckle-style couplers. I chose the knuckles so I can operate the car with my other rolling stock.
The first step is to prepare the parts for assembly. This is done by removing minimal flash from the castings, drilling a few holes using the locating jigs, and deciding on the type of paint or weathering to be used. I washed all of the metal parts in soapy water, rinsed them, and allowed them to dry. This removes any mold parting compound that would keep paint and glue from adhering. I decided that my model should represent a well used, heavily weathered car. The wood parts were treated with an acrylic stain and the metal parts were treated with a chemical blackening agent before assembly. I used Titebond glue for the wood-to-wood assemblies and CA cement for the other joints.
The next step was to build up the basic underframe, which has mortised end beams to accept the sills; a laser-cut locating jig is also included. I found it better to use the jig upside down, which made inserting the sills much easier. There are a few holes that needed to be drilled, which are located with another jig. With the frame built, the various other structural and underbody detail parts were added, which included a detailed air-brake system. The decking was then laid down to complete the car body.
A pair of detailed, sprung, West Side Lumber, four-foot-wheelbase trucks are included with the kit. These actually form a separate kit with wood and metal parts. There is one page of written instructions and several clear photos to help with construction of these. A few holes needed to be drilled to accept the n/b/w castings and the transverse brake-shoe mounts. With this done, it was just a matter of slipping the various parts together to complete the trucks.
To finish the car, I glued on the brake staff and wheel, mounted the couplers, and attached the trucks. The completed car is a nice piece of well-detailed rolling stock that represents an actual protype. It went together quickly and easily and lends itself to kitbashing.