Iron Horse Engraving
207 Canterbury Dr.
State College PA 16803
Price: $400
Website: www.ironhorseengraving.com
Gauge 1, 1:20.3 scale, East Broad Top steel-frame caboose kit; laser-cut wood; interior details; trucks and couplers not included; suitable for novice builders or beginners who like a challenge. Dimensions: length, 27″; width, 4 7/8″ (5 3/8″ over steps); height, 7¾”. In 1:20.3 scale, this works out to 45′ 8″ x 8′ 3″ x 13′ 1″, respectively
Pros: Well-engineered kit; clean cuts and tight-fitting components; accurately scaled to prototype
Cons: Instructions relating to the details (grab irons, etc.) vague in places
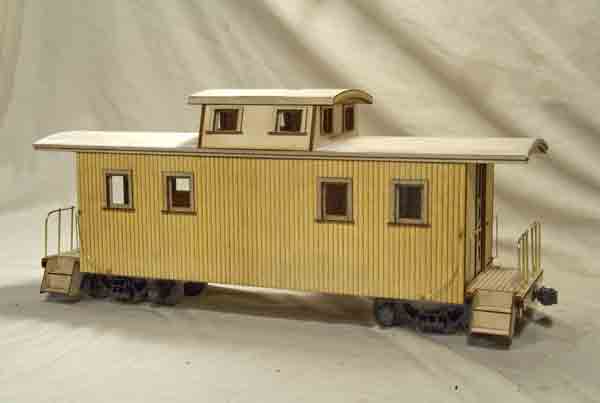
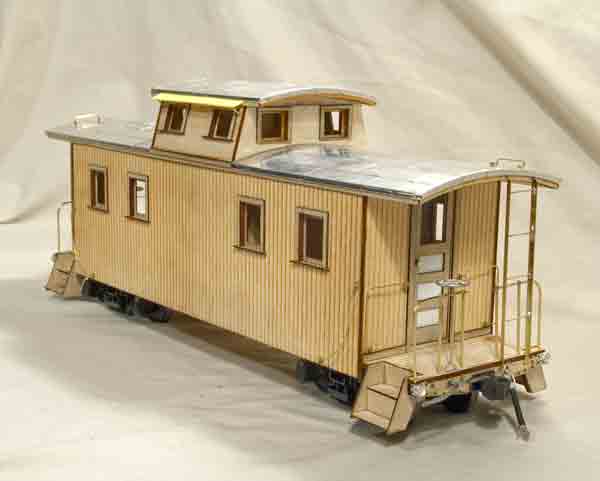
Being an EBT fan, I was pretty jazzed when I heard about Iron Horse Engraving’s laser-cut kit for the railroad’s most familiar caboose. While a little more modern than my 1910s-era modeling, I’m always keen to build a replica of an EBT prototype of any date. This kit is Iron Horse Engraving’s first foray into laser-cut kits, so I was interested to see how things came together.
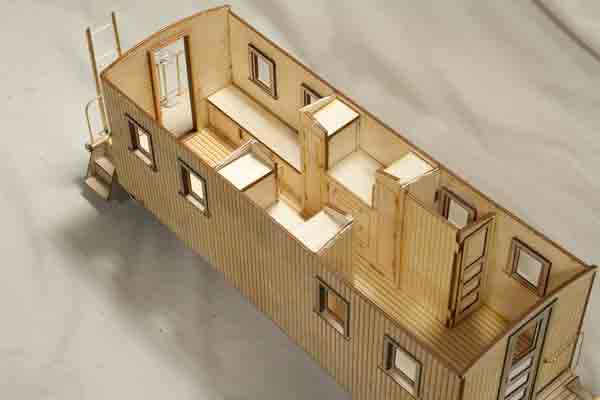
The kit is well packaged. Parts come neatly labeled in various plastic bags, while the sides and longer pieces are carefully rubber-banded together in the box. The kit includes laser-cut wood pieces for both the exterior and a complete interior, 1⁄16″ brass rod and L-brackets for the handrails and ladders, clear plastic for the windows, and printed instructions. It also includes jigs for bending the grab irons, railings, and ladders. It does not include trucks, couplers, or fine details, like brake components, air hoses, cut levers, etc. These details and many others can be easily added by the modeler.
Before beginning this project, you should first read through the instructions. Each step has photos that illustrate what to do, as well as outlines of the specific pieces you’ll need. For the most part, the instructions are well written and illustrated.
Construction proceeds in a logical order. You start with the frame, build the interior components, add the walls, then build the roof. The roof is removable so you can detail and show off the interior.
Most of the kit is made up of 1⁄8″ birch plywood, with the siding joints laser-scribed into the wood. The frame is made of bass, and the trim pieces and window frames are 3⁄64″ plywood. Many of these pieces come with an adhesive backing on them, so you need only peel and stick—a clever feature. Cuts were clean and almost everything fit snugly together. There was only one place where the tabs and corresponding slots didn’t exactly line up, and that was easily fixed with a razor saw.
If you follow the instructions, the kit goes together fairly quickly. It took me about a week’s worth of evenings in the workshop to go from opening the box to having a caboose body ready for mounting on a pair of trucks. The roof looks daunting at first but is ultimately fairly simple. While the instructions recommend using a wood glue, such as Titebond, I found myself using CA cement first, for a quick bond, then, once the roof panels were attached, following up with Titebond for additional strength. I did add some wood filler along the edges of the roof to help form a smooth transition from the top of the roof to the trim pieces; that was the only finicky thing about the roof. The only major departure I made from the instructions was that I decided not to install the window glazing until after everything was painted, to save the trouble of having to mask everything.
The weak point of the instructions had to do with bending the end railings and building the ladder assembly. The jigs for these were mentioned, but the actual construction is left to the modeler’s experience. I contacted Iron Horse, who told me they’re updating the instructions and will continue to do so, based on customer feedback. To make the ladder, I used some small pins to hold the L-bracket frames in place, then soldered the wire rungs across, using the jig as a guide. On the end railings, I used the 1⁄16″ brass rod, but hammered flat the part of the railing along the top (as was common on the prototype). I marked and drilled holes through the flat part, as per the jig. I then threaded the other vertical posts through the holes and soldered them in place.
I mentioned above that the kit doesn’t include trucks or couplers. My advice would be to procure those prior to building the frame, so you can build the frame to accommodate your choice of trucks and couplers. I didn’t, and had to do some post-assembly surgery to get things to fit properly. To be prototypical, you could use the trucks from an Accucraft EBT three-bay hopper, or order a pair of trucks from Rich Yoder Models. Of course, any other truck would work; it just wouldn’t be accurate to the prototype. The instructions don’t mention how high the caboose is supposed to sit above the rails. Prototypically, the top of the end platform should be around 30″ or so above the rails; if you shoot for that when mounting the trucks and couplers, you should be okay.
As supplied, the kit provides enough detail to satisfy the average modeler. With some paint and proper lettering, it would make a fine addition to your train. It has the potential to be superdetailed, should you so desire. There’s no part of the kit that needs to be modified—it’s good as it is. It’s all about adding details. I added poling pockets, coupler lift bars, and air-brake components to the end, as well as window shades over the cupola windows to match the prototype. I also used thinner but wider boards for the roof walks to better match those on my other cars.
I was on the fence, when building this model, concerning the appropriate time to paint the model. I thought, with the full interior, that a paint-as-you-go approach might be more prudent. However, I ultimately decided to just build it, then paint it, if only to show the completed model unpainted for the review. As it turned out, painting the interior after completion with a can of spray paint, then detailing with a brush, was easier than I expected. The exterior received a proper coat of red paint, followed by appropriate EBT dry transfers I bought from the Friends of the EBT (www.febt.org).
The finished model is a delight to watch on the end of my train. The caboose matches the prototype dimensions within an inch or so in all the critical areas. If you’re looking for a caboose that will make a statement at the end of your train, this kit will fit that bill well.