News & Reviews Product Reviews Kamloops Junction Wood Products water tower

Kamloops Junction Wood Products water tower

By Kevin Strong | April 25, 2006

| Last updated on November 3, 2020

1:24 scale

Email Newsletter

Get the newest photos, videos, stories, and more from Trains.com brands. Sign-up for email today!

Kevin Strong

1:24-scale water tower
Kamloops Junction Wood Products
850 Ida Lane
Kamloops, British Columbia V2B 6V1 Canada
Price: $119.99 Can.
Note: Manufacturer is no longer in business

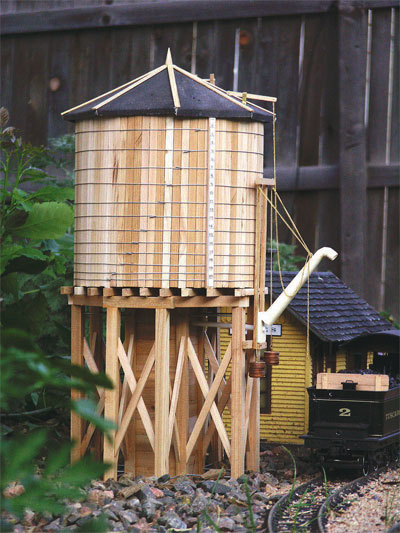
Craftsman-level kit; pre-cut cedar stripwood; Sonotube section for the tank substructure; corrugated plastic sub-roof material; sandpaper roofing material; resin castings for the water spout, counterweights, and nut-bolt-washers; steel wire for the tank rings. Dimensions: 22″ tall, 10″ wide (without ladder), 10″ deep. In 1:24, this works out to 44′ x 20′ x 20′, respectively

Pros: Stripwood neatly bundled and labeled for easy identification; sufficient extra material to allow for mistakes or embellishments; drawings helpful in identifying parts
Cons: Vague instructions, almost to the point of being no help at all; clearer detail photos would be
a welcome addition

During the steam era, water towers were perhaps the most prominent feature of any railroad landscape. Railroads built them every 10 or so miles along the line, so locomotives would have ample opportunity to replenish their water supply. Water towers, for the most part, were very similar, consisting of a large round tank supported on timber legs.

Kamloops Junction’s water tower is not modeled after any particular prototype, but follows the familiar form they all took. It scales out to 44′ tall, which, based on drawings I’ve seen, is a bit on the tall side. In 1:20.3, it “shrinks” to a more reasonable 37′ tall. Certain features, such as the legs, can be shortened a bit, allowing builders to lower the structure as they see fit. One of the inherent beauties of these kits is that they lend themselves well to modeler’s license.

Like other Kamloops Junction kits, this kit is not for those unfamiliar with a workshop. A good amount of invention and intuition is required to make the construction go smoothly. Assembly is easy once you figure out what goes where, but some steps require foresight and planning that those unfamiliar with setting up jigs and the use of a saw may find confusing. There’s a lot more awkward gluing and clamping involved in this kit than I’ve encountered in a long while.

The first part of construction-the base-requires the most care. It is a spidery-looking network of legs and cross bracing that took some thinking to put together. The drawings helped me figure out what goes where, but care had to be taken to make sure that the center column was square and that the outlying support timbers were all the same distance from the center.

The tank goes together easily. To attach the staves, I lined them up along the edge of my workbench, then ran two strips of masking tape along the back, making a “sheet” of staves. This kept everything square and even. The ring locations were transcribed from the drawings to the tank at periodical intervals, and the wire bent around to match.

The roof was the most problematic part of this whole project. The kit came with sections of corrugated plastic to be used as a subroof material. These were not cut evenly and required a lot of cleanup to get eight, identical, pie-shaped wedges. The diagram on the drawing is wrong, and you will not get a wide enough roof if you use it as a template. Give yourself an additional two degrees (20 degrees total) and add 1/4″ to the length of each section, and it will work out nicely (wider pie sections will give a flatter roof). Here again, I used tape to hold the roof sections together while I glued the entire thing to the top of the tank. The “paper” roofing material went down fairly easily once cut to fit. The wood trim was glued directly to the edges of the paper.

The spout and related hardware go together fairly well, though I took the liberty of hollowing out the end of the spout to give it a more realistic look. How exactly it was supposed to be attached to the tank was a mystery. I opted for a long screw into the back, giving enough play that the spout can move up and down freely. I also opted against using the supplied counterweight castings, using pennies instead. I used styrene tubing for the supply pipe to the spout, rather than the wood dowel provided with the kit. I found the nut-bolt-washer castings to be too large to be prototypical, and were of varying quality. I’d opt for Ozark Miniatures or Hartford castings instead.

I wish the instructions were clearer for this kit. It would take a lot of the guesswork out of what is otherwise a nice kit. The basic parts are there and the kit builds up to a well-proportioned water tower. Add to that a handful of third-party detail parts, and you can take this kit to the next level. Once treated with a wood preservative and given a coat of paint, there’s no reason why it won’t be able to supply your iron horses with their essential nutrients for years to come.

You must login to submit a comment