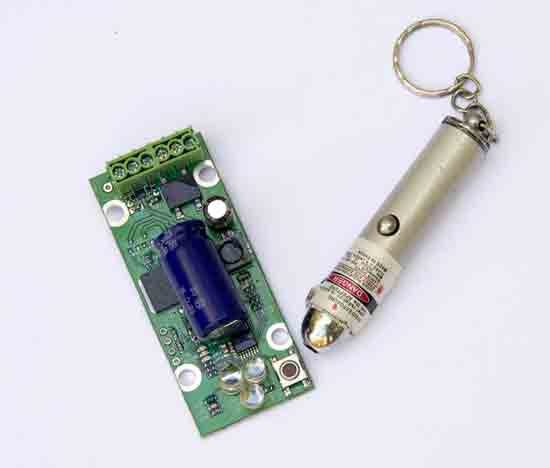
Laser-activated circuit for controlling electronic switch motors
Unionville Depot
E-mail: queries@unionvilledepot.com
Price: SC-11 1-coil (2-wire) switch machine controller, $39; LP-10 laser pointer, $18
Website: www.unionvilledepot.com
Pros: Simple installation and operation
Cons: Difficult for laser to register on the controller in sunlight; circuit board not weatherproof
Unionville Depot’s “LaserActive” system is intended to fill that need. It consists of a small PC board with a photoreceptor that is activated when struck by a laser beam, causing it to throw the switch. Our review sample is their controller for LGB and similar single-coil switch machines (as opposed to the slow-motion switch machines.)
The board has six input terminals, though only four are used; two for the power in (12-21V DC, 10-18V AC, or 14-21V, if drawing power from a DCC-powered railroad), and two outputs that go to the switch motor. Hook-up is simple but read the directions to get the right wires to the right terminals.
Once power is applied, you’re ready to go. The device is activated by shining a red laser beam onto the sensors on the end of the control board. Once it sees the laser, it throws the switch machine. It then “freezes” for around four seconds or so, so you can’t accidentally trigger the switch machine twice. After that delay, you can activate the sensor again, and it will throw the switch the other way.
On the workbench, the system worked flawlessly. I shined the laser on the receptor for around one second and the switch points moved right over. I waited the requisite delay (there’s a red LED that goes out, letting you know it’s ready for its next command), hit the sensors again, and the switch snapped back. The PC board also has a “manual override” button on it that you can press to throw the points if your laser doesn’t work.
There are some limitations to this system. First, there’s the laser itself. It’s a single point of light so, the farther away from the sensor you are, the steadier your hand must be to keep the laser in place long enough to trigger the switch machine. (The instructions recommend a distance between three and ten feet.) The PC board is not weatherproof, so it will need to be protected inside a lineside building or something like that. The manufacturer does offer “coated” circuits that are a bit more weather resistant, but that’s only half the battle.
The biggest issue when using these systems in the garden is that they don’t work very well in direct, or even indirect, sunlight. The laser from the supplied pointer is not strong enough to be seen by the sensors. (I tried using my laser level, with the same results.) So it’s not only for weather resistance that it’s advisable to put the sensors inside a building (behind a window or open door or somesuch), but operational as well. The downside to having the PC board inside a building is that you can no longer reach the manual override button.
I love the concept of this product. For the indoor modeler, it’s a cool way to control switches and other accessories on your railroad. Outdoors, I have concerns about its practicality. I think you could take steps to shield the photo receptors on the PC board so that the laser was more effective but there’s also the issue of seeing where you’re pointing the laser, which is easier said then done in the daylight (even in the shade).