PIKO America LLC
4610 Alvarado Canyon Road, Suite 5
San Diego, CA 92120
piko-america.com
R/C GE 25 tonner, 284.99; R/C GE 25 tonner Clean Machine; $299.99
Features:
Directional light-emitting diode head light and backup light
Five-pole ball-bearing can motor
Heavy duty hard chrome ball-bearing wheels in gauge
Minimum recommended radius: 600mm (23.6″)
Road names: Pennsylvania RR; Atchison, Topeka & Santa Fe; Union Pacific
Weather-resistant plastic construction
Weight: 2 pounds, 3 oz.
Analog R/C system, $184.99
Features:
8 selectable channels
22V/5A transformer
Up to 4.5A DC track power
Up to 2A DC fixed accessory power
Range of up to 80 feet
Includes pocket remote with CR2025 battery
R/C locomotive receiver with remote, $99.99
Features:
3.5A maximum current
Two relay function contacts
Works with battery or track power
Range of up to 80 feet
Remote includes CR2025 battery
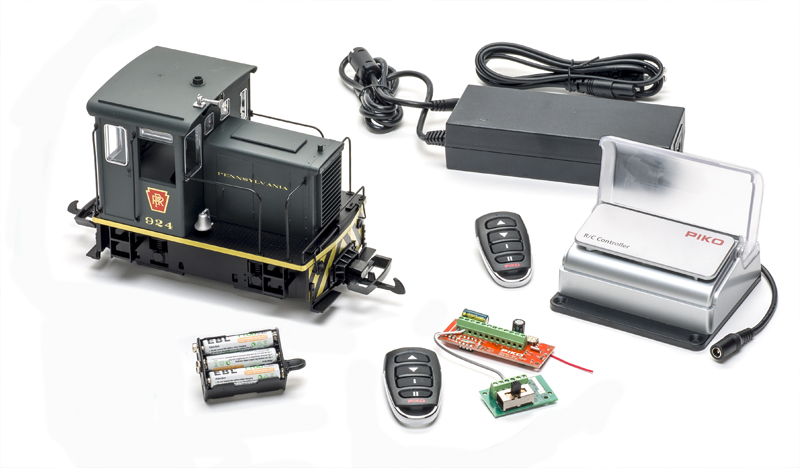
25 tonner. This latest GE 25-tonner release uses the same tooling as the model I reviewed in the Spring 2019 issue. Most of the model is made of UV- and weather-resistant plastic. The handrails and uncoupling levers are separately applied flexible plastic parts. The plastic horn and bell are installed by the user.
As with the earlier release, the model measures within scale inches of a prototype diagram. The wheels are correctly gauged for no. 1 track (Note that no. 1 track measures to 42 scale inches in 1:24).
Hook and loop couplers are factory installed at the correct height. Instructions and spacers are included for Kadee nos. 831 or 909 knuckle couplers (sold separately).
Our review sample is decorated in a freelanced Pennsylvania RR scheme. The model’s olive green paint is noticeably lighter than Pennsy’s almost-black Dark Green Locomotive Enamel. That said, it’s an attractive scheme with clearly printed gold lettering and red and gold keystone heralds on the cab sides.
The motor and mechanism are the same as the track-powered version, as listed in the above features box. The main differences are the R/C electronics. Also, instead of a weight, the locomotive has a battery cradle housed under the hood.
Operation. After removing the radiator grill, I pulled out the battery cradle and installed six AAA batteries (not included). I used rechargeable 11000 mAh batteries but alkaline batteries will also work fine.
The power switch is located on the underframe below the engineer’s side of the cab. Under the fireman’s side of the cab is a potentiometer switch used for selecting the R/C channel (0 to 7). The channel needs to be the same on both the locomotive and the pocket remote, which looks very similar to an automobile key fob. For the remote I simply removed a rubber plug from the back of the unit, then used a small screwdriver to turn the channel dial. From the factory these are both set to 0.
After flipping the power switch to the ON position, I noted the cab interior light came on. I then set the switcher on our test track.
The remote has two arrow keys and two keys marked I and II. One click of the top or bottom arrow key selects the locomotive direction. The directional headlights made it easy for me to see which way the locomotive would start to move. After that, subsequent keypresses increased or decreased the locomotive speed. Pressing both keys together serves as an emergency stop function.
There’s some momentum built into the speed control. After the first keypress to select the direction, I pressed the arrow key about four more times before the model started moving at 4 scale mph. After about six more keypresses the locomotive moved along smoothly at a scale 15 to 20 mph, which is the normal top speed for a small industrial switcher.
Weighing 11 ounces less than its track-powered counterpart, the battery-powered switcher is slightly less powerful than the track powered-version. However, rubber traction tires helped the battery powered switcher achieve an 8-ounce drawbar pull on our force meter tests, which is equivalent to 8 free-rolling large scale freight cars on straight and level track. This compares to 11 ounces (or 11 cars) for the track-powered version.
The remote’s I and II keys trigger two functions when those outputs on the R/C receiver board are connected to a sound module or decoder. For this application the buttons are usually used for the bell or whistle/horn.
The R/C 25-tonner is also available in a Clean Machine version with spring-loaded and slightly abrasive mesh cleaning pads. We loaned the unit to a local modeler for testing on his garden railroad. He ran the Clean Machine on a few loops of his dirty track for a solid 45 minutes without any battery fade and was satisfied with the results.
For those that wish to convert their own locomotives, the R/C electronics are available separately (see Facts & Features box). Along with a pocket remote, the set includes a 1⅛” x 2¾” receiver board that’s prewired to a 1″ x 1¾” slide-switch board. At less than 3⁄8″ thick, these electronics are small enough to fit into most large scale diesel and steam locomotives.
R/C Analog Power Set. For those that don’t wish to replace the electronics in their DC locomotives, PIKO offers the option of the R/C Analog Power Set. This set includes a 22V, 5A power supply with DC adapter cable, an R/C analog DC receiver, and a pocket remote. This 8-channel system uses the same type of pocket remote as the other ready-to-run R/C products.
The plastic receiver box measures 2¼” x 4″ x 4¼” and has four screw holes for attaching it to layout benchwork. As stated in the product manual, this system is for indoor use only.
Setting up the system is simple. After connecting the power supply and DC adapter to the appropriate spring terminals on the back of the unit, I plugged the adapter into a wall socket. I then connected the leads from out test track to the spring terminals marked for variable DC track power. There are also spring terminals for constant voltage that can be used to power accessories.
Because it still relies on track power, the system will run only one locomotive at a time. After removing the cover from the receiver, I could select the R/C channel (0 to 7). I set the receiver and its pocket remote to 1.
The remote will increase or decrease voltage to the track and switch polarity to change the locomotive’s direction. As with the ready-to-run R/C locomotive, the arrow keys are used to select locomotive speed and direction. For the analog controller, the II key is used for emergency stop and the I key turns the constant voltage accessory power output on or off.
I tested the system with a locomotive set for DC track power. The locomotive performed smoothly, although as with many track-powered engines, the headlight brightness is also dependent on the track voltage. It ran alongside the ready-to-run R/C locomotive (set to a different channel) without any difficulties.
It may not be the most sophisticated system on the market, but the PIKO America R/C lineup of locomotives, electronics, and analog power system offer simple, affordable solutions for those who wish to add remote control operation to their large scale layouts/railroads.
This engine appeals to me as someone new to Garden railroading. I don’t want the hassle of wiring or track cleaning. I take it that the separate receiver will work in other Piko products, but won’t be able to operate their sound or smoke capabilities. Is that true?
An appropriate supplement might be how to add sound to the receiver in the Engine. With 2 “triggers” a device with at least a bell and a horn, and running sounds related to engine voltage and pollarity, seems doable.