How To Restoration & Repair Craft store finds for toy-train enthusiasts

Craft store finds for toy-train enthusiasts

By Angela Cotey | July 13, 2011

| Last updated on February 2, 2021


Details for scenicking a layout can come from surprising sources

Email Newsletter

Get the newest photos, videos, stories, and more from Trains.com brands. Sign-up for email today!

D0911_Cody-extra03
By the letter (and number)
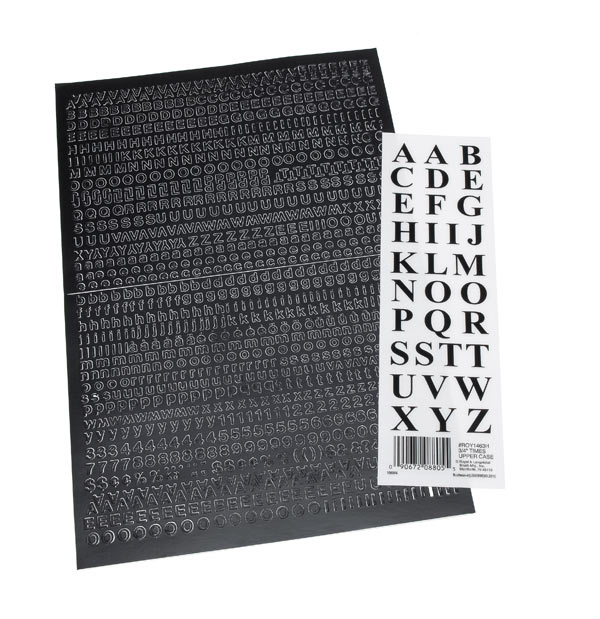
Vinyl letters with self-adhesive backing as well as dry transfers can be used straight from the package or as masks to letter structures, rolling stock, and locomotives. Alphanumeric sets are typically located with the drafting supplies. Additional self-adhesive and dry-transfer letters can be found in the scrapbooking supplies.

D0911_Cody-extra11
Mark it up
Crafts stores carry an assortment of paint pens and markers. The white and yellow samples here are from Sharpie’s Poster-Paint line. I’ve had good luck using these opaque water-based markers for putting stripes on various road materials including foam, plaster, and plastic.

The silver fine-point marker is a fairly new item, but one that I’ve added to my toolbox. I’ve used the marker to paint the all-weather windows on diesel locomotive cabs, to simulate chrome bumpers and trim on automobiles, and to suggest aluminum framing on caboose and passenger car windows. The markers are sold in two-packs. For best results, store them tip down.

D0911_Cody-extra09
Rhinestone cowboy
I’ve used rhinestones for years to simulate headlights, ditch lights, and classification lights on locomotives, but you can also use them for headlights and taillights on vehicles and marker lenses on cabooses and passenger cars. No matter what the use, spray the rhinestones with a flat finish, such as Testor’s no. 1960 Model Master Lacquer Overcoat (testor.com) before installing them with a dot of full-strength white glue

D0911_Cody-extra11C
Storage bags
Screws, springs, and wires are just some of the things modelers have lying around a workbench. Why not organize these items? Fortunately, crafts stores have a variety of storage solutions: containers, multi-drawer units, and self-sealing bags. I prefer clear storage containers  so I can see what’s inside. However, I label the small bags so I know where the parts came from.

D0911_Cody-extra10
Pastels
Weathering is a great way to add realism to locomotives, rolling stock, and roads. One of the most economical ways to do this is with pastel chalks, such as General Pencil Co.’s 12-pack of earth, portrait, and skin tones (generalpencil.com). Just use a no. 11 blade to scrape some pastels into a box or small storage container. Apply the powdered pastels to a freight car, locomotive, or structure with a brush and seal them with a flat finish.

15 thoughts on “Craft store finds for toy-train enthusiasts

  1. On my Lionel layout, I am using Sharpie paint markers to give the track rails the grimy black weathered look. I plan on using the fine black paint marker to weather the track rails on some Ntrak modules.

  2. I have used the clear plastic strips that come in shirt collars for a number of years for windows in locomotives and such. I also found that using a standard hole punch on it and you can crank out perfect diesel porthole lenses. I once used a clear pushpin for a headlight lense in an old Lionel steam engine, I just sawed off the part with the metal pin in it and it fit perfectly.

  3. For frosted window look, use frosted plastic packaging from other items. I use stiff yet flexible packaging from Jockey underwear. I have used it on buildings and train windows.

  4. Hi Dennis,
    For “windows” you could try using using the clear vacuformed packaging many store bought items come in. Just find & cut out the flat pieces to size and apply them to your model using white glue, or the specially made glues such as Testors clear parts cement or “canopy glue”. While contact cement or even 5 minute epoxy could also be used, they are less forgiving. Using Ca glue is not the best idea, as it could craze or fog the clear plastic. Other options for “glass” are available. Plastistruct makes an assortment of thicknesses and sizes of clear plastic that can be cut to size. Your local arts & craft store may carry report binders with clear plastic covers that though thin, will serve in a pinch. To frost the plastic, you can purchase a spray can of frost or matte from a hardware store, or an art supply store. as a last resort, you could even use a spray can of flat white and spray the inside area of the glass lightly from a distance.

  5. Love the ideas…simple but practical.

    Can I ask for some help. I am using wheat lamps to light my Plasticville structures and would like to cover the windows with a frosted thin plastic to defuse the light. 3M scotch tape works on small windows but it will not last very long. Any thoughts or ideas would be appreciated. I have been unable to find a supplier or store that can satisfy my needs.

  6. I learned something here. You have to have an imagination when you walk in a store like that- or a garage sale or anywhere else.

  7. Nice piece! Cody brings some insight from MR where I've always liked his articles. This one crosses all scales in terms of finding low cost materials and tool. Very helpful!

  8. I have found alot of useful items at craft stores. They carry lots of stickers which make excellent building signs, etc. I recently purchased some wooden peg axles which made great smokejacks for a roundhouse I was working on. They would also work great for roof top vents.

  9. Hello; Great ideas. Went to the dollar store and bought some eye shadow makeup in earth tones, works great! Try it.

  10. There's a nice selection of wooden parts, metal, wire, etc. at craft shops too….I am a 'regular' at our local store. Fun place to hang out.

You must login to submit a comment