Q: I’m interested in correctly applying consolidated stencils to rail cars existing in 1972 when consolidated stencils were introduced. Please describe the parameters of the area on a rail car within which the consolidated stencil must be located. This is possibly described in AAR Field Guide, Rule 80. – Chris Roehl
A: Hi, Chris. You’re right; the placement of the consolidated stencil – commonly confused with the name of one part of that panel, Clean, Oil, Test & Stencil – is dictated by Federal Railroad Administration regulations and outlined in the Field Manual of the Association of American Railroads Interchange Rules. Rule 80 covers all car markings, including not just the consolidated stencil but also the reporting marks, number, car weight, and more.
If you don’t happen to have a copy of that weighty, expensive tome in your collection, you’re still in luck. The National Model Railroad Association has your back. The NMRA has a document, Data Sheet D5e, available for download on its website. This document summarizes the federal rules about freight car lettering, including consolidated stencils.
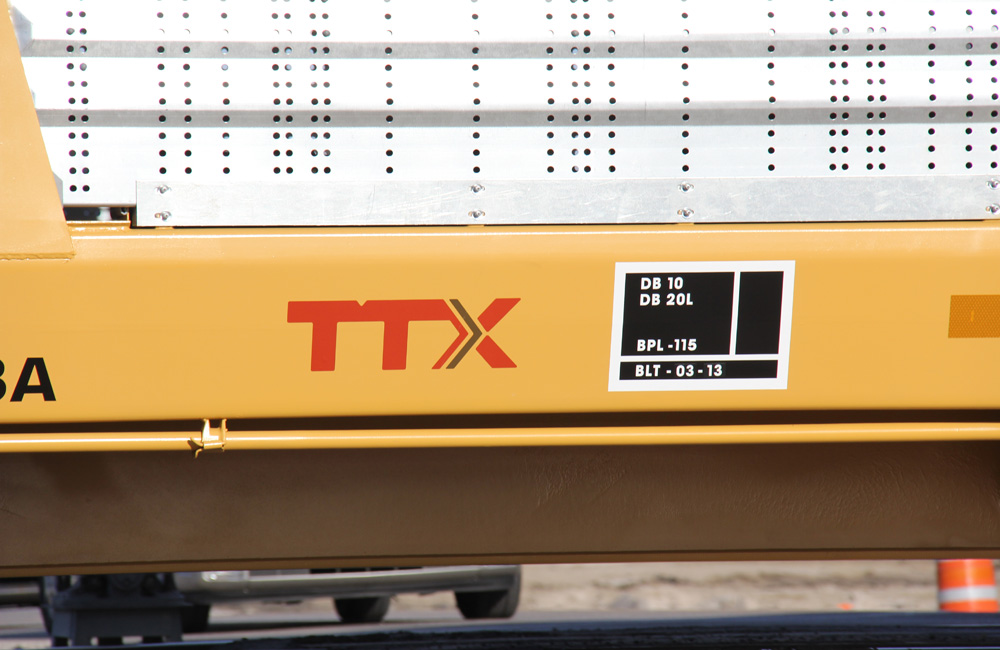
According to AAR Rule 80, a consolidated stencil includes three sections. The top-left quadrant has information about the braking system. The top line is the primary braking system, and the second is the backup brake, if any. In the photo above, DB 10 and DB 20L are types of air brake valves. Below that, the length of the air brake line (Brake Pipe Length, or BPL) must be listed if that length exceeds 75 feet.
The top-right panel includes the month and year when the car was last lubricated (LUB), a code for the location the work was performed, and the railroad doing the job. This panel can be blank, as in the photo above, if it’s a new car that hasn’t been in for service yet.
At the bottom is the car’s built date (BLT) and rebuilt date (RBLT), if applicable. Other info that can be included in this panel is the Clean, Oil, Test, and Stencil (COTS) date, indicating when the brake control valve was last serviced; and the Repacked (RPKD) date, when the trucks’ friction bearings were last serviced.
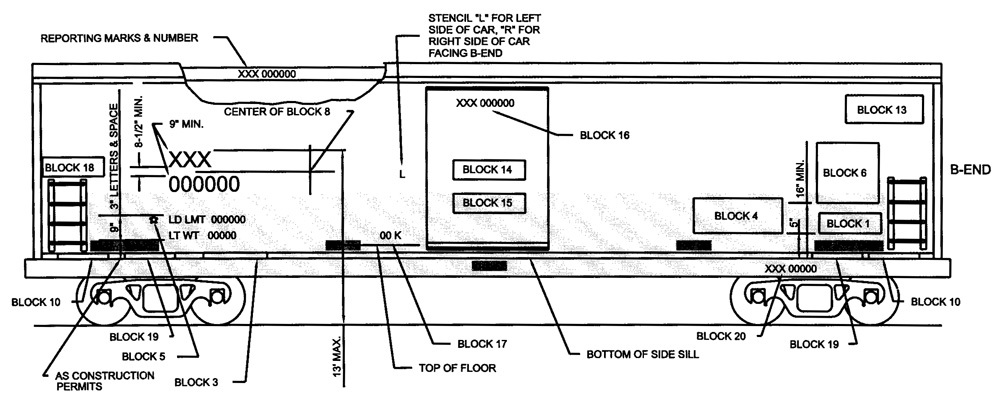
Regulations say this panel must be black, with a 1” wide white border, 1/2″ white lines separating the sections, and 1” high white gothic lettering. Since the amount of information in the panel can vary, so can the panel’s size. It must be no less than 11-1/2” x 16”, but can be no larger than 14” x 24”. Exact placement of the panel varies depending on the configuration of the car, but in general, it’s supposed to go near the bottom-right corner of the car side. On boxcars, reefers, hoppers, and other cars with sufficient space on the side, it must be placed 5” from the car’s sill. Check out the diagram below from the FRA; Block 4 is the one for the consolidated stencil.





As information, in November 2017, the AAR removed the requirements for the display of Consolidated Stencils on freight cars. For tank cars, the built date (BLT) will be stenciled at the BL and AR corners on the sides of the car in the area near the qualification stencil (panel).