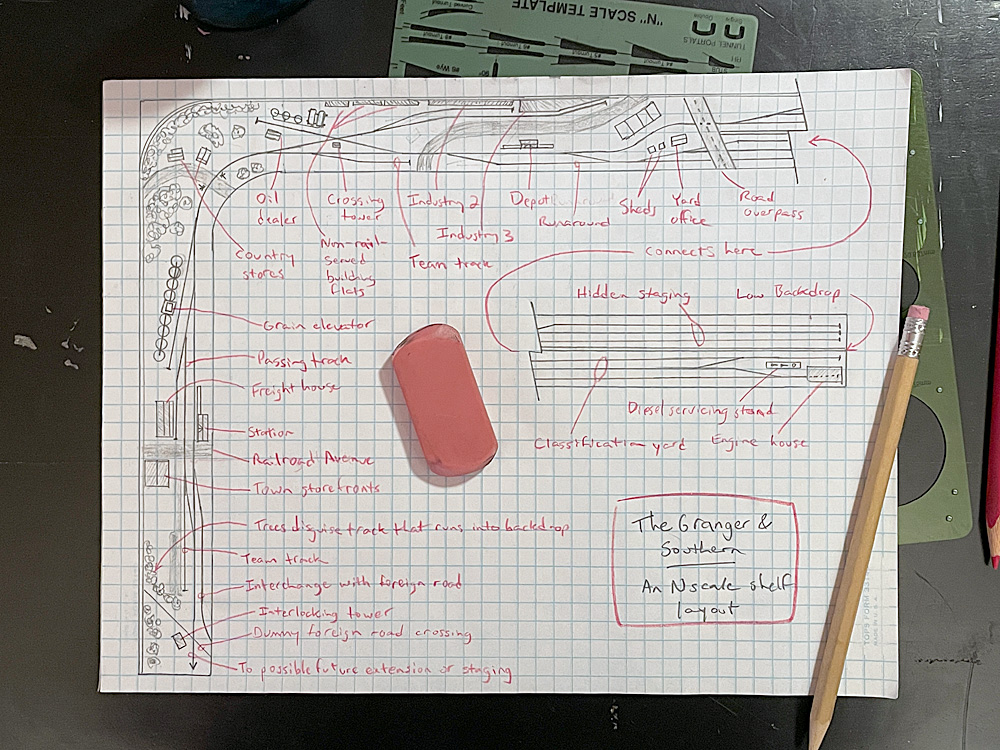
In some of my early “Sketching with Steve” articles – in particular, “What is a station?” and “Big industries for small spaces” – I admit to having an ulterior motive. I was building toward something. Specifically, I had been thinking for a while about building an L shaped N scale shelf layout in my basement office. Those two sketches were ways to test out different concepts I could use when designing that layout. If you read those articles, you’ll see some familiar elements in this sketch.
I don’t know if I’ll ever build this track plan. My cats, who have free run of this section of the basement and love to play with my trains, might have something to say about it. But this design moves me one step closer to pulling that trigger. And hopefully some of you can get some ideas for your own model railroads from my thought process.
Since early 2020, I’ve been spending at least part of each workweek at a tiny desk in a corner of my basement, working remotely. Though I’ve tried to create a cheery atmosphere with train art and railroad herald plaques, I think that what could really make my home office seem more like the Model Railroader offices is an L shaped N scale shelf layout on the walls above my desk. When I’m editing a particularly tough article, I could rest my brain (and my tuchus) by simply standing up, grabbing a radio throttle, and switching some industries.
This corner of the basement has two unobstructed walls, 8 feet long on one side and 13 feet, 6 inches on the other. There are two windows on the long wall, but since this is a basement, they’re high enough that they wouldn’t interfere with a shelf layout situated a little over four feet above the floor. If I keep my benchwork thin – say, a shelf cut from hollow-core door, supported by shelf brackets – it should also clear the top of my computer monitor. If the shelf is no more than 12” deep, it won’t interfere with work at all.
I started at the end of the 8-foot shelf (bottom left in my sketch). I might be able to attach a staging shelf or even another scenicked section of the layout here in the future, but at this point, I had to make sure there was a long enough unobstructed switching tail for the runaround track. Two feet should be plenty of space, I figured. But I had to do something interesting with this end of the layout, not just lay down two feet of flextrack. So I added a dummy crossing with a foreign railroad and an interlocking tower to protect it. Backing up the main line a couple feet, I added a turnout to a parallel track that leads off the edge of the layout, representing an interchange with the foreign road. Placing the dummy track at an angle lets me use a stand of trees to disguise the fact that it just runs into the backdrop.
Since there isn’t room for the foreign road to be working, the interchange will have to be fiddled. This means cars will be moved on and off the track by hand during an operating session. Though that practice isn’t prototypical, it’s worth doing, because a universal industry like an interchange can both receive and supply any kind of car. What else can you do in a 3 x 24-inch space that can give you that much operation?
I drew in the turnout on the other end of the passing track, then put in two more universal industries attached to either end of it: a freight house and a team track. Each is long enough to handle three or four cars. N scale has its advantages! Next I added a passenger station, a road, and a couple town storefronts to make the heart of the town I’ll call Granger.
Although these two spurs could receive and ship a wide variety of cargos, my town needed more freight volume. Since I planned my L shaped N scale shelf layout to be flat, that suggested a granger country setting. And what industry says “Midwest” more than a grain elevator? I drew in the curved track leading to the longer shelf so I knew how much space I had to add another turnout. I had to nudge the passing track turnout a little bit to make room, but not much. I used a left-hand turnout to lead the main into the curve, avoid an S-curve, and gain a bit more passing track length.
Although the track through the curve was fairly short, there was a lot of space behind it. I could easily fit a spur to an industry back there, but I didn’t want to clutter every square inch with structures and track. Rather, this space seemed like a natural place for a rural scene to visually separate my two main operational areas. A rural grade crossing and a couple of buildings, like a country store and a bait-and-tackle shop, should make for an interesting scene. Trees disguise the road’s curve into the backdrop.
Next, I turned to the other end of the layout. I knew I wanted staging, and I hoped to find space for a small classification yard. I decided to put both of them side by side at the far end of the long shelf. First I drew in a low backdrop down the middle of the shelf to hide the staging yard from view. To disguise the beginning of the backdrop, I added a diagonal road overpass. I then drew in a three-track yard. Four feet should be long enough to hold six trains. I didn’t add an escape turnout because six trains should be enough for an operating session, so they could be made up and broken down between sessions.
This left room for a three-track classification yard in front of the low backdrop. To make this scene a bit more interesting and add some more operation, I put a single-stall enginehouse and a diesel fuel/sand/water stand at the far end. Since these structures and the escape turnouts would shorten the yard unacceptably, I put the yard ladder on the left side of the road overpass.
Between the yards and the corner curve were a shade more than five feet for my second town. The first step was to connect the main line to the two yards and add a runaround track. The runaround wouldn’t have to be the length of a full train, so I made it just a foot long. I arranged its turnouts so it could also function as the yard’s switching tail. I put the depot on the back side of the runaround so it could serve trains coming either from the yard or from staging.
There’s a space about 6” x 24” behind the depot, deep enough for a street and a couple of tracks in front of some low-profile industries. I want the road to look like it goes somewhere, so I want to disguise where it curves into the backdrop. I did this by putting a block of city buildings along the curve to staging. Then I added the road, two spurs, and a pair of industry flats.
Then I erased them. Even backing up the turnout off the main all the way to the corner curve didn’t give me enough space to put two spurs where I’d drawn them. So I lengthened the buildings and slid the turnout to the second spur farther down the lead track. While that worked, it also restricted the space I had for other industries. Oh, well, that’s why it’s called “Sketching with Steve” and not “Polished, Finished Designs with Steve.” No track plan is finished until it’s built.
I can fit two more turnouts between the grade crossing and the turnout to the two-industry spur. One, in the narrow space between the main line and the aisle, seems like the perfect spot for a team track. The other will have to cross the two-industry spur at grade to reach the open space behind it. This crossing would be a good place for a crossing tower or a smashboard.
The new industry spur isn’t that long – just a foot – but it’s far enough from the backdrop to allow a fully modeled industry, rather than a flat. So I decided to make this an industry that doesn’t work well as a flat – an oil dealer.
Although I would have liked to have more industries in the second city, I’m happy with the operating variety included in this L shaped N scale shelf layout. I wouldn’t want to give up either the staging or classification yard to put in more spurs; I feel this would decrease my operational possibilities. Who knows, I might decide to build this after all, as long as I can figure out how to keep the cats off of it.




I love the concepts here. Plenty of “working railroad”, and just enough flexibility that I can modify it as the top deck of my layout. I have my bottom deck planned out and under construction, but really hadn’t given much thought to the top deck, other than I knew it would be there.
The interchange will tie in perfectly to my helix. With the foreign railroad being inbound from the helix, and the “future extension” being outbound to the helix.
The staging/yard end will be a bit tricky as I’ll have to turn another corner at about the depot, but I think it’s doable.
Thanks Steve!