How To Build a Model Railroad How to wire power-routing turnouts

How to wire power-routing turnouts

By Angela Cotey | January 29, 2010

| Last updated on January 12, 2023


In two-rail model railroad wiring, it's a matter of where you put the breaks in the current, and to never power a turnout from the wrong direction

Email Newsletter

Get the newest photos, videos, stories, and more from Trains.com brands. Sign-up for email today!

How to wire power-routing turnouts: While it may initially seem difficult, basic two-rail wiring for power-routing turnouts is easy if you understand and apply just two simple rules.  The diagrams below demonstrate these crucial wiring principles.
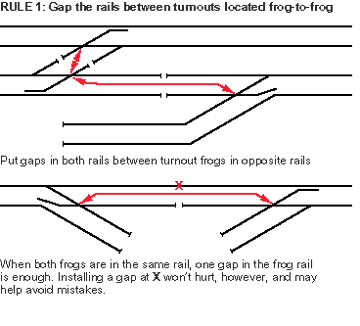
How to wire power-routing turnouts: A diagram which reads: Rule 1: Gap the rails between turnouts located frog-to-frog. Put gaps between turnout frogs in opposite rails. When both frogs are in the same rail, one gap in the frog rail is enough. Installing a gap at X won't hurt, however, and may help avoid mistakes.
Rule 1: Gap the rails between turnouts located frog-to-frog.
Place gaps in both rails, between turnout frogs in opposite rails. When both frogs are in the same rail, one gap in the frog rail is enough. Installing a gap at X in the diagram above won’t hurt, and may help avoid mistakes. Notice that what is important is the arrangement of the turnouts, and not the distance between them.
A diagram which reads: Rule 2: Feed power from the point ends of turnouts. If gap X is used, additional feeder is needed at A.
Rule 2: Feed power from the point ends of turnouts.
This graphic shows why rule 2 is necessary, and what it means. Notice that feeders anywhere along the turnout stock rails satisfy rule 2. That’s because the frog and the rails beyond it are still supplied with power only through the turnout points.
It may seem difficult to wire power-routing turnouts, but keeping these two rules in mind, many errors can be prevented, and while wiring is not a favorite task for many, it is none the less essential. Looking for more information on turnouts? Read Five tips for trouble-free turnouts, which demonstrates how to improve performance and electrical continuity on your layout.
From Wiring Your Model Railroad by Andy Sperandeo, published by Kalmbach Books.

18 thoughts on “How to wire power-routing turnouts

  1. I am using peco code 55 electrofrog turnouts. Since layout is a switching design, there are 14 turnouts. From the article above, am I correct in thinking that basically if I insulate both rails of each turnout at both ends, power each turnout at the point end, and power each track lying between each of the turnouts, there would be no short circuits and there would be good power to all?

    I realize this may seem redundant, but actually simpler and more straight ahead rather than figuring which turnouts have facing frogs etc.

    Also I plan on having 5 blocks and 2 power cabs. Again it seems that powering like I said above would make it easier when wiring the blocks to the cabs.

    Also, a reversing wye, which I know will involve reversing polarity to the rest of the track. Add in a scissors crossing just to make it interesting!

    Does this make any good sense at all?

    I do have a pdf file clearly showing the layout including turnouts, which I would gladly send to if anyone was up to the challenge of providing some visual help as well.

    Thanks to any one that might give me some help.

    Tim Goodman

  2. I have a DCC layout and I added a left hand DCC crossover and a right hand DCC turn out I have a automatic reverse circuit but don't have clue how to make all work.

  3. I have some N scale Peco Electrofrogs for my DC layout, however, every so often, the switch points do not contact the rails enough to flow the current. I usually clean the points and rail with a Rix uncoupler and sometimes I have to resort to a small screwdriver in order to clean the points and track. I have tried a liquid product that is supposed to improve electrical conductivity, however it has made much of a change to problem. Is there another way to solve this problem?

  4. I need some help, I have MTH trains and I would like to run 2 trains (on 2 separate tracks) but have a 3rd engine on 1 of 2 spurs(non powered ) so I can switch engines without having to remove it from the track. what do i need, and how do I wire it?

  5. I am just getting back into the hobby. Need help in wiring layout using Peco 83 Electrofrog for DC power. My layout is small and does not warrant the cost for DCC. Block wiring I understand and that is why I need a hint foor these turnouts so that no "short" happens on GP units. Thanx-Scott

  6. For Scott and others considering DCC, I also spent a fair amount of Modeling time working through the Pro's and Con's of going to DCC. I went to DCC for the flexability it allowed. My choice was made easier in that I have the tools and can follow a simple wiring diagram to modify Locos to DCC. If you have problems in this area, many of the newer locos come DCC Ready which means you remove the shell, take out a Plug and plug in your prefered decoder (Sound or Motor only?). Brand is not a major issue as most follow the NMRA practice for wiring colours but check the current requirements as some locos have a high current draw which may damage lighter decoders (2A stall on a 1A decoder wont go. No waranty usually, Check manufacturers some offer Goof Proof so you may be covered). Your LHS may be able to test the Loco if you dont have the tools (Ammeter) to do it your self. Some also offer Decoder installation services or can recomend someone if they can't. Hope this helps

  7. im trying to get information on installing DCC in Mantua Camel Back engines 0-4-0 0-6-0. 2-8=0 etc where can i get information I've tried on line forums with not much success

  8. Having a hard time grasping powered vs unpowered frogs and ramifications regarding power routing. Is this or is this not a concern.

  9. I wish they would put a book out for dumb guys like me, that fancy wiring blows me a way! I read It, I study It and still can,t get from the page to the brain and back to the layout .

  10. I have read several booklets re DCC, articles in MR, etc., but yet have to find info re the nitty gritty of wiring, e.g. how does one arrange the power bus wires under the subroad bed thru out the layout, with its many switches, and complex routes.

  11. I'm a babe in HO model trains! I'm trying to get some idea the pros and cons of using a number 6 double slip switch from walthers. What is the issues with double-slip switches in terms of power wiring, derailment issues, and track planning in regards of where are they placed in yards, sidings, mainlines, etc..

    Where can I found additional information concerning the pros and cons of using double slip switches such as number 6 and or number 8.

  12. I am starting back into HO scale railroad again,but when I first started out DCC was not available. After takeing a look at the wireing that is needed in a DC layout it is very confusing. A block goes here,and a block goes there, but make sure that you block it in the right section. Blocks, wires,and more wires and switches to operate the blocks. My question is DCC better than DC? It just seams that with DCC you just plug in,program and go. With DC it seams like you have to be an electrition to figure it out. The only thing I notised is therre are a less selection of engines in DCC than in DC. I need a little help in choosing what is a better way to go DC or DCC. Thank You Scott.

  13. dc and block ctrl or track bussing is part of the fun in creating the fun of running trains. I have used a 20A dc Switcher and a 317 3-37 vdc voltage regulator to control base current and a 2N3055 for the voltage control. Its durable and close to bulletproof. Most of these patrs can be found at any electronics junk store. I have 35 sections of track I can turn on or off, park trains on, it is part of figuring out the puzzle and creating interest. Sure, you can spend a wad of money and get an automatic system. I would guess those people would be happy taking pictures with their cell phone.

    Looking for ideas on signal trackside lights to indicate block control using leds and availble scale tresles and signal poles. Relays are so last century. Any Ideas using latches, flip-flops and other digital indicator solutions. Something which can be duplicated as many times as need to create a truly unique layout with a board top display system.

You must login to submit a comment