


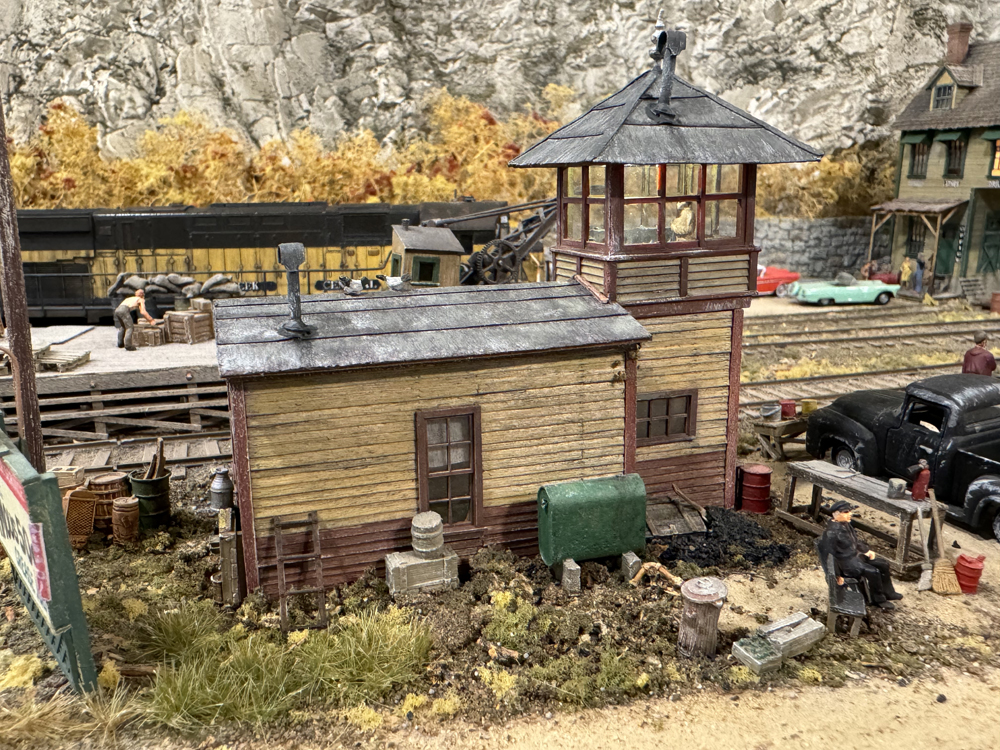
While sifting through my “someday” project box, I found an old Atlas elevated gate tower. I’ve had this little plastic structure since my earliest days in the hobby, but it’s been a number of years since I’ve used it on a layout. Despite its rough shape, I pulled it out of the box thinking it might make an interesting starting point for a new project.
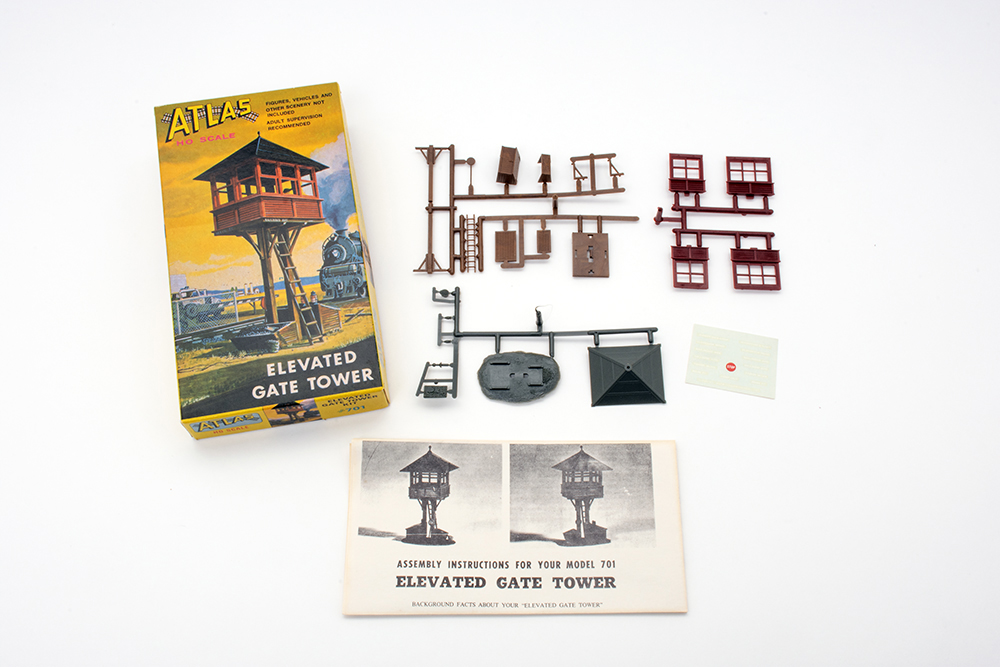
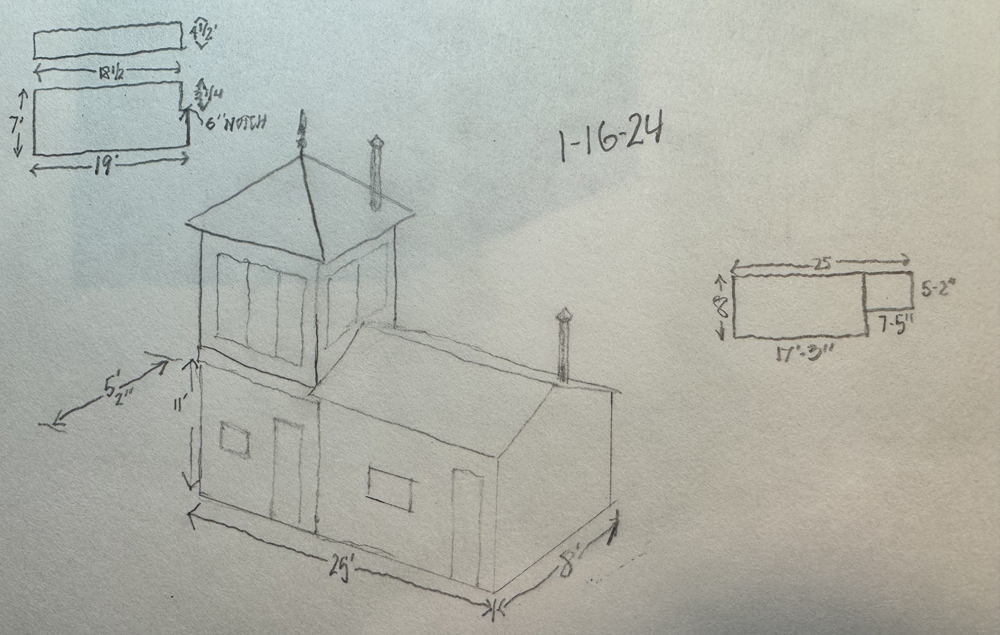
I’ve got a couple of places on my layout where I could still use a yard office, so I figured the Atlas elevated gate tower would be a good starting point. I spent a little time drawing up ideas and came up with a rough plan to combine the tower with an all-new lower structure. You don’t need to have architectural-level drawings to do a kitbashing project like this, but it’s good to have an idea of what you want to complete, as well as work out the key dimensions ahead of time. You’ll notice from the sketch, I did make some alterations as I worked, including omitting one of the doors.
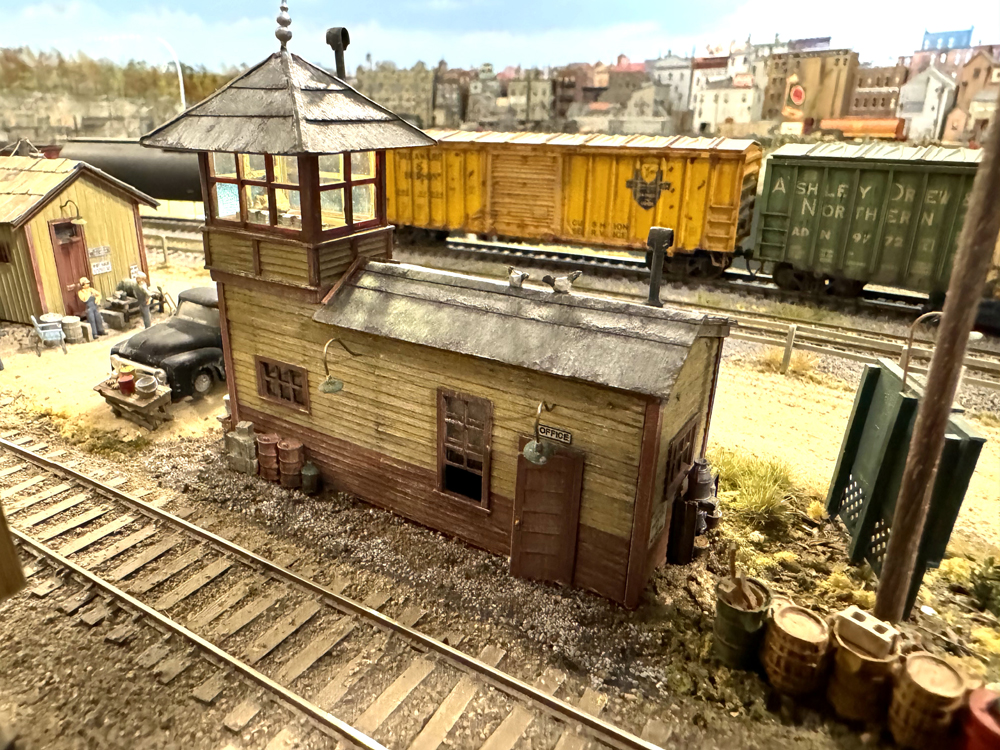
Admittedly, the larger portion of the final building is scratchbuilt. However, the Atlas elevated gate tower plays an important role in the structure, as it was much easier to graft the well-detailed plastic part onto the yard office than it would have been to scratchbuild it.
Disassembly before assembly
I started the project by disassembling the original tower. I’d built the model when I was very young, and so between sloppy glue joints and some poorly assembled parts, I had a bit of work to do. Fortunately, the glue I’d used did not hold the plastic very well, so I was able to carefully take the model apart and clean up the excess glue with an X-acto knife, a file, and sanding stick.

With the cleanup of the tower parts complete, I washed them in water with a bit of dish soap to remove all the sanding dust and oil residue from my fingers, then set them aside to dry. While I waited, I pulled together an assortment of window and door castings from Grandt Line and Tichy that I planned to use on the other parts of the office. See the materials list for more detail.
When I had everything collected, I primed the tower parts, doors, and windows. I then set all of those things aside to dry overnight.
I used mostly what I had on hand for this project, and that included the paint. I painted the tower’s exterior walls (and later the tower office walls as well) with Polly Scale Depot Buff. I used Polly Scale Freight Car Red for the windows and trim. While these paints are no longer available, you can find similar colors in acrylic paints offered by Vallejo, Mig Acrylics, and others.
The yard office
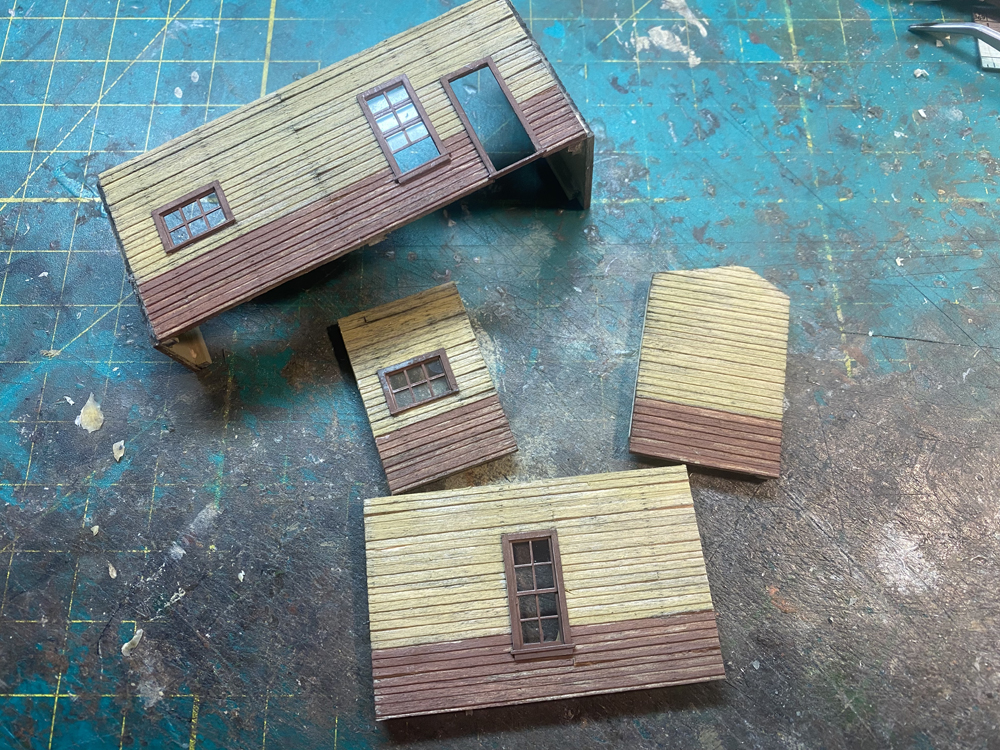
With the parts of the tower painted, I turned my attention to the rest of the structure that would support it. Following the dimensions I’d written on my rough sketch, I the cut the wall sections from a few scrap pieces of Northeastern Scale Lumber clapboard siding that I had in my wood parts box. These wall sections would become the first floor of the yard office.
Since I like my layout structures to look a little weather-beaten, I distressed the wood walls using three different techniques. I started by using a brass bristle scratch brush to roughen the finished surface of the wood. To do this, lay the part on your work surface and scrub the brush along the wood parallel with the siding. I like doing this before I cut window openings because it’s easier to work on the wood pieces with a solid surface. When the wood is later painted or stained, the rough surface will take on an aged wood look.
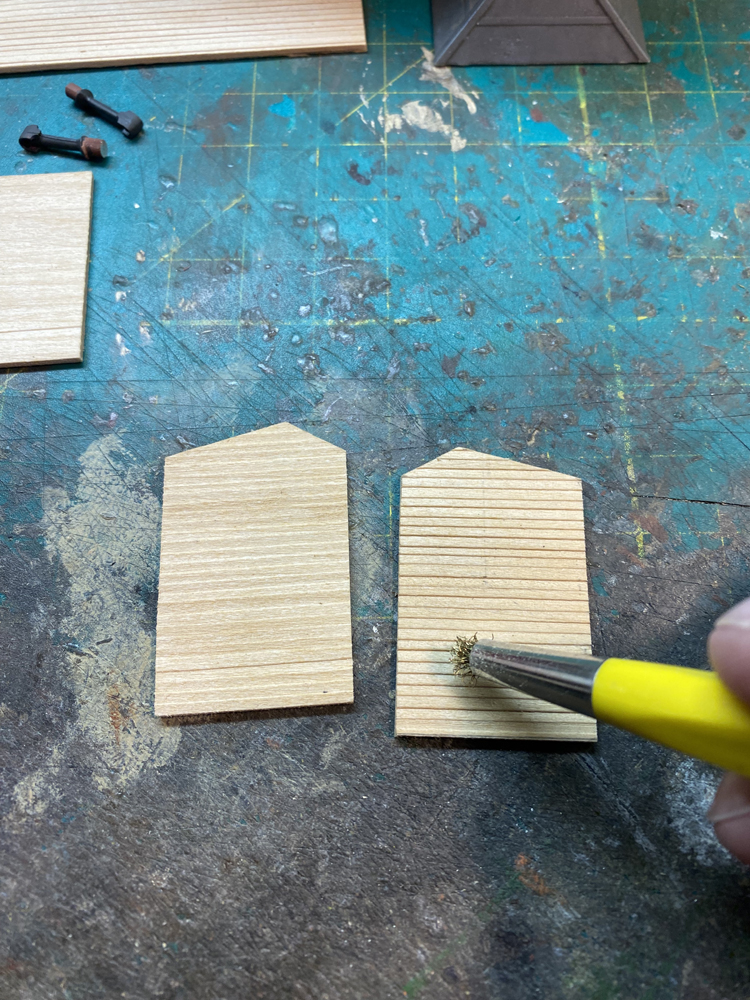
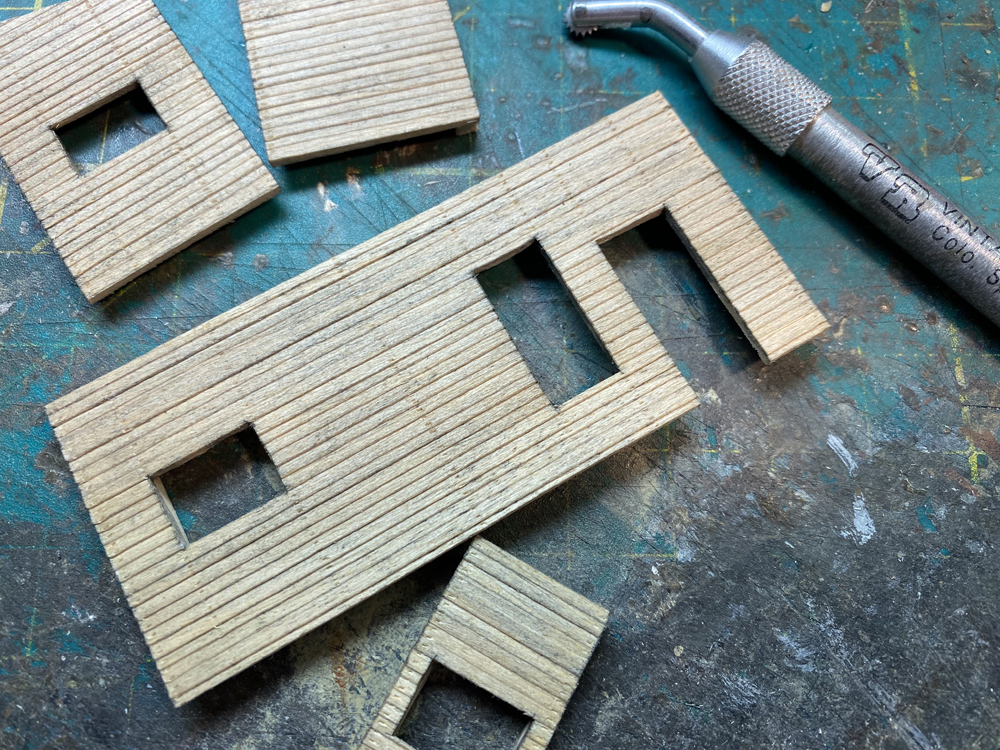
Before doing any other distressing work, I cut the window and door openings in the walls. Once this was done, I cut the openings for the window castings. The wall on the narrow end of the tower split as I cut the window opening. If this happens to you, don’t worry, as it is a common problem when cutting wood parts near an edge on a small piece. To fix it, I put a small dab of wood glue on the two halves where the piece broke, then I added a 3/64” square wood brace on both sides to hold it.
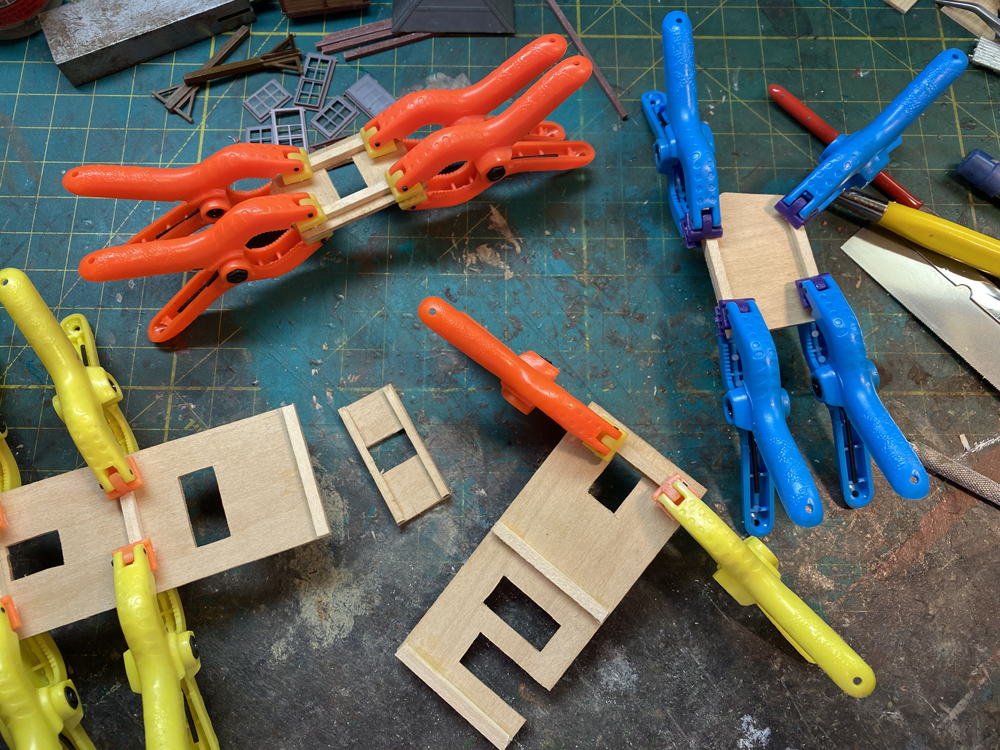
Bracing the walls is a technique that I use on all of my wood structure projects. For the yard office, I added 1/8” square stripwood to brace to each wall section. This step does a couple of things for the model. First, it adds strength to the walls and greatly reduces any warping that may occur in the painting process. Since I use water-based paints whenever I can, bracing is mandatory in my book. Second, the bracing provides better support around the window and door openings, making a more secure connection point when I glue in the castings later.
I glued the braces to the back of the wall sections using wood glue, and I clamped them in place until the glue dried using spring clamps. There are two things to keep in mind with the braces: The first is to be sure to apply the braces against the grain of the wood. If you apply them with the grain, they will not effectively prevent the walls from warping. The second is to be aware of where the wall corners meet. You only need one brace in each corner, so don’t apply them to both ends where two walls will join together – they won’t fit.
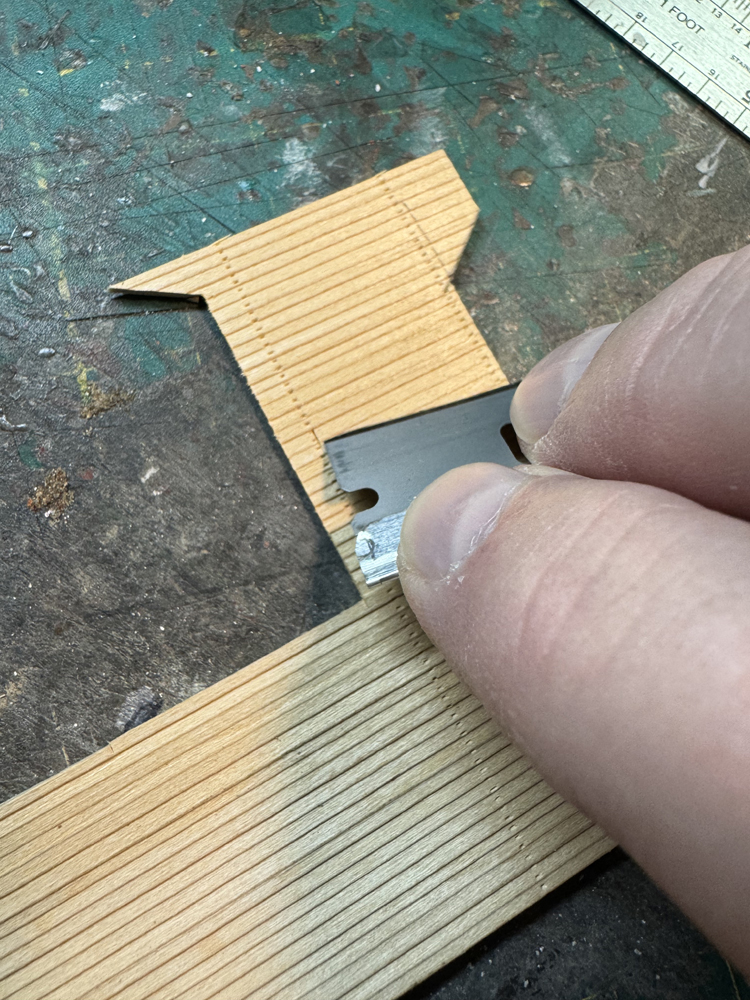
With the windows cut and the walls braced, I returned to my distressing techniques. I used a pounce wheel (shown in the photo) to make nail holes in the wall sections. Mine is a Vintage Reproductions brand pounce wheel, but you can buy this type of tool on Amazon.com or at most any craft store, and they are very easy to use. To make the holes, set a straight edge vertically along the wall where you want a row of nails, then carefully roll the wheel along it to form the holes in the soft wood surface. Nails would be used on the siding where the wall’s studs run behind the boards, so there is a pattern you should follow. Studs typically are spaced on 16” centers, but they also run alongside all door and window openings. A little goes a long way here, so no need to place lines of nails every 16”.
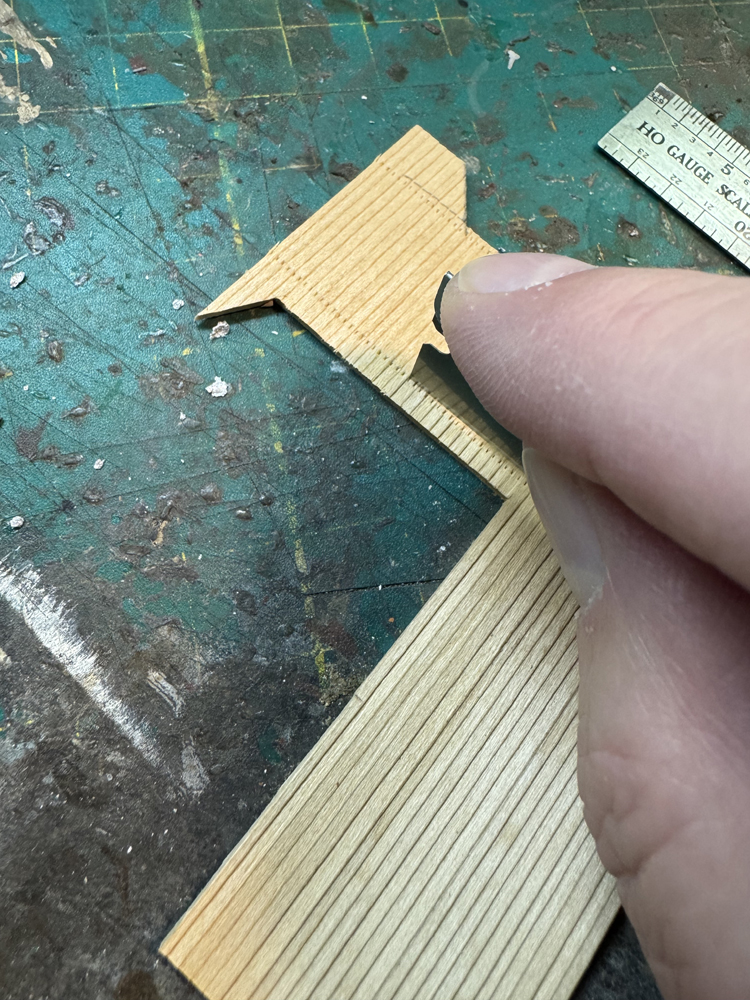
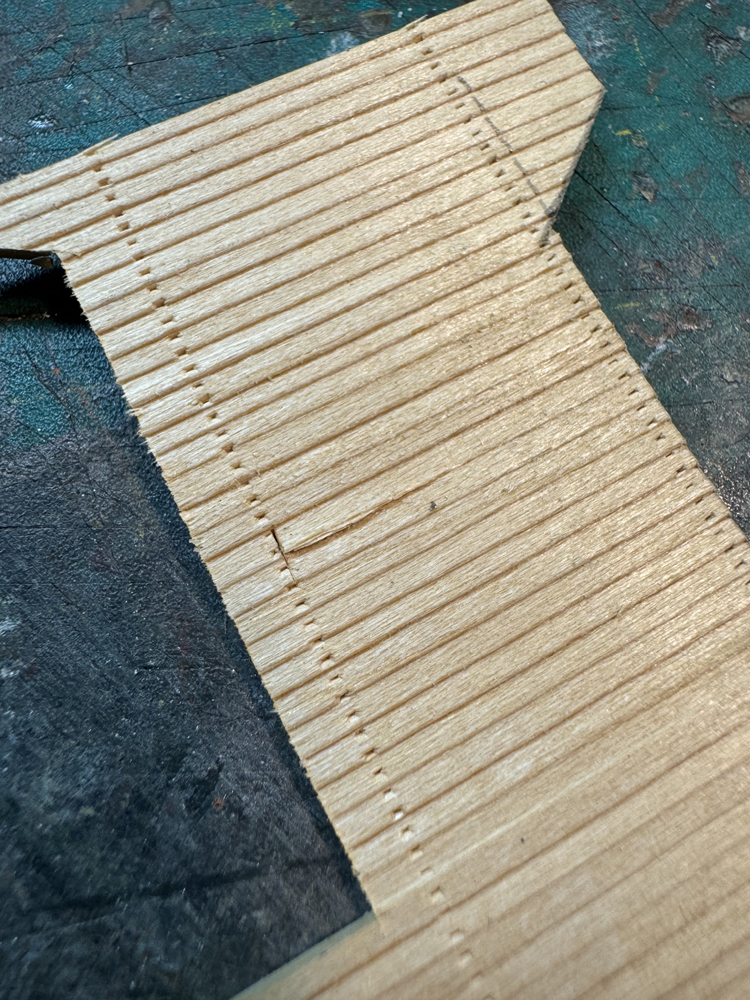
Another technique I like to use on older wood structures is to make it appear one or more siding boards are coming loose. This usually happens at the end of a board where it connects to a stud. Wait to do this until after you’ve added the nail holes, so you know where to place the ends of the boards.
It’s easiest to explain this technique through photos. Unfortunately, I’d added the loose boards to my yard office before I realized I hadn’t photographed the process. In the images below, I used a scrap piece of siding to do the demonstration.
Staining and painting
With all the distressing complete, I brushed a coat of stain on all the wood pieces. I made the stain using a mixture of 1 teaspoon of black drawing ink diluted in a pint of 70% rubbing alcohol. The ink gives definition to details, such as siding boards and nail holes. Even though I planned to paint the office, I started with the ink stain as I wanted to leave some of the bare wood exposed and enhance the rundown look of the structure.
Instead of painting the wood parts completely, as I did to the plastic Atlas elevated gate tower section, I used the drybrushing technique to paint the walls. I also painted all the walls before I added the doors and windows or assembled the model.
Drybrushing is a technique that allows you to put paint on a model a little at a time. Dip just the tip of a paint brush into the color, brush most of it off on a paper towel or piece of cardboard, then carefully apply it to the model. When applied over the stained wood, it leaves nice patches of unpainted wood showing through.
I also used this technique to weather the window and door castings, as well as the tower section. I used a light gray color drybrushed vertically from top to bottom over the surface to make the painted plastic parts also look aged.
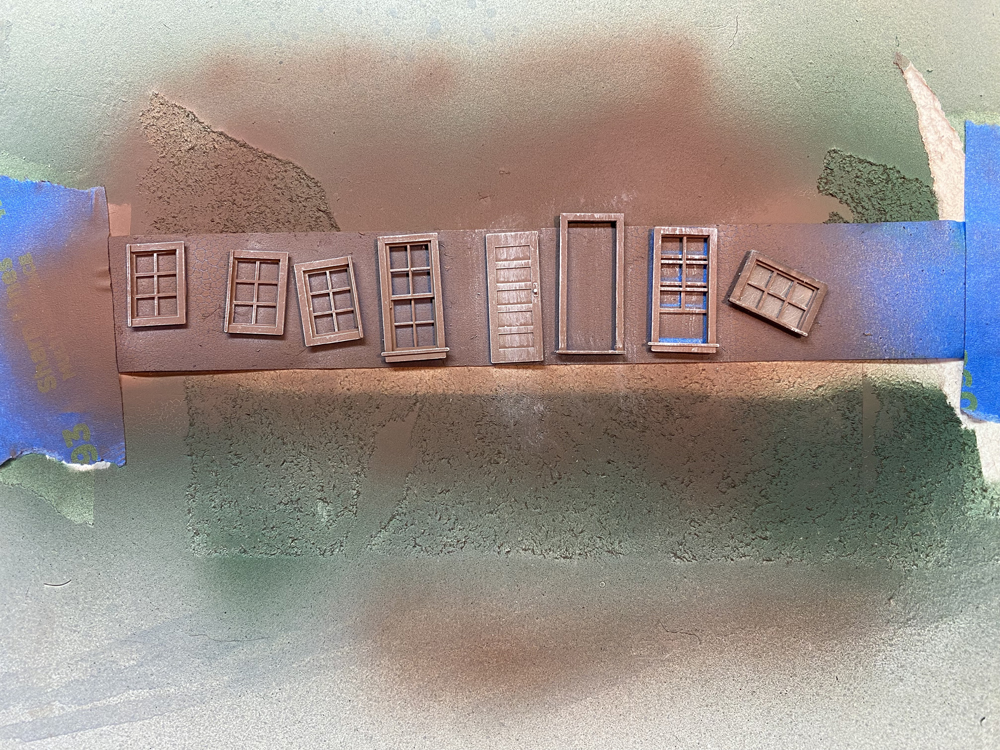
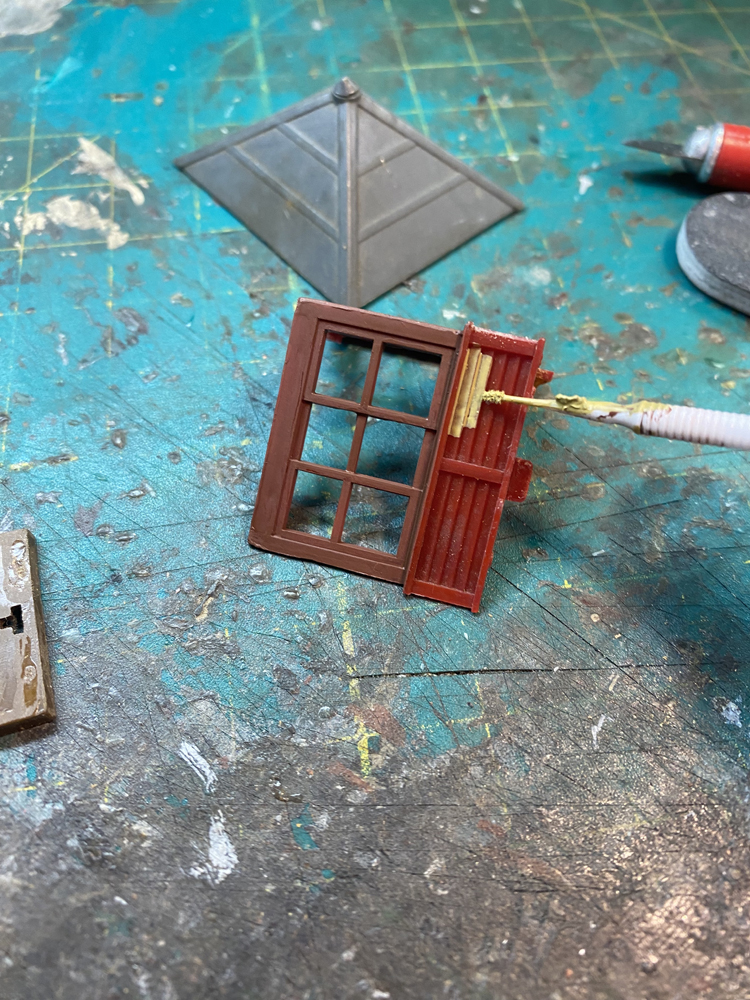
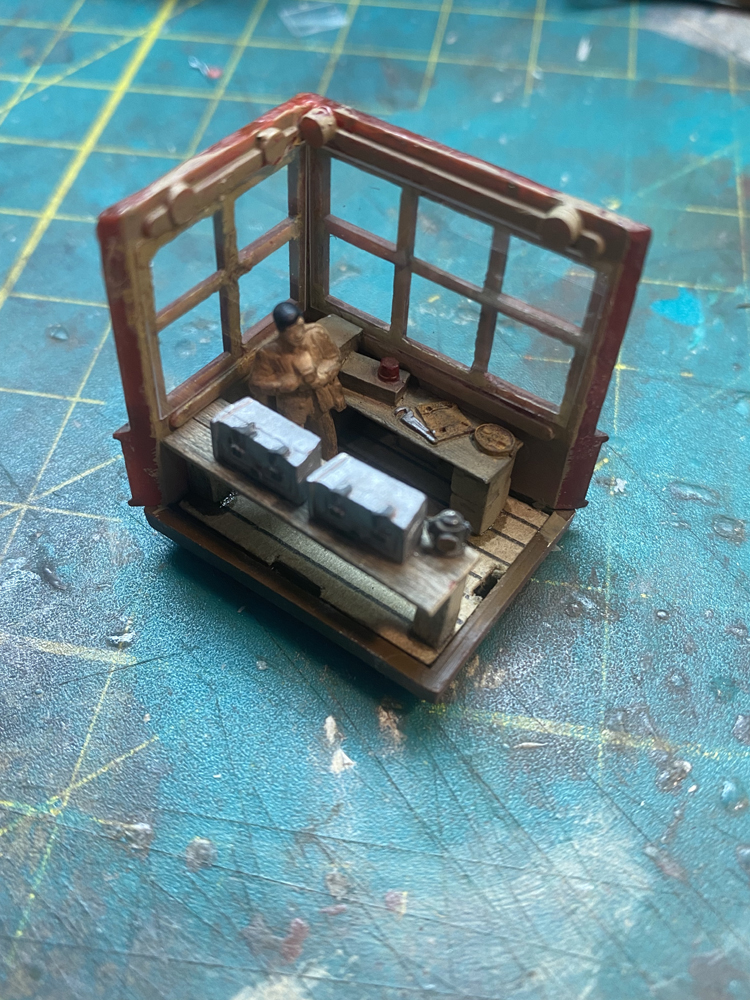
Next, I drybrushed the wall and trim colors onto each section and added the window castings. I used a two-tone scheme, painting the lower third of the wall Polly Scale Freight Car Red and the upper two thirds Depot Buff. Once the paint dried, I installed the windows.
I should add that I applied the acetate to the window castings before I glued them to the walls. It’s much easier to do this step before you assemble the wall sections. I then added another coat of stain to darken the paint on the siding and the windows.
Interiors and assembly
While you can easily omit the next step, my tower will sit near the edge of my layout. With those big windows, the interior will be seen easily, so I needed to put something in it. I partially assembled the tower section, including adding a new wood-plank floor, and then I spent some extra time installing a few details to the inside. I built most of the furniture myself from scraps, including a desk and equipment bench. I then added some simple detail castings from my collection of spare detail parts, as well as a figure.
While I was at it, I added an LED with a 4.7K ohm ¼ watt resistor. Once I’d completed the interior details, I glued the other two tower walls in place.
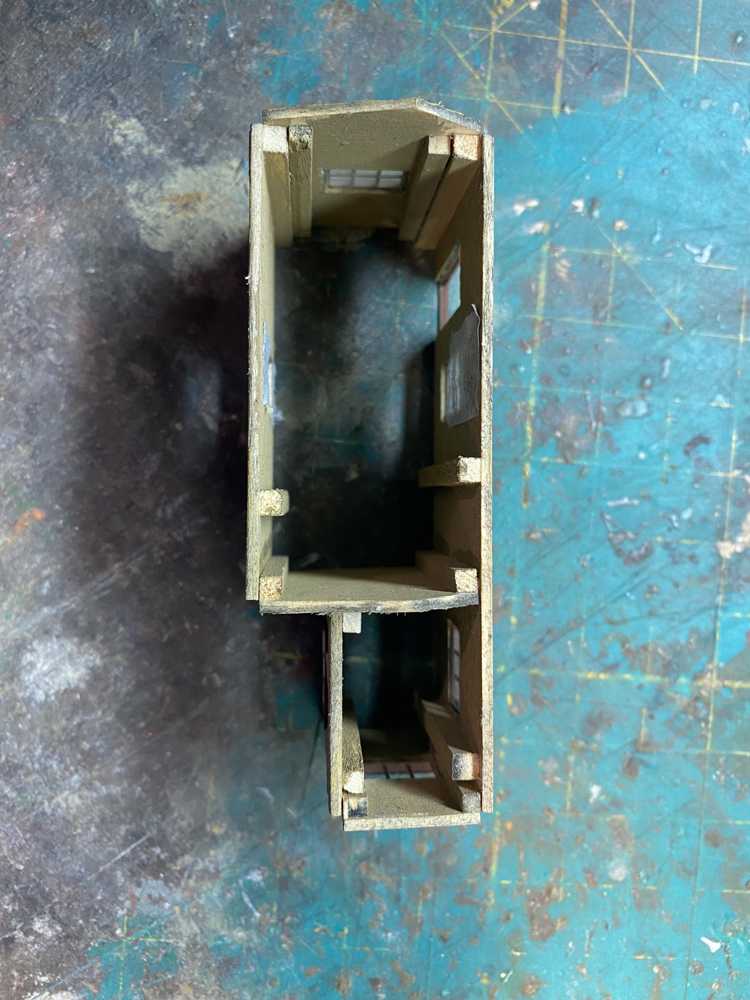
Next, I assembled the wood wall sections. I started with the front wall, adding the short end wall, and I continued building the structure from there. I used a small machinist square to make sure the walls stayed square. While gluing the walls together I left a notch where the walls meet at the corner so that I could add HO scale 6 x 6 stripwood for the corner trim later. It’s much easier to paint the trim pieces separately, then add it after the walls are assembled.
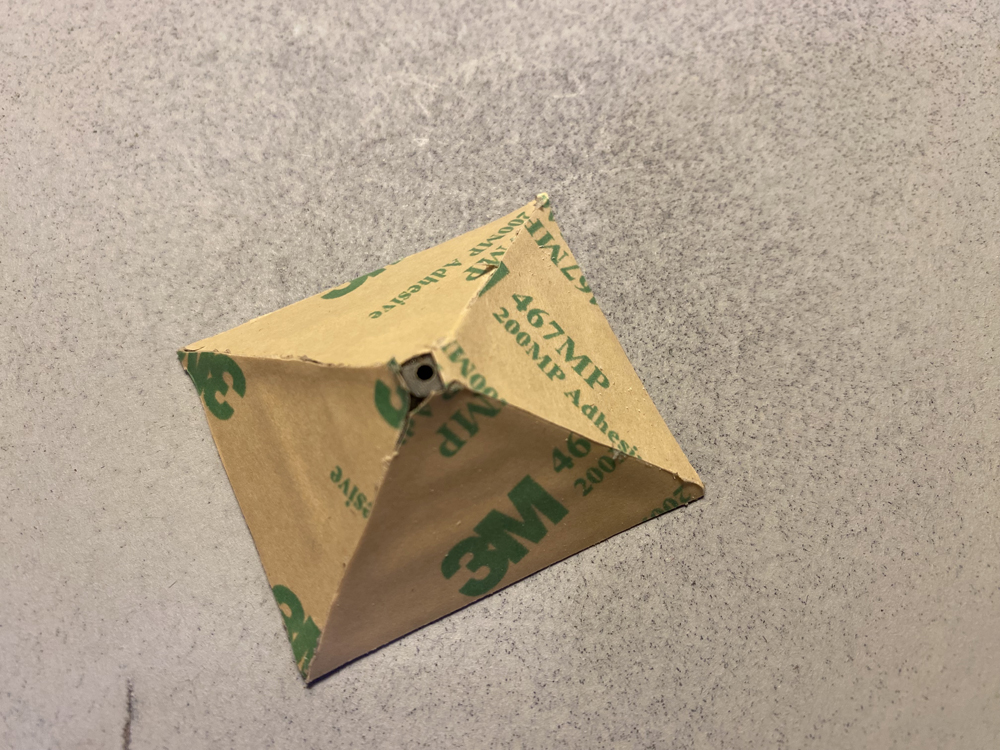
For the roof of the main building, I cut two pieces of cardstock, leaving a small overhang on the front, rear, and right side. I then covered the cardstock with transfer tape. This is a double-sided adhesive tape made by 3M, item no. 467MP. I like it better than ordinary double-sided tape as it has a paper coating to protect the adhesive sides until you are ready to use it, making it much easier to cut and apply to models.
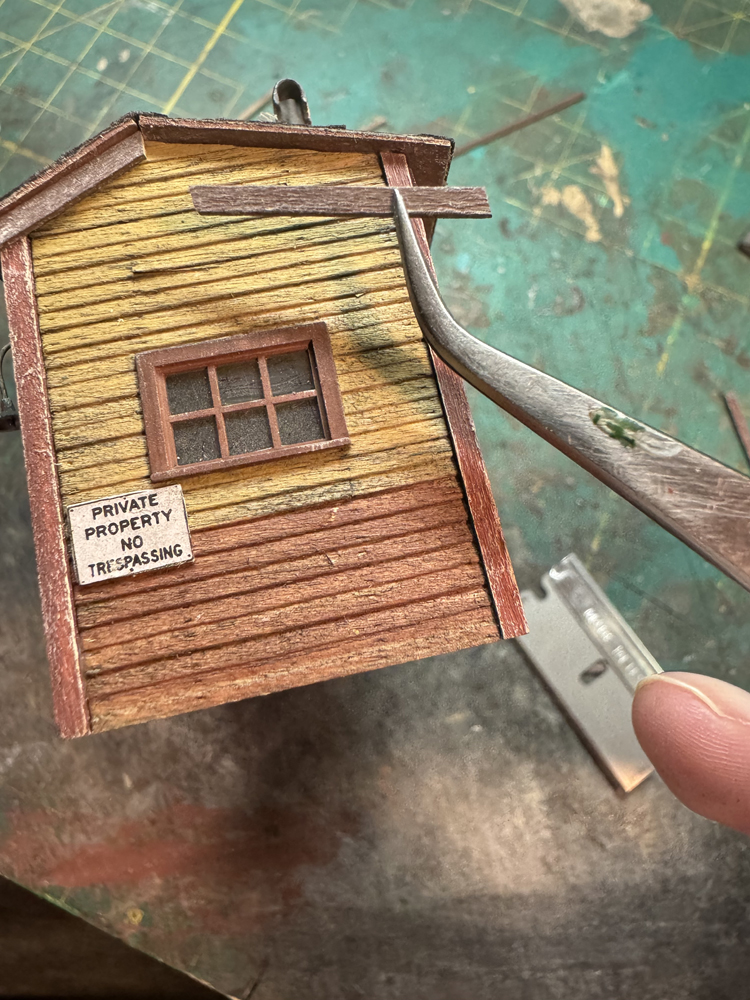
With the adhesive in place, I then applied strips of black construction paper that I’d sprayed a light coat of gray paint to represent rolled roofing. I like using black construction paper because I don’t have to paint the edges after its cut.
Before I glued the roof sections onto the structure, I braced them with more 1/8” square stripwood. I then glued the roof to the building.
I used the same paper roofing method on the plastic roof of the tower itself, although a modeler could also just paint the roof. This way, however, the roofing material matches on the entire structure.
Once the roofs were in place, I added some trim to the main part of the building. The corner trim is made from Northeast Scale Lumber HO scale 6 x 6s, and they fit nicely into the notches I left at the corners where the walls join. The eaves are cut from 1 x 6s. I painted and weathered the trim using the same techniques I’d used on the other parts of the building. I then cut all the boards to length and attached them with more wood glue.
Wrapping it all up
Some of the final details on the model included Grandt Line lamps, some signs, and a couple of smoke jacks. Once I installed it on the layout, I really went to town on detailing the surrounding area with railroad junk, a found workbench from my scrap box, and more figures.
It’s hard to believe that what was a few weeks before an old structure from my childhood is now part of a highly detailed finished scene on my layout. While you might not need a yard office for your model railroad, if you’re looking for a fun challenge, try digging out an old structure from your scrap box and seeing what you can make of it. You might be surprised by all the great models you can make using things you already have laying around your workshop.
Materials list:
Northeastern Scale Lumber
- HO scale clapboard siding (18CLP6)
- 1/8″ square stripwood (18STR18)
- HO scale 1 x 6 stripwood (HOSCAL1624)
- Corner posts are HO scale 6 x 6 (HOSCAL6624)
Grandt Line and/or Tichy (I mixed doors and windows from both suppliers)
- 30” 5-panel door Grandt Line (5021) or Tichy (8197)
- six-pane horizontal window Grandt Line (5242) or Tichy (8026)
- 27” x 64” double hung window Grandt Line part (5029) or Tichy (8028)
- Eight-pane double hung open window Tichy (8069)
- Lampshades Grandt Line (5062)


This is another great article. It stacks up nicely with the kitbash of the UP station article!
At what point do you decide that it’s time to get a new hobby pad?
What I great idea. I have an old Atlas Signal Tower somewhere. Wonder what I could do with it?