


Here’s how you can make a billboard, poster, or wall sign from an AI-generated image for your model railroad layout. Artificial intelligence generators have been in the news lately as writers, artists, and other creative types debate the possibility of computers taking over their jobs. Although AI-generated art is not good enough yet to replace human artists, it can produce art good enough for the miniature signs on our layouts.
These AI generators work by parsing a written description of the desired image into key words, then blending together elements from images corresponding to those key words to make completely new works. The more detailed and clearly phrased this written request, or “prompt,” is will determine how close the resulting image is to what you’re looking for. If the image the AI generator produces isn’t right for you, you can reword or add to your prompt, or just hit the “Create” or “Generate” button again to get another interpretation.
There are more free AI art generators popping up all the time on the web. But not all are created equal. How good an AI image generator is for a particular purpose depends on the images used to “train” the AI and the algorithms it uses to blend them. Creating and hosting an AI site isn’t free, so these sites offer paid subscriptions that unlock higher resolution results, faster generation, and more control over rendering settings. But most of them have a free mode that produces images good enough for a hobbyist’s uses. To use the sites for free usually involves creating a user account or logging in with your Facebook or Google account. First I’ll compare some AI image generators, then tell you how to create a sign from an AI-generated image.
Free AI image generators
Here are some of the AI image generators I tested and how they performed on a few test prompts.
Bing Image Creator
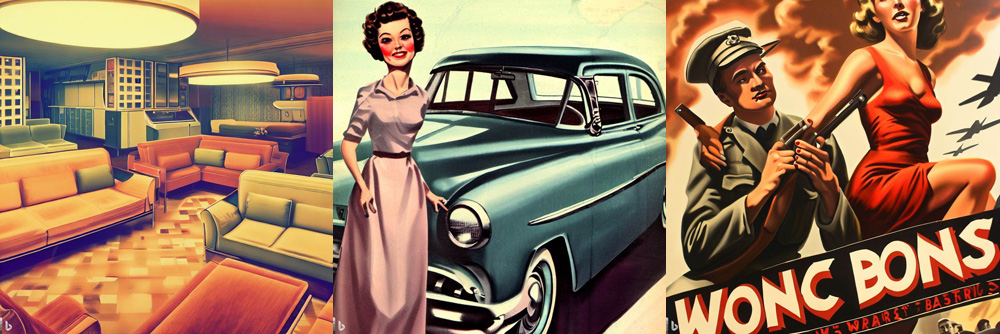
800-pound-gorilla Microsoft recently entered the AI image generator market with Bing Image Creator. This generator is designed to run on Microsoft’s own Edge web browser. Free users get 100 image credits a week.
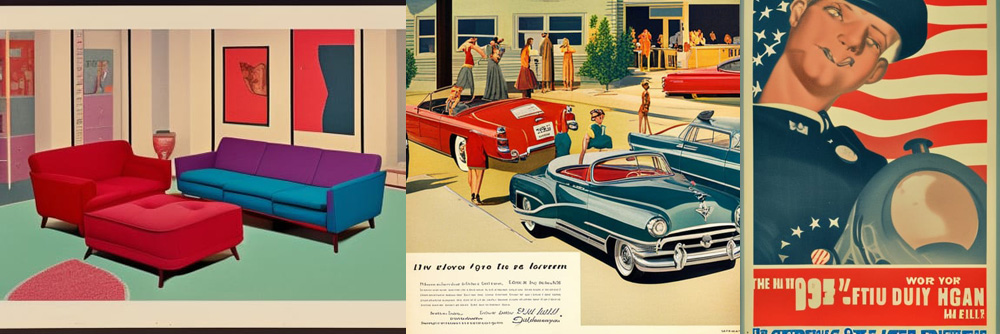
The three images above were generated with the prompts “1970s furniture store interior with couches and armchairs, advertising art style,” “1950s automobile advertisement,” and “1940s War Bonds poster.” Each prompt produces four small square images. Clicking on one enlarges it and allows you to download it to your computer.
Bing produces only square images, which are sometimes cropped oddly; the War Bonds poster cut off both the top of the woman’s head and the fake text on the bottom. The images come watermarked with the triangular Bing logo in the bottom left corner, but it’s fairly small.
While the faces in the images Bing produced were OK, the bodies and other details were somewhat distorted. Note the large head and twisted neck on the woman in the car ad and the impossible position of the woman’s arm in the War Bonds poster. (Not to mention, what is the soldier supposed to be holding?) The furniture store image looks good, but it didn’t match my vision for the billboard I wanted to make.
You may be wondering about the “Wonc Bons” text in the war bonds photo. AI image generators usually use random letters (which graphic designers call “Greeked text”) to stand in for the real thing. If you’re printing your sign very small, you can leave it as is. Otherwise, use an image-editing program to blank out and replace the nonsense text.
Craiyon
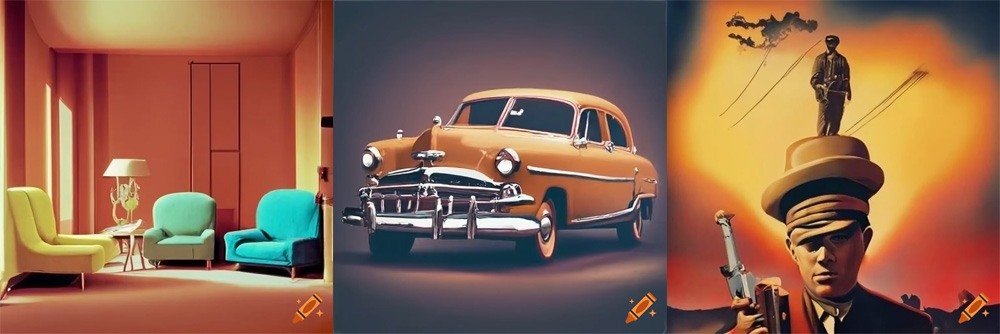
Craiyon takes about a minute to generate nine square thumbnails matching a prompt. Clicking on one shows a larger, though still low-resolution image, that you can save as-is or “upscale.” This also takes about a minute. I couldn’t find an option for a different shaped image.
All images have a crayon watermark in the bottom-right corner. Depending on what else is in the image and how you intend to crop it, this might be more difficult to eliminate than Bing’s smaller logo.
As for the images themselves, the ones produced by my three test prompts could be described as impressionistic at best, surrealist at worst. Though the furniture looked good at first glance, the chairs and couches weren’t symmetrical; some had mismatched or even missing legs. The car ads likewise suffered from asymmetry, particularly in the chrome parts. Some were missing wheels. And the war bond prompt produced images that looked more like the cover of a science-fiction paperback than a World War II patriotic poster.
Helpfully, Craiyon suggests alternate prompts similar to the ones you type in. For example, my furniture store prompt led the site to suggest “Retro furniture showroom with stylish couches and armchairs.” This led to more images, but they were rather similar to the first results. Another neat feature is that when you download your images, the filename contains the text of your prompt, helping you remember which prompt gave you the best results.
Catbird
Catbird produced the most realistic images of the AI image generators that I tried. If I’d found this site before I created my billboard, I might have used Catbird’s images instead. Its furniture, cars, and people were all realistic, and captured the spirit I was looking for in my three prompts. As with all AI image generators, Catbird had occasional issues with faces and hands. These were slight compared with other sites, though.
The site produces four large square preview images from every prompt. Clicking one brings up a closer view with a button to “Upscale and Enhance.” That process can take a minute or two, especially when the site is busy. Clicking away from the site while it’s rendering seems to delay the process. Catbird’s images are not watermarked.
When I created my account (signing in with Google), I got 250 credits. Each render costs 1 credit (so, 4 per prompt), and upscaling an image cost 13 (this probably depends on the image size).
Clicking the “Advanced” tab lets you select vertical and horizontal sizes for your image, in case you have a certain shape in mind (like my furniture billboard). The thumbnails are still square, but you can see the entire image by clicking one.
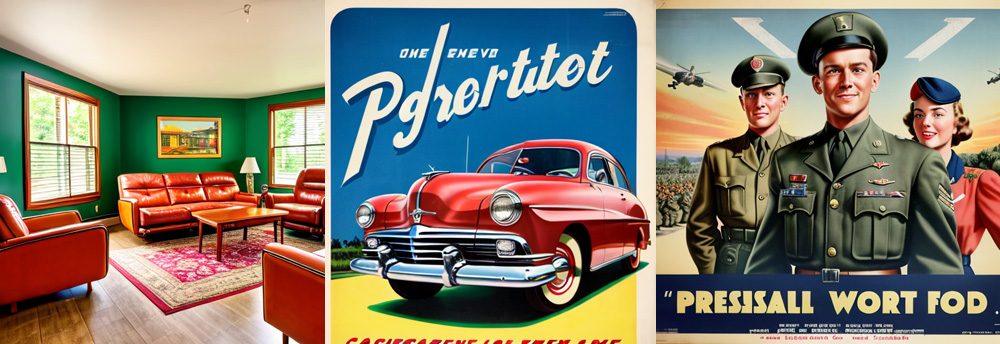
Nightcafe
Nightcafe seems to draw from the widest array of “training” images, returning images in a wide variety of appropriate art styles, like those in the samples above. But sometimes the results were bizarre. For example, look at the woman in the car ad who disappears into the fender of the red car and the strangely twisted face of the sailor in the war bonds poster. With the properly phrased prompt and multiple regenerations, it can produce usable images, though; the image I used to create my furniture store billboard was made by Nightcafe.
One reason I went with Nightcafe was the ease of use. Clear controls on the side of the screen lets you select the number of images to generate (one, four, or nine), the resolution, and the proportion (1:1, 3:4, 4:3, 9:16, and 16:9). You can also select the rendering model. While you can do this on some other sites (some of which offer a broader selection), Nightcafe helpfully shows examples of each model and gives a brief explanation of their strengths. You can also select a variety of art styles from a menu with sample thumbnails.
You can generate any number of single thumbnail-sized images for free using the StableDiffusion model, but activating those other useful settings will quickly deplete your small pool of credits. You can earn more by logging in daily, signing up for notifications and newsletters, completing challenges, and more. There are also several levels of subscriptions that increase the number of credits granted daily. Nightcafe’s images are not watermarked.
Creating a sign from an AI-generated image
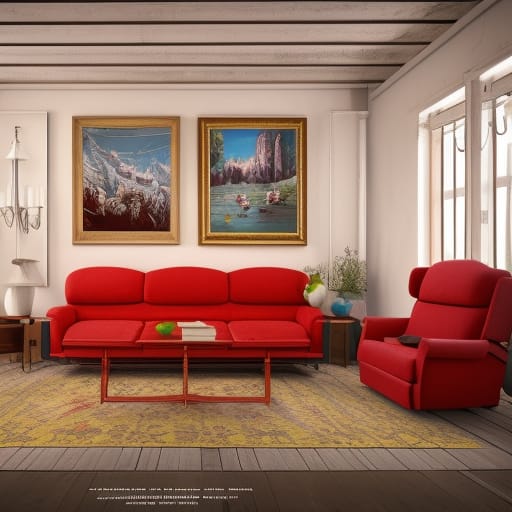
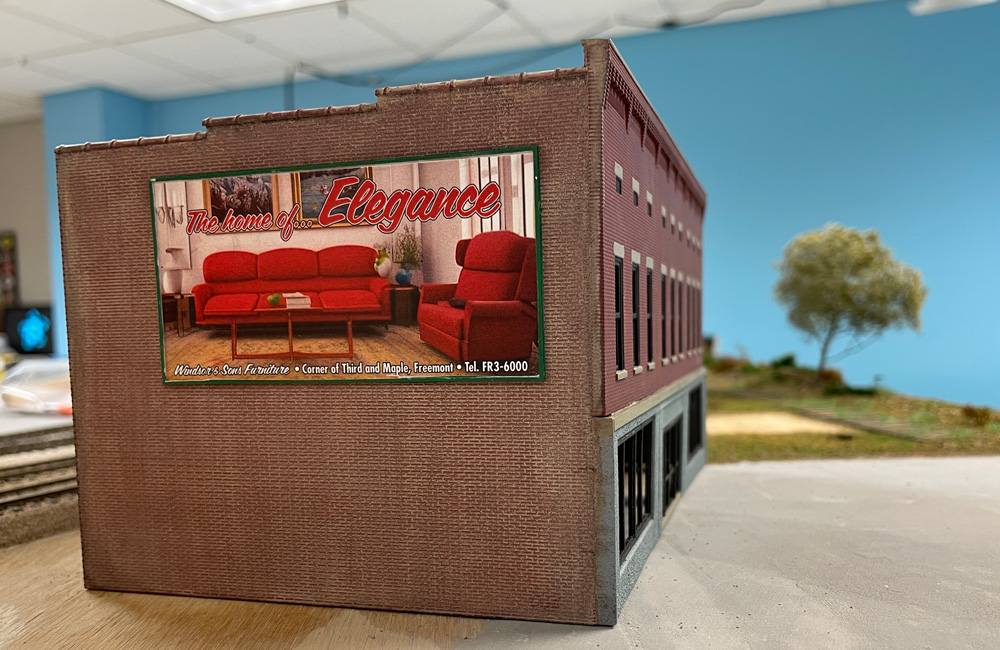
One of my iterations of Nightcafe produced a furniture image I thought would work for my billboard. It had issues – the couch is tilted forward and hovering, there’s a vase on the arm of the couch, the coffee table has no top – but I thought it looked good enough.
I hadn’t found the settings for the image aspect ratio yet, so the image was square. Luckily the furniture itself occupied a narrow horizontal band, so I could crop it to billboard proportions and still have room for text above and below. I opened the image in Adobe Photoshop Elements and cropped it to half its height, with the furniture slightly below the center of the image.
Next, I added text. Though some AI image generators will put text on an image, it’s usually a nonsense jumble of letters or letter-like shapes. If your sign is going to be big enough to be legible, you should add the text yourself. I used Photoshop Elements’ text tool to create an eye-catching headline and a smaller line for the bottom with the store’s made-up name, address, and phone.
To make the multicolored outline effect of the text, I right-clicked on the layer containing the text in Photoshop Elements’ Layers panel and selected “Simplify layer.” This turns editable text into image pixels, but keeps them on the same separate layer. After positioning the text where I wanted it, I hit ctrl-A to Select All, then nudged the outline with the arrow keys so the selection would shrink to just the pixels of the text. I then used the Select menu to Save Selection. This would allow me to modify the area selected, then load the original text shapes again.
Loading the saved text selection, I used Select… Expand to grow the text shape by 4 pixels and filled it with black. I then reloaded the saved selection, expanded it by only 2 pixels this time, and filled that with white, giving me a white shape with a 2-pixel black outline. Finally I loaded the text shape a third time, and without expanding it, filled it with red to create the headline. I used a similar, two-step process to create the black-outlined white text on the lower part of the sign.
I sized the finished image to about 3 inches wide and printed it on our color laser printer. I cut it out, then cut a sheet of .020” plain styrene to the same size as the paper sign. I used .040” styrene strip to build a frame around the styrene sheet and painted it dark green. Finally I glued the sign into the frame with white glue and used liquid styrene adhesive to glue it to the side of my building.
Creating a sign from an AI-generated image like this can give a building identity, reinforce your layout’s sense of time and place, and add visual interest to a bland, blank wall. With the rise of artificial intelligence, unique custom signs are now within the reach of more modelers.


Great article! I’ve been exploring different live cam platforms lately and Livexcams.tv is a solid place to discover live webcam shows organized by categories.