


Modifying
I began by adding a few styrene pieces to modify the boxcar’s side sills. I cut these pieces from scraps of .015″ styrene and glued them in place. The photo shows the placement of one of the four filler pieces.
Next I pried off the 8-foot door on the left side using a no. 17 blade in a hobby knife and replaced it with a 7-foot door. I was fortunate enough to find a set of 7-foot doors in my scrap box, but they can also be ordered directly from InterMountain. To remove the factory lettering, I used Polly Scale Easy Lift Off paint and decal remover, applying the liquid with a cotton swab and following with a toothbrush and warm, soapy water.
I also removed the existing stirrup steps. These plastic steps look great but don’t hold up well for operation. I used small needlenose pliers to bend new steps from Detail Associates’ .010″ x .018″ flat brass wire. (A-Line steps would also work.) I drilled eight no. 76 holes and installed the new steps. Finally, I added uncoupling levers, air hoses, and tack boards.
Parts list
Cal-Scale
276 air hoses (20 hoses and brackets) black plastic
Details Associates
2522 .010″ x .018″ flat brass wire for stirrup steps
6411 and 229-6414 Option for stirrup steps
InterMountain Railway Co.
40400-64 7-foot boxcar doors
40698 50-foot AAR sliding double-door boxcar
Microscale decals
MC-4112 DSS&A HO scale 50-foot double-door boxcar
87-1116 SOO HO scale boxcars colormark variations (1974 – 1986)
70211 N scale graffiti alphabet and numbers (white)
Polly Scale
110013 Grimy Black
110030 Reefer Orange
Testor Corp.
1146 Silver
1160 Dullcote
Weaver Models
20816 PRR Freight Car Red
Painting
I airbrushed the car using Scalecoat II PRR Freight Car Red, but any color closely resembling the faded oxide red of the prototype would have worked. After letting the paint dry overnight, I masked around the roof and airbrushed it using Testor’s Silver. I let this dry for at least one hour.
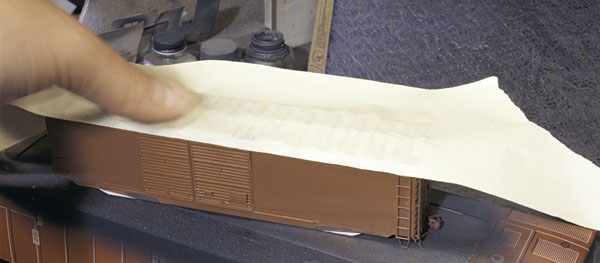
The prototype roof would no doubt have shown signs of heavy weathering by 1970. To mimic that, I airbrushed the roof with a coat of Floquil Grimy Black and let it dry for no more than 5 minutes. I then applied masking tape to the roof, pressing firmly on the ribs and crevices, as shown in the photo. Next I ripped the tape off to reveal realistic patches of exposed silver and repeated the process until I was satisfied with the roof’s appearance.
I then decaled the car using the Microscale DSS&A HO scale 50-foot double-door boxcar set, although I didn’t apply the car reporting marks, car number, and capacity data since those would come later in the process. Instead, I airbrushed Floquil Grimy Black on the car’s ends while holding a card up to the rivet strips to mask the sides.
Weathering
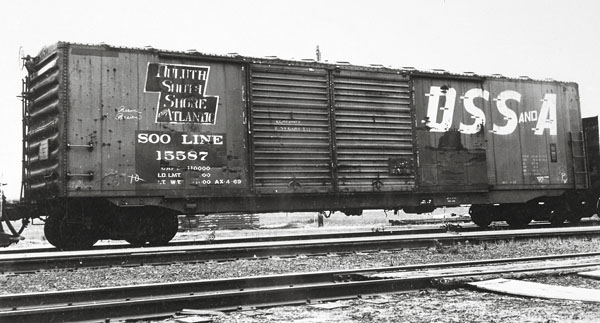
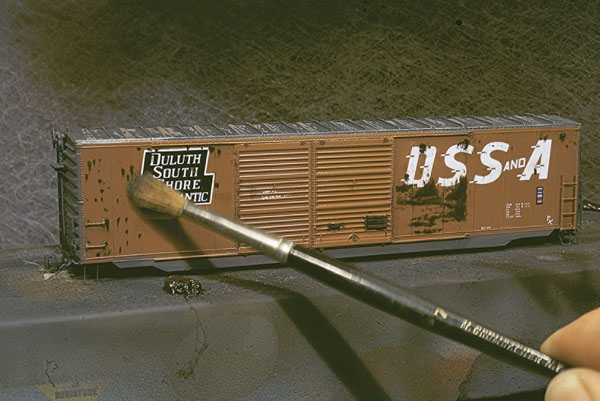
Using the prototype photo as a guide, I started weathering the sides of the car by dabbing very small dots of Burnt Umber artist’s oil paint. I used a medium-size soft bristle brush to pull down these patches of paint, adding more to areas that appeared to be heavily weathered in the photo, such as the boxcar’s sliding door. I used a cotton swab moistened with small amounts of turpentine to remove the paint from areas too saturated with the Burnt Umber paint.
Next, I masked around the area that would receive the Soo Line reporting marks and capacity data. I airbrushed this area with Scalecoat II Boxcar Red and applied the reporting marks and capacity data from the Microscale Soo Line boxcar decal set. I applied Floquil Grimy Black to the sill with a small brush. To simulate the chalk markings, such as the small “10” on the left side, I used the Microscale N scale graffiti set. I finished by airbrushing the car sides with a layer of Testor’s Dullcote. This flattened and sealed the finish up to that point.
I then combined 50/50 Grimy Black and thinner and used the mixture to airbrush the dark, weathered areas of the car, closely following the prototype photo. The photo on the right shows how I use a card to control the amount of weathering in certain areas, such as along a weld seam.
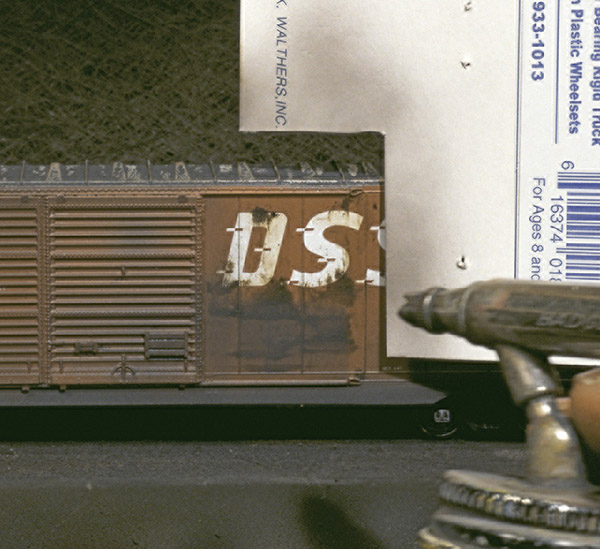
In this case, the photo shows a dark rust patch caused by years of the door scratching the side. This rust patch ends with a defined straight edge, which I matched by airbrushing along the edge of a thin card.
Adding final details
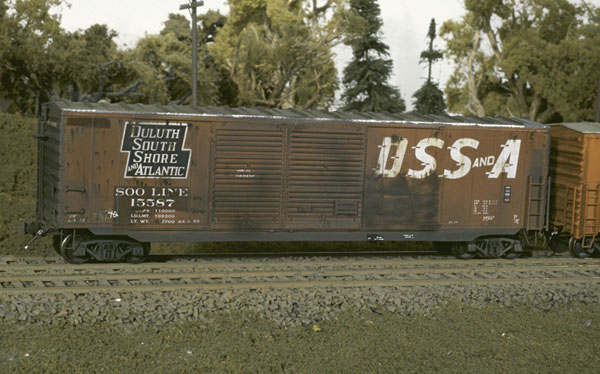
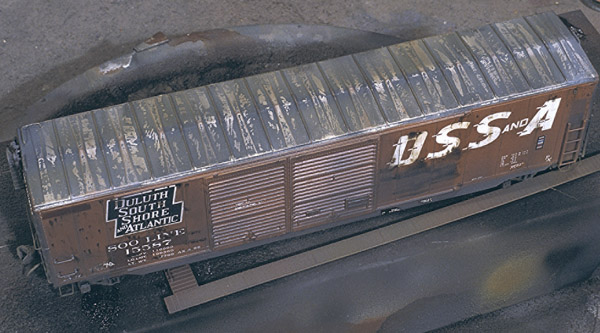
I placed a 50-foot running board on the car and airbrushed one last coat of the Grimy Black-thinner mix to tone down the roof’s bright silver patches. Before removing the running board, I also airbrushed a small amount of Floquil Reefer Orange to represent rust. The mark on my finished roof in the above photo replicates a car that’s had its running board removed.
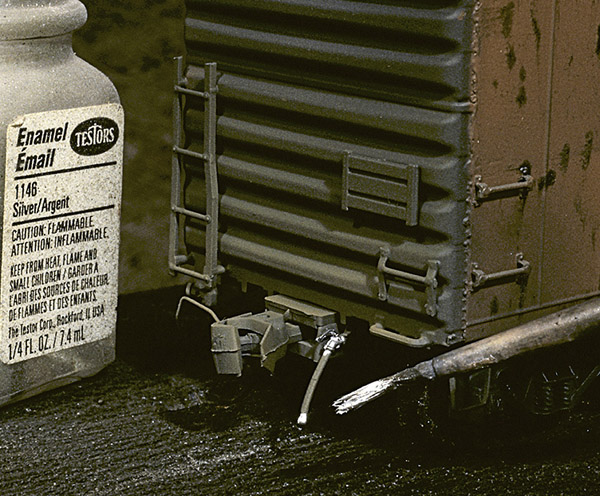
I applied Testor’s Silver to the air hose glad hand and angle cock to make them stand out. I finished by airbrushing Grimy Black and Reefer Orange on the ends and trucks, rolling the car to cover the wheels’ sides.
With a few modifications and painting tricks, I transformed a scale boxcar into a timeworn beauty. With prototype photos in hand, modelers can use and adjust these techniques to make any model come to life.


Very impressive modeling-thanks for the great tips and visual steps!
I see where a couple of responders seem to think they might mess something up when they weather a car. The idea is to mess up the factory finish. The beauty of it all is the if things don't work out; we can clean everything off the car and begin again. Use an old car as a sacificial candidate and get with it. It is surprising how quickly one can learn to do those things we read about and admire; yet are afraid to try.
great job!
A well presented article with very useful details which compliment the "know how"of my own methods. Thanks for the job well done.
It's never too late to learn new techniques. Using tape to remove unwanted paint. I tried it and I am extreamly satisfied with the results. Also using an airbrush is easy. The more I use it, the more I like it. I used to use powders only, being afraid to use too much paint. The airbrush allows you to use so little it can be built up gradually. Thanks for the tips!
It's a great article and turned out a beautifully weathered car, but I don't have or know how to use an airbrush. Is there a site on here for weathering a car without one? I've tried with brushes with limited success, and I'm always up for seeing what ideas others have.
Great article been trying different mediums thanks for the info
Wow, this looks like the real thing! Excellent…
Great job! Nice touch of realism.
a cheaper alternitive to expensive weathering chalk is some burned paper from a wood fire i use it on my layout and all you have to do is crush it with your fingers so you get the dust on them then push the finger that has the ash on it on the car or house that needs weathering and wa-la the jobs done.
This is an excellent article. I am sure many will use some of your skilled techniques to weather their own. Thanks for sharing an outstanding job.
The car looks great! Bob is one of the best in my opinion at weathering!
Some of the best techniques in one spot ever.
Excellent article. Some very useful tips for all to try.
Keep up the good work.
A job well done it looks great
The finished model looks realistic, not overdone as some (mine included) I've seen. In addition, I'd be curious how Bob treats the undeside of the car he weathered.