The smooth-flowing lines of a gently curved switch lead produce some of the most realistic looking trackwork we’re likely to find in the hobby. For many years, handlaying the track was the only option for modelers who wanted to capture this appearance. But in recent years, track manufacturers have responded to the demand for ready-to-use curved turnouts.
Curved turnouts are special switches used to join two tracks that curve in the same direction. Prototype railroads have these switches built to fit specific locations where a regular turnout won’t work. Most of these turnouts are prefabricated for final assembly at the site.
Modelers have a more limited selection of curved turnouts, but once you catch on to how they work, you’ll find many uses for them. On my own HO scale Ohio Southern, I’ve used them to help compress leads into my staging yards, lengthen passing tracks, provide crossovers on curves, smooth the entry into the last tracks in yard ladders, and fit industrial spurs into tight locations.
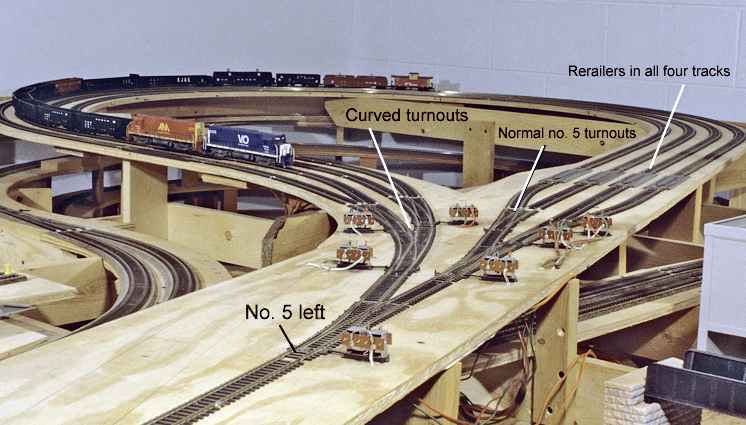
The reverse loop staging yard that represents my upper deck Virginian & Ohio connection, shown above, is the first location where I used a group of Peco curved turnouts. The entry side of the yard is straight, so I used three regular medium radius (equivalent to no. 5) turnouts to serve the four tracks.
As the staging tracks loop around, they return to the lead track at almost a 45-degree angle that’s far too sharp for normal turnouts. I wound up using a regular medium left at the junction with the straight entry lead, and then added three SL-87 Code 100 Universal double-radius left-hand turnouts to blend the staging tracks into the exit turnout.
Other potential applications for curved turnouts are shown in the diagram (upper right). The ones with larger radii come in handy to lengthen passing tracks by placing them in an end curve well before the track straightens out.
Used in pairs, curved turnouts can be combined to make crossovers in double-tracked curves. I’ve had excellent results with a long curved crossover leading into my main yard from the south. It provides access to the main yard for setouts and pickups by through trains. I used Walthers no. 8 curved turnouts in this location, and they’re now going on more than 25 years of service.
The end of a yard ladder is another place where a medium-size curved turnout can smooth the entry into the last pair of tracks. When I used all straight turnouts in my ladders, I always wound up with a fairly sharp curve where the last track was bent to run parallel with the rest of the yard. Now I use a Peco double-curved turnout in this location so the curves into the last two tracks are wider and operate better.
Finally, I’ve also used an occasional curved turnout to cut an industry track into the inside of a mainline curve. I’ve always liked the looks of a track curving along the outside of an older building.
Careful alignment pays off. As I began installing my first curved crossover, I realized that good alignment was going to be critical anywhere large locomotives and heavy traffic abound.
As I install any curved turnouts, I do a lot of leaning down and sighting along the rails to make sure the curve continues smoothly and there aren’t any kinks at the rail joints. To install a crossover, I cut in the outside turnout first and slide the rail joiners in place to hold it. I position the inside turnout and make sure it’s aligned through the crossover before I cut it into the inside curve. Then I make any minor adjustments needed to align the inside curves.
I’ve learned that the bigger locomotives (steam or diesel) tend to naturally find any imperfections in the outer curved rails, especially at rough rail joints. I also carefully sharpen the curved switch points with a file to get a smooth transition before installation. I test my switch points by sliding a thumbnail along the inside of the railheads to find any rough spots.
Ribbonrail track alignment gauges also come in handy to ensure that all of the rails curve uniformly through the turnouts and the approach tracks. Then I solder the rail joints within the installation to secure everything before final spiking.
HO and N scale curved turnouts
- Atlas – N scale
Code 55 curved left and right turnouts. www.atlasrr.com
- BK Enterprises
Kits for curved turnouts with shaped points, and rails (without ties) in N, HO, S, O, and G scales. www.troutcreekeng.com
- Peco – HO scale
Code 100 Setrack line double-radius left and right turnouts. Code 100 Universal line double-radius left and right turnouts. Code 83 (U.S.) Streamline no. 7 double-radius left and right turnouts (Electrofrog or Insulfrog). Code 75 Streamline double-radius left and right turnouts. www.peco-uk.com
- Peco – N scale
Code 55 medium-radius double- curved left and right turnouts. Code 80 double-curved left and right turnouts (Electrofrog or Insulfrog). www.peco-uk.com
- Walthers – HO scale
Code 83 double-curved turnouts, no. 6½, no. 7, no. 7½, and no. 8, left and right. www.walthers.com
How do you find the dimensions to draw a cruved turnout into your plan?
Curved turnouts are great but they sure are expensive. Glad I bought a few years ago in prep for my layout.