


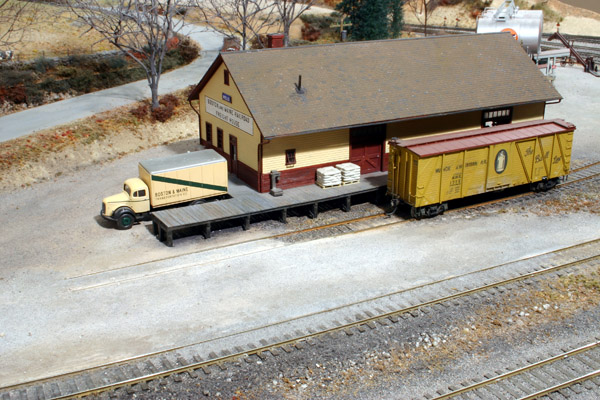
Gravel-covered siding. Gravel from an adjacent lot can mix with ballast on a siding. Paul partially covered this siding (lower right) at the freight house on his home layout. He embedded the rails of the spur (at left) into the parking lot.
On some secondary lines the space between the ties is filled with dirt to form a simple grade crossing or gravel lot. I added a gravel lot to the spur on my diorama. The following technique is less messy than using plaster alone.
First I cut pieces of cardboard to fit the space between the rails and the approaches to track. You could also use foam board or styrene. I built up the area where the lot crosses the tracks to a height slightly below the railhead to ensure that locomotive wheels wouldn’t lose electrical contact. I also allowed about 1/16″ on each side of the cardboard for flangeways. Then I attached the cardboard to the track and scenery with white glue.
On his diorama, Paul built up a gravel lot using layers of cardboard. He used real powdered dirt as ground cover for the road surface.
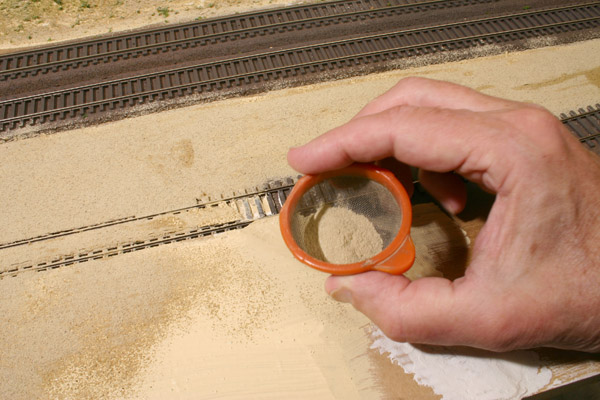
I blended the edges of the cardboard to the scenery base using plaster. Once the plaster dried, I painted it and the cardboard with tan latex paint. Then I sprinkled the wet surface with fine dust that I collect from a dirt road near my home. I used ground foam to model a few random weeds.
After all of the scenery had dried, I cleared the flangeways with a utility knife. Then I lightly sanded the gravel lot to simulate tire tracks from vehicles crossing the tracks.


Am in the process of extending layout to add a shunting/freight yard and this technique will be handy
Great idea, nothing beats low budget creativity!
Very nice idea, will have to try it when i get to that point of my layout.
Great Idea, I will be using it plenty on my layout
excellent. need to cover up that plywood. thanks
I also use real dirt for some scenery. I usually find a construction sight with a lot of truck traffic,looking for the fine clay powder. It makes great dirt roads.
Good tip. I am just starting an N guage layout, so need all the help I can get.
Rather than fine dust, I use red clay. Collect dry clay, crush, and
sift through a very fine tea strainer. Sprinkle onto a thined white
glue surface and let dry. Vacuum up excess. The clay will look dry. Flood area with thined white glue and when dry the clay will look wet. This also looks good along foot paths, around
fields, as well as unpaved roads.
I enjoyed your tip!
Great idea…I have a dirt road grade crossing that's on a curve. For dirt I use the ash residue from my charcoal grill briquets. It's like a powder and is the right color.
I think it's quite interesting!
have lots of places to use this on my layout.
very,very nice i will use over and over again,
Great idea, this has given me something to work with on my layout.
chocolate milk mix will probably bring a lot of ants onto the layout.
i thought about using chocolate milk mix instead of dirt?
Watch useing food products instead as one fellow thought … it will attract insects … including ants ! There's nothing more real looking than the real thing …. that includes real stones also .
Nothing looks better than real dirt for dirt roads, parking lots, and grade crossings. The finer and drier the dirt, the better. I use dirt from a baseball diamond (We call it baseball mix in upstate NY) it is fine and once you screen it it is perfect. I apply it dry and then wet it throughly with "wet water and white glue". The crossing itself looks great if you use thin strips of basswood laid parallel to the tracks as in a prototype rail crossing. The wood can be trimmed from the flangeways and stained to look old. The final effect looks great.
I believe the B&M Freighthouse is from Hodgdon Scale Models and is based upon the freight house at North Conway, NH. The actual structure is located adjacent to the well-known North Conway depot.
You've set up the next project on my new n scale layout. Thanks much.
nice was needing this tip today great!!!
Useful for my Back country lay out:)
That is a vary good way to make a layout rellistic.
Very good.
I used a mixture of play sand and and light brick paver sand. Used the same modeling techniques as John R Green to achieve my southwest 50's layout for dirt roads and parking areas. Thanks to the guy that invented the Dustbuster . Appreciate the tip. Thanks
very helpful, thank you