Model train décor using shelf layouts: While having a favorite model or two on display in the family living space is a great way to enjoy your trains, it’s usually only satisfying when you have a dedicated area elsewhere in your home, apartment, or condo to be able to run them. But if that’s not possible, what can you do about it?
Much has been written on the concept of building layouts into furniture in order to integrate a model railroad into the rest of daily life. So much so, in fact, that I’ve split the concept into two broad categories: Shelf layouts, which we will explore here, and coffee table railroads, which we will cover in the next installment or our Model Train Décor series.
The concept of building a model railroad on a shelf is fairly straight forward – straight being the operative term. Most shelves are linear by design, and while not necessarily able to offer the option of a continuous running loop, a shelf layout is a lot more like a real railroad. Most railroads run from point A to point B in as reasonably straight a fashion as they can manage, and shelf railroading pretty well enforces that practice.
I’ve seen shelf layouts of all manner and design and have even built a few myself. If switching cars at slow speeds is your thing, a small-sized shelf layout may be ideal because it is best suited for that type of operation. However, it doesn’t have to be a small layout if you’ve got a bit more space.
Shelves to the extreme
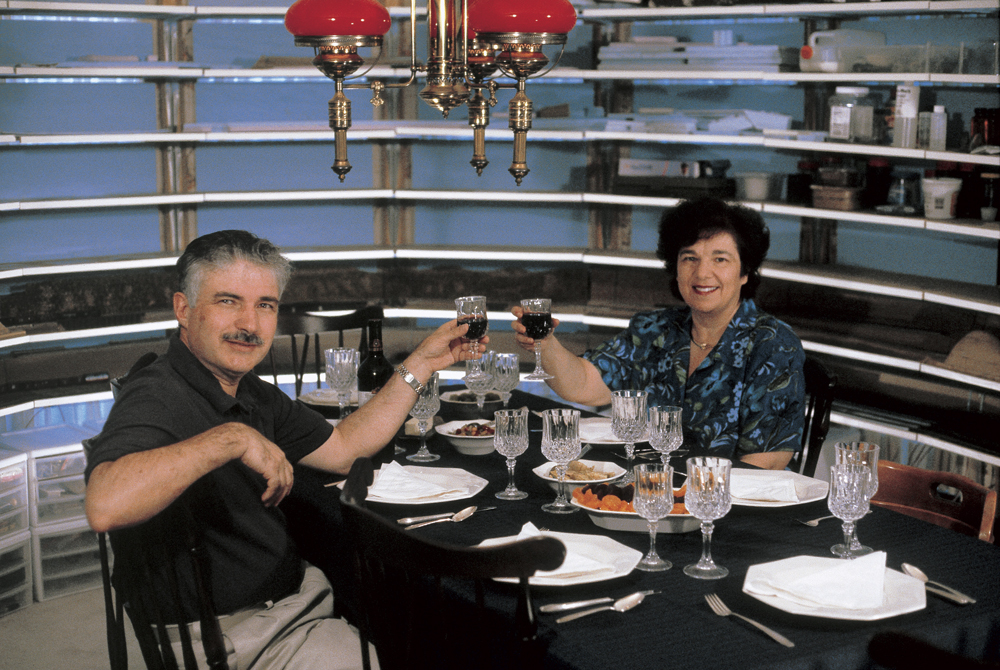
Perhaps the most amazing shelf railroad I’ve seen was one built 20 years ago by Gary Saxton in his dining room. The layout looped the complete room 7 times, creating an impressive 710-feet of linear N-scale main line. As shown in the photo, eating in the dining room was something similar to sitting in the middle of a model railroad helix. This was exactly what gave Gary the idea for building the railroad, except that he pushed the helix out all the way to the walls. If you’re interested, Gary’s article appeared in Model Railroad Planning 2003. In fact, there are 9 great plans in that issue for various shelf and bookcase layouts, so you may want to pick up a back issue of it.
Just the shelf
You don’t need to have seven-levels for a shelf layout. In fact, you can build a shelf-type model railroad just about anywhere you can put a shelf. In its simplest form, the railroad can be built along one or more walls of a home on an ordinary shelf board mounted on store-bought brackets.
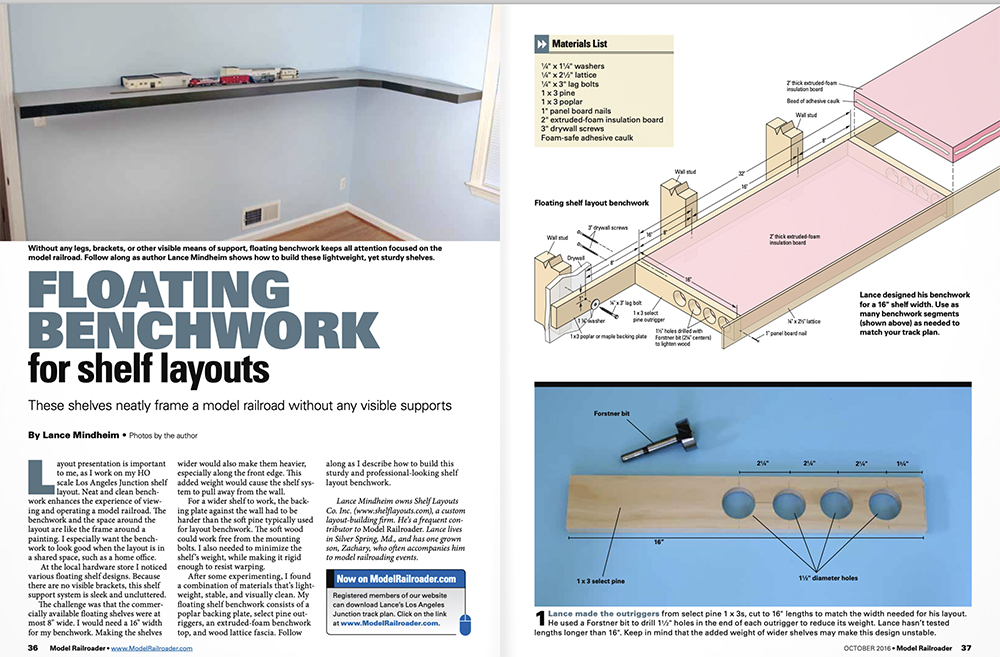
Professional layout builder Lance Mindheim took the concept a bit further with his design for a free-floating purpose-built shelf. Lance shared a simple design for such a layout in the October 2016 issue of Model Railroader.
His floating shelf benchwork system uses an open grid made from dimensional lumber and hardboard. He bolts it directly to the studs in the wall, eliminating the need for brackets to support it. He fills the gaps between the boards with blocks of 2” thick foam insulation board, and then lays the track and builds the scenery directly on top of the foam.
The finished shelf is 16” deep by 2.5” tall and can be made to just about any length desired. Because the shelf is secured to the wall without visible brackets, it leaves plenty of space below for other shallow-depth furniture items, such as small sitting chairs, a bookcase, or a television. Lance’s plan is the most stable if you can also attach it to a second wall in the corner.
Shelf layout with cabinets
A shelf layout doesn’t necessarily have to be mounted to the wall. I’ve seen, and even designed, several options for building a shelf layout that rests on top of existing cabinets in a home.
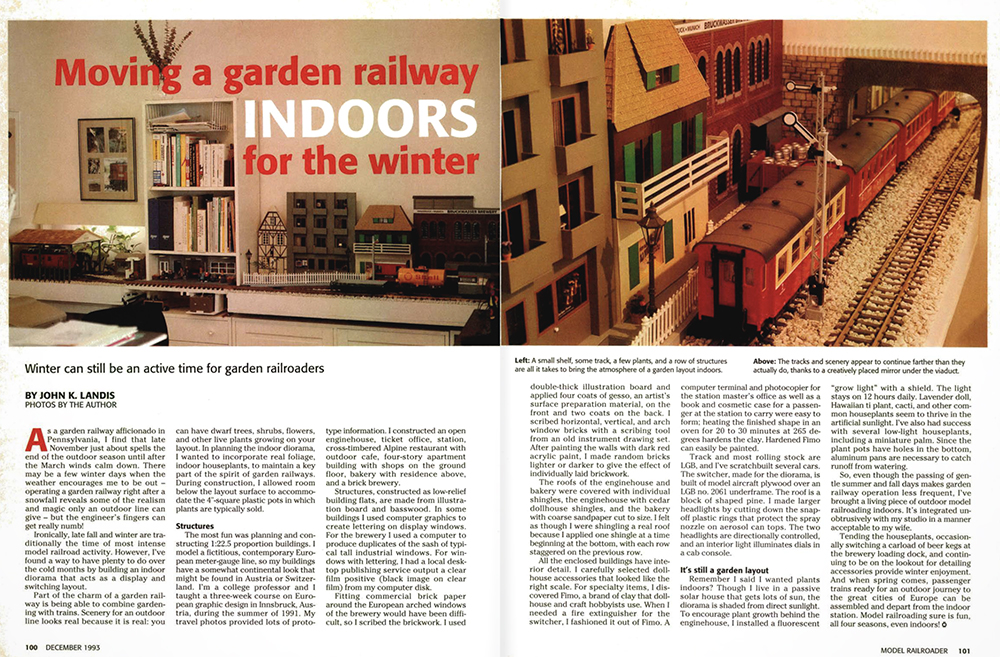
When cabinets are involved, you don’t need to be all that restrictive of scale either. Back in the December 1993 issue of MR, John Landis shared his G scale shelf layout built to stretch across several cabinets in his living room. His small switching layout allowed him to run a few trains during the winter months when he couldn’t be outside working on his garden railroad.
The benchwork was built on simple wood frames, which he then placed on top of the cabinets.
Because John’s layout is not permanently affixed to the cabinets, he can dismantle the display and store it during the part of the year when his garden railroad is in operation.
A shelf layout among shelves
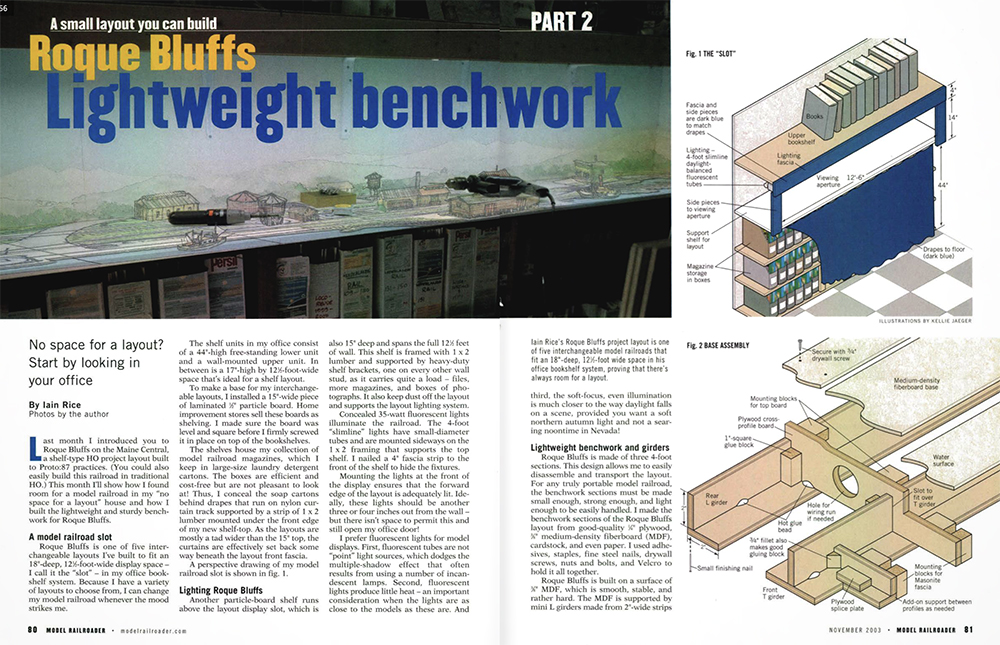
Layout designer Iain Rice built a shelf-type railroad for a series of articles in Model Railroader in 2003. His 18” deep by 12½-foot wide Roque Bluffs HO scale layout was designed to fit as one shelf along a wall of shelves that held other things. By building a 15” tall shadowbox front for it that attached and adding lighting mounted to the shelf above, Iain was able to successfully integrate the New England-themed switching layout into an existing space in his small workshop. You can read the entire series of articles, starting in the October 2003 issue of Model Railroader.
This type of project would be ideal for anyone with an existing set of shelving in their home. In fact, you could build the layout and the shadowbox front as a removable component, allowing you to do messy work, such as plaster and scenery, away from the rest of the shelves, and then slip it back into place when you are finished.
Bookcase railroads
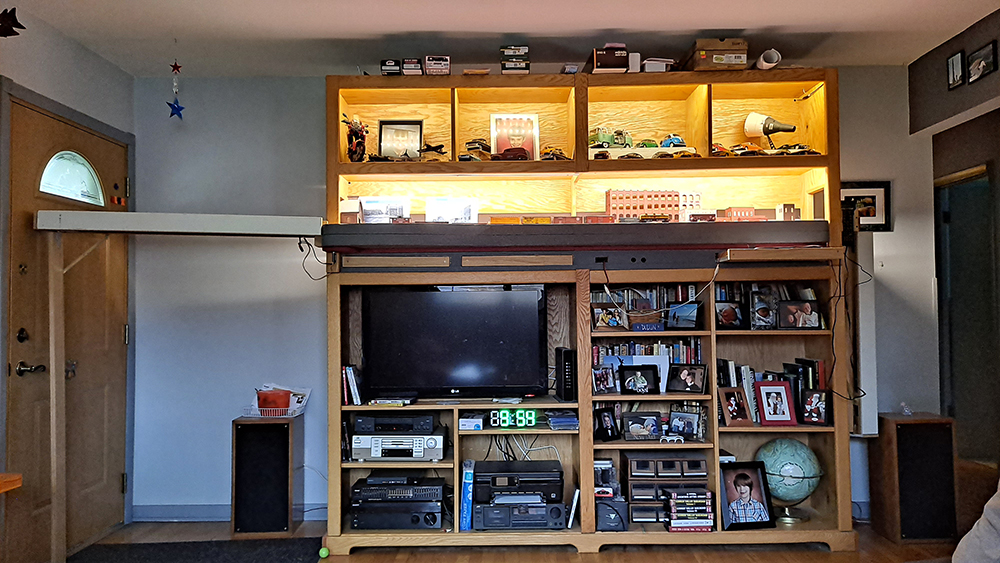
MR editor Eric White took Iain’s idea one step further, by modifying an existing set of free-standing bookcases in his living room to fit a layout. By removing the center divider on one shelf in the bookcase, Eric created space for an industrial switching layout. He explains his work like this:
“I built this piece of furniture with the help of my uncle for my apartment back in Pennsylvania. After moving to Wisconsin, I realized it would be some time before I could build a basement empire, so I brought the entertainment unit up from the basement and designed a switching layout to fit into the shadowbox space that had been part of the old apartment layout.
Staging wings on either side give trains somewhere to go and to come from, while the action is all in the switching in the middle. Having something in the main living area of the house means the whole family can be together while my son and I run trains – we just have to be sure to keep the volume down on sound-equipped locomotives.”
Shelf with false backdrop:
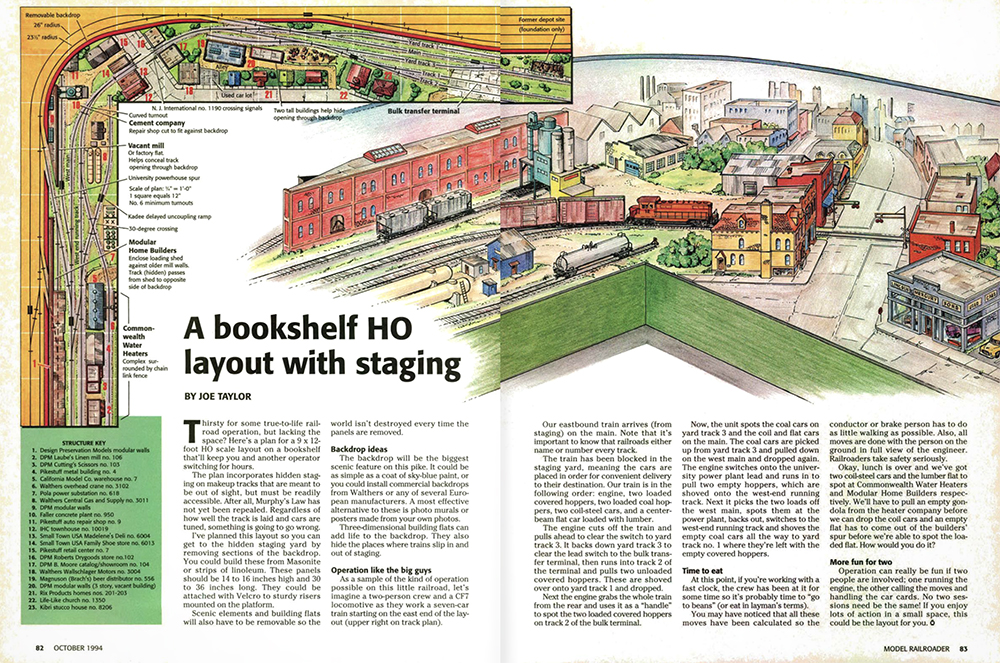
Shelf railroads are nothing new, and in fact go back to the earliest issues of MR. One clever approach, however, can be found in Joe Taylor’s article in the October 1994 MR. The L-shaped layout could be built on two shelves in the corner of a room. What makes it unique is that the backdrop does not go all the way to the wall. In fact, Joe left roughly 8” of space between the low backdrop and the wall to include staging spaces. This way the trains can come and go from the scene without the need of fold-up or plug-in staging sections, like those Eric used.
The backdrop panels are 14” to 16” tall. To see over the backdrop and switch cars behind them, one could simply use a single-step stool to gain the necessary height advantage. Joe designed the panels to be removable as well, allowing the modeler to access the track behind them, which would facilitate cleaning the rails and making adjustments.
Layout as wall art
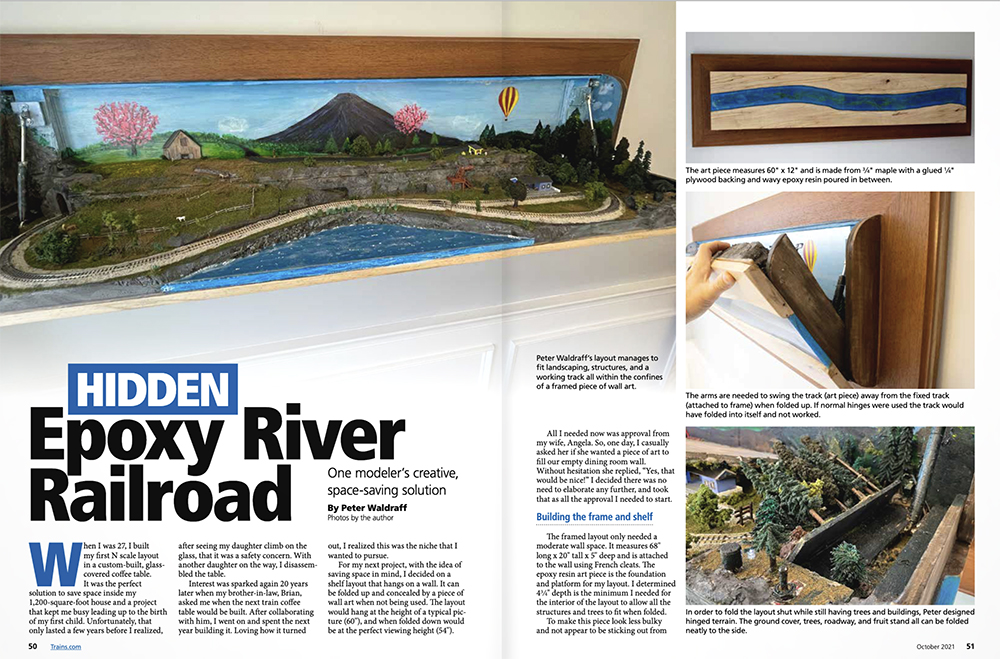
Something I’d not seen before until the October 2021 issue of MR was the idea as a model railroad disguised as wall art. In the article, Peter Waldraff built a 12” x 60” 3-dimensional art piece using wood and epoxy, surrounding it with a custom wood frame. The wall art stands out from the wall about 5”, and it’s stained and varnished frame would make it fit in with almost any living space.
The secret to the art piece is that it folds down, forming a narrow N scale railroad. With artistically rendered scenery, it makes a great way to run your favorite trains for an evening. When it’s time to put the trains away, the layout folds back into the wall, returning it to its second life as a piece of art. Peter’s creative solution is a clever way hide a model railroad in plain sight.
Shelf layouts in a box
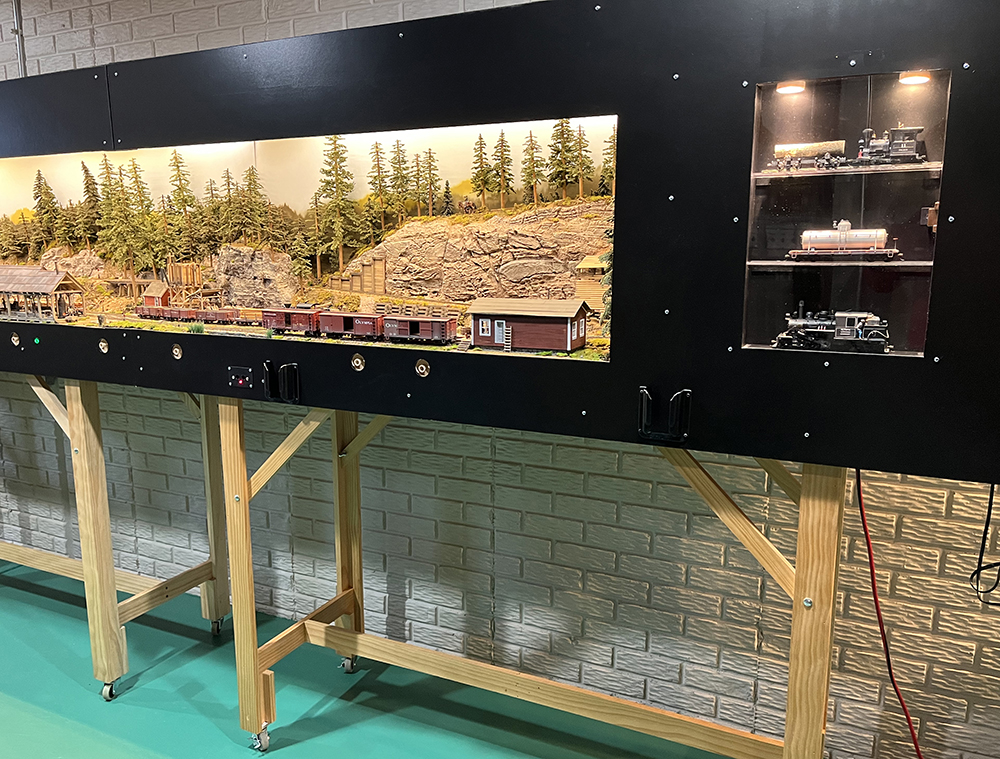
Several years ago, I started “future planning” for the day when my wife and I will downsize. I used the condo we were renting on vacation as a good example of what kind of space I might have available. Using the Condo’s open dining room for inspiration, I designed a small, self-contained layout that would fit along one wall and could blend into the room as furniture. The first 6.5-foot by 22” Olympia layout that we built for MR Video Plus was the result.
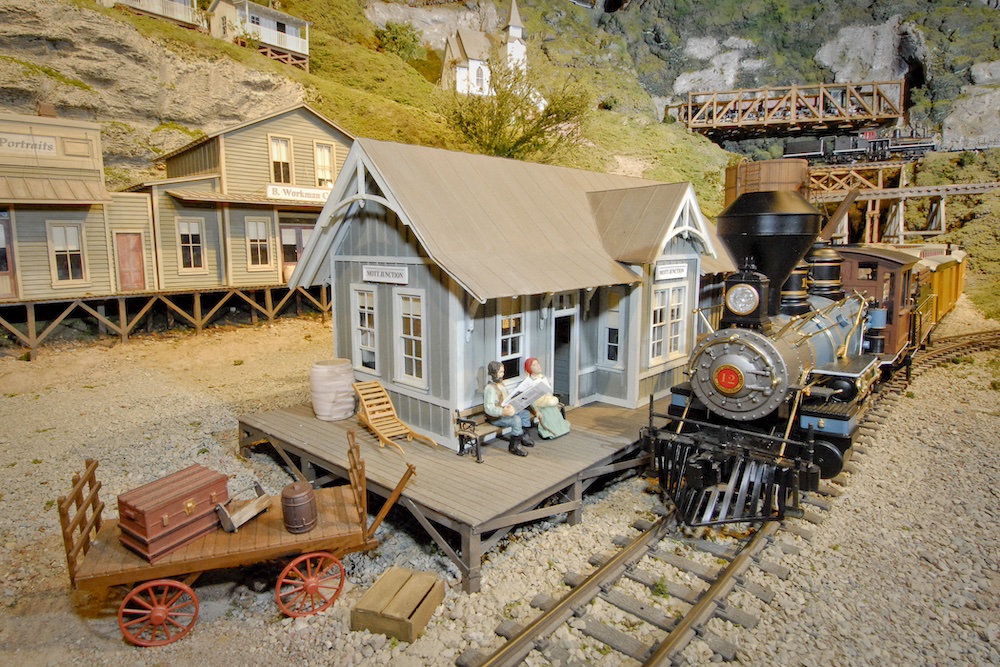
Olympia is an On30 logging railroad built in a self-contained shadowbox. It includes all of the controls and lighting, as well as a space-saving sector plate hidden behind a built-in display case for switching tracks. Although I built the railroad on its own legs equipped with casters to make it easy to move, it could have just as easily been mounted atop inexpensive kitchen cabinets that you can buy at any home improvement store.
Was the On30 layout small? Yes.
However, it provided many hours of satisfying model railroading, which was the entire point of the project. And with the scenery finished, painted backdrop, and its LED lighting, the Olympia looks more like a museum display than a traditional model railroad, making it an acceptable partner in the living space.
Although designed for the small dining room in a 600-square-foot condo, Olympia could just as easily fit into a spare bedroom, a home office, or a rec room. Plus, once the shadowbox is finished, if you get bored with the layout’s theme, strip out the structures and scenery, then build a completely different layout inside it.
In fact, flexibility is one of the shelf layout’s greatest assets. Because shelf layouts have smaller footprints and less compact benchwork, it means that as your interests in the hobby change, you can easily replace some or all of it with new track, scenery, and trains. In fact, as long as it is portable, you may be able to sell your finished shelf layout to someone else and start fresh with all-new materials. If you’re short on space, a shelf layout is worth a look. And if you’ve built a shelf layout, share your experience in the comments section below.




I have been using a technique similar to Lances to build an N-scale layout that incorporates T-Trak cutouts. Instead of using 2″ foam set into 2 1/2 in wood forms made from 1 x 3 stock I use 3/4″ plywood cut into 2″ strips topped with 1/4″ plywood that has 1/2″ foam board attached to the top. This gives a strong construct that is lightweight with plenty of space below for wiring.