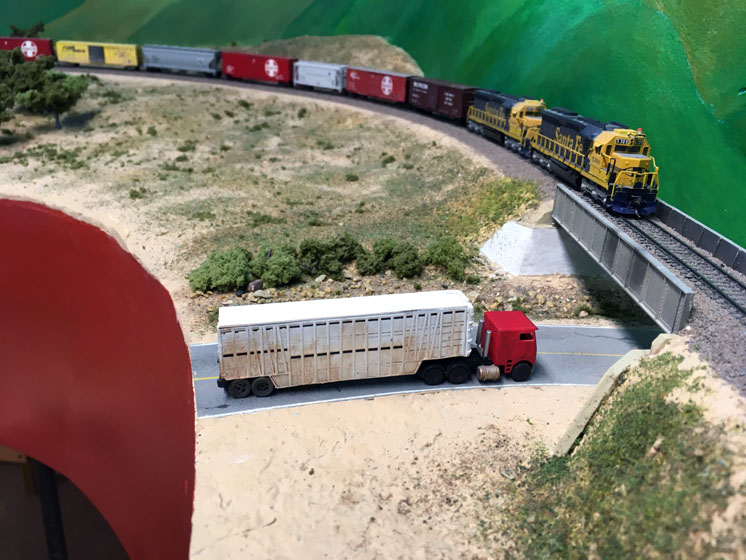
I’ve often seen trucks like these serving ranches near the Tehachapi Loop. This was cattle country, and a truck like this would be a signature vehicle for my layout, one that would help the viewer understand what I’m trying to accomplish.
If we want to represent a particular place and time, then everything on the layout should contribute to that theme, or at least not detract from it. It begins with the railroad equipment and carries right on through to the structures and all the details.
Where we place vehicles can matter a lot. If we see a stock truck on a freeway, it might just be passing through, but if we see one on a rural road, then it’s probably on its way to or from a local ranch.
History affects everything we model. I model 1985, and if you go back some 40 years before that, you would’ve seen lots of livestock being hauled to market in stockcars, often headed for the great and often faraway stockyards of Chicago, Kansas City, and Sioux City, Iowa. The big yards were there because the big packers were there, but transporting animals by rail was a slow and costly business.
All that changed as smaller, regional meat packers began appearing in the 1960s and animals traveled to market in less than a day on trucks. Transporting processed meat was far more efficient than hauling livestock on the hoof.
The Road Apple line – A signature N scale truck for Tehachapi
I suspect many of you have never heard of Road Apples. It was an extensive line of N scale vehicles, many from the 1970s and 1980s. They met a major need for modelers like me.
Road Apples autos and trucks were solid chunks of cast resin. They were a little rough, with considerable flash and occasional tiny air bubbles, but clean them up and give them a decent paint job with an airbrush and they looked pretty good. I probably have a dozen Road Apples models on the layout and another dozen I’ll get around to building some day.
Building the model
I’ll keep this brief because I’m guessing very few of you will build this kit. I’ve not been able to locate another anywhere.
The instructions said this kit was difficult, and they weren’t kidding. For each side I had to laminate one etching over another. I found that cyanoacrylate adhesive did the job, but not very well.
If I were to build another kit, I would spray the back of the top piece with a rattle-can adhesive like 3M Super 77, let it set for a minute, then apply the part. The alignment would have to be all but perfect, and you’d get only one shot at it.
The floor of the trailer was warped, but I straightened it as best I could with my fingers and it was usable. I replaced the top with one made from styrene.
The hardest part of building the kit was freeing the wheels from the flash across their backs. This I did by sanding them against a sheet of coarse sandpaper laid flat on the workbench. The flesh on my fingertips came off at about the same rate as the flash. Maybe work gloves or Band-Aids would’ve been helpful.
The state of things
Since Road Apples stock trailers aren’t available, I looked for alternatives and found several 3-D printed N scale stock trailers on Shapeways. They looked good.
A while ago Trainworx released a fabulous injection-molded tractor and trailer set called the Bull Hauler. It must have been a success, because it’s been sold out everywhere I’ve looked. That would’ve been an elegant signature indeed.
Want to see Jim Kelly’s Tehachapi Pass layout in action? Check out Layout visit: Jim Kelly’s N scale Tehachapi Pass!


So realistic I can almost smell it!