


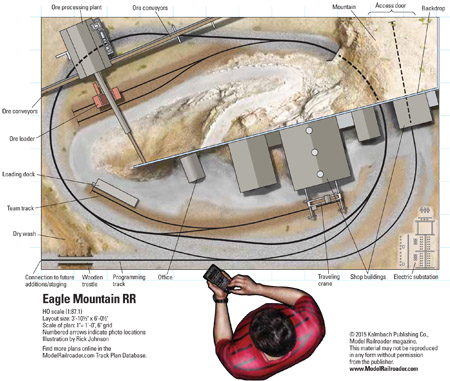
Name: Eagle Mountain RR
Layout owner: Model Railroader staff
Scale: HO (1:87.1)
Size: 3′-101⁄2″ x 6′-01⁄2″
Prototype: Eagle Mountain RR
Locale: Riverside County, Calif.
Era: late 1960s to early 1970s
Style: island, portable
Mainline run: 14 feet
Minimum radius: 19″
Minimum turnout: Peco no. 5
Maximum grade: none
Height: 45″
Track: Peco code 83 flextrack, Peco and Walthers code 83 turnouts
Scenery: plaster gauze over cardboard webbing and extruded-foam insulation board
Control: NCE Powercab DCC
This track plan was originally published in the January 2016 Model Railroader. Click on the link to download a copy of the track plan.


Height is a very personal choice. Some people prefer something to be waist high so they can get an overall view of the layout. Others, a very high level so that they can get the feeling of being trackside and also see all the detail that they build into their models. Of course, what waist and chest high actually is will depend greatly on your height. Personally, I prefer a higher layout and I am 6'1" so I like something around 56". However, with this one I think 42" would be a good height assuming you are between 5'8" and 6'3" or so. Anything higher would be difficult to make steady without building some very heavy bench work or attaching it to the wall which obviously would not work with this design.
In addition to the instillation of the backdrop or divider what would the recommended height of this for a 4 x 8 layout. Thanks
Robin, they had a divider on last year's project layout, Red Oak. I believe what they did is cut a groove all the way through the two inches of foam board that was the tabletop, then put a giant piece of styrene in the groove. It's covered in part 2 of the video blog if you want more details.
I like the concept of splitting the scene with a divider
Howdy, I'm looking for suggestions on the process for installing a scenic divider. My home railroad is 5' X 9' and I want to split it with a scenic divider. I have searched online and through several MR Videos and have not found ways to mount the divider, everything refers to back drop. Yes it is a backdrop but not against the back wall. I want it across the middle of the railroad. Any help or suggestions are appreciated. Thanks
Love the simplicity of this layout! However, how long will the manufacturers produce the structures that you identify?