How To Track Plan Database N scale Red Oak

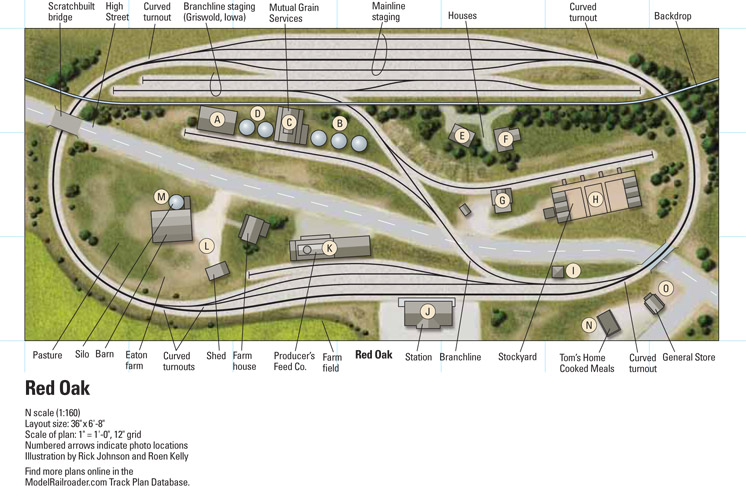
N scale Red Oak

By Angela Cotey | November 20, 2014

| Last updated on January 18, 2021


Download this track plan from Model Railroader

Email Newsletter

Get the newest photos, videos, stories, and more from Trains.com brands. Sign-up for email today!

NscaleRedOak

Name: Red Oak
Layout designer: staff of Model Railroader
Scale: N (1:160)
Size: 3′-0″ x 6′-8″
Prototype: Chicago, Burlington & Quincy RR
Locale: Red Oak, Iowa
Era: early 1960s
Style: island, portable
Mainline run: 15 feet
Minimum radius: 13″
Minimum turnout: Peco no. 6 medium
Maximum grade: none

Originally appeared in the January 2015 Model Railroader. Click on the link to download the PDF of this track plan.

18 thoughts on “N scale Red Oak

  1. Is there a list of the number of regular turnouts needed and are they all Peco #6? What about the curved turnouts?

  2. Im looking at this project due to a recent house move and the discovery of an already built benchwork I had in storage. I have a 3×9 board and not a 3×7

  3. Has anyone actually built this and if so did you develop a wiring plan for DC and if so, are you interested in sharing it? Also–can someone comment on the curve radii used on the main line? Based on the 36" width of the door it appears to be about 16" or 17".

  4. For the Peco ElectroFrog Code55 used for this layout, the wiring is the same for DC or DCC. Basically do the following:
    1. Attach two wires to each piece of flex track, very important for DCC conductivity and safety.
    2. Then attach two wires to each turnout at the tie bar end of the switch.
    3. The frog rails are switched for polarity, automatically by the sprung tie bar which can be switched with just your finger.
    4. Add two insulated rail joiners to the two frog rails, to isolate them.
    5. Most important, do not paint the movable parts of the turnout so that electrical conductivity is assured.
    6. Best way to add wires is by soldering to the rails. But, wired rail joiners are also available from Peco.
    7. I have used this Peco Code55 track for 25 years, with both DC and DCC control.
    8. The Peco turnouts are a little more expensive but the sprung tie bar means that you do not need to purchase a switch machine or switch stand. Also, this track is very robust and conducts electricity well and stays clean longer.

    Thanks, Tonkphilip, Carlsbad, CA.

  5. Timothy Karp, they aren't using sectional (pieces of set size and shape) track like you seem to think. The only sectional track they are using are turnouts (switches). To link the turnouts together, they are using what is called flex-track, which comes in 36-inch sections, can be straight or bent to almost any radius of curve, and can be cut to different lengths with a tool called rail nippers. Using said rail nippers, they are cutting the flex-track to fit the space between the turnouts as according to above track plan.

    Hope this helps! 🙂

  6. The operation looks like its one way out so Im just curious , how do you get a train that uses the branch line into the staging area and the power turned around to come out. I saw a picture you had of a train ,engine first going in with what looked like a consist that would be sticking out with no where to go. It seems like its a one way operation coming out with no way to go back in unless there is a plan for an extension like on the Virginia layout for turning and staging.

  7. Came just at the right time. Will make with some elevation and industry changes , but looks like a good starting place. Thanks for the ideas

  8. Like the plan – may actually try this plan. But I think I am going to use the Rock Island line in the 70's. Can't wait for more.

  9. Love this plan! I may try to adapt it to HO with tighter curves to make it 5'0" wide. Great operational and staging elements here….can't wait to see more.

  10. Interesting looking plan even if a bit basic. I can't wait for more info. The CB&Q is my favorite so I'm looking forward to this series.

You must login to submit a comment